carl63_99
-
Posts
271 -
Joined
-
Last visited
Content Type
Profiles
Forums
Events
Gallery
Everything posted by carl63_99
-
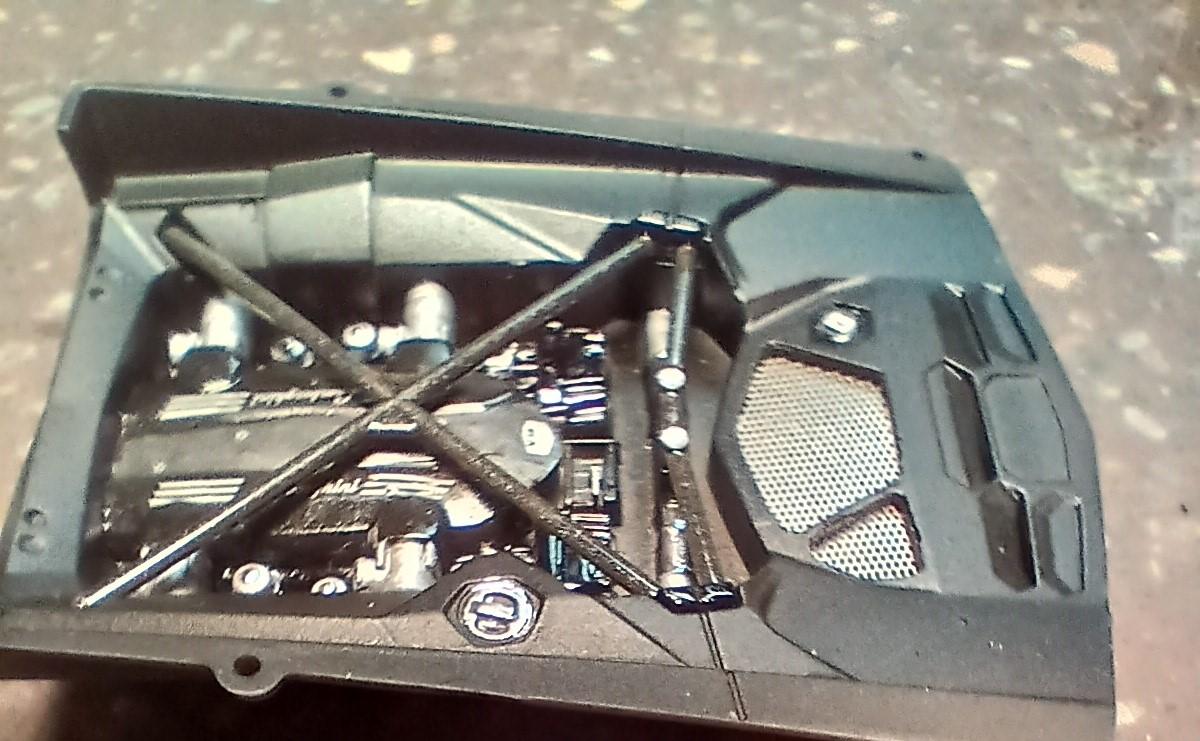
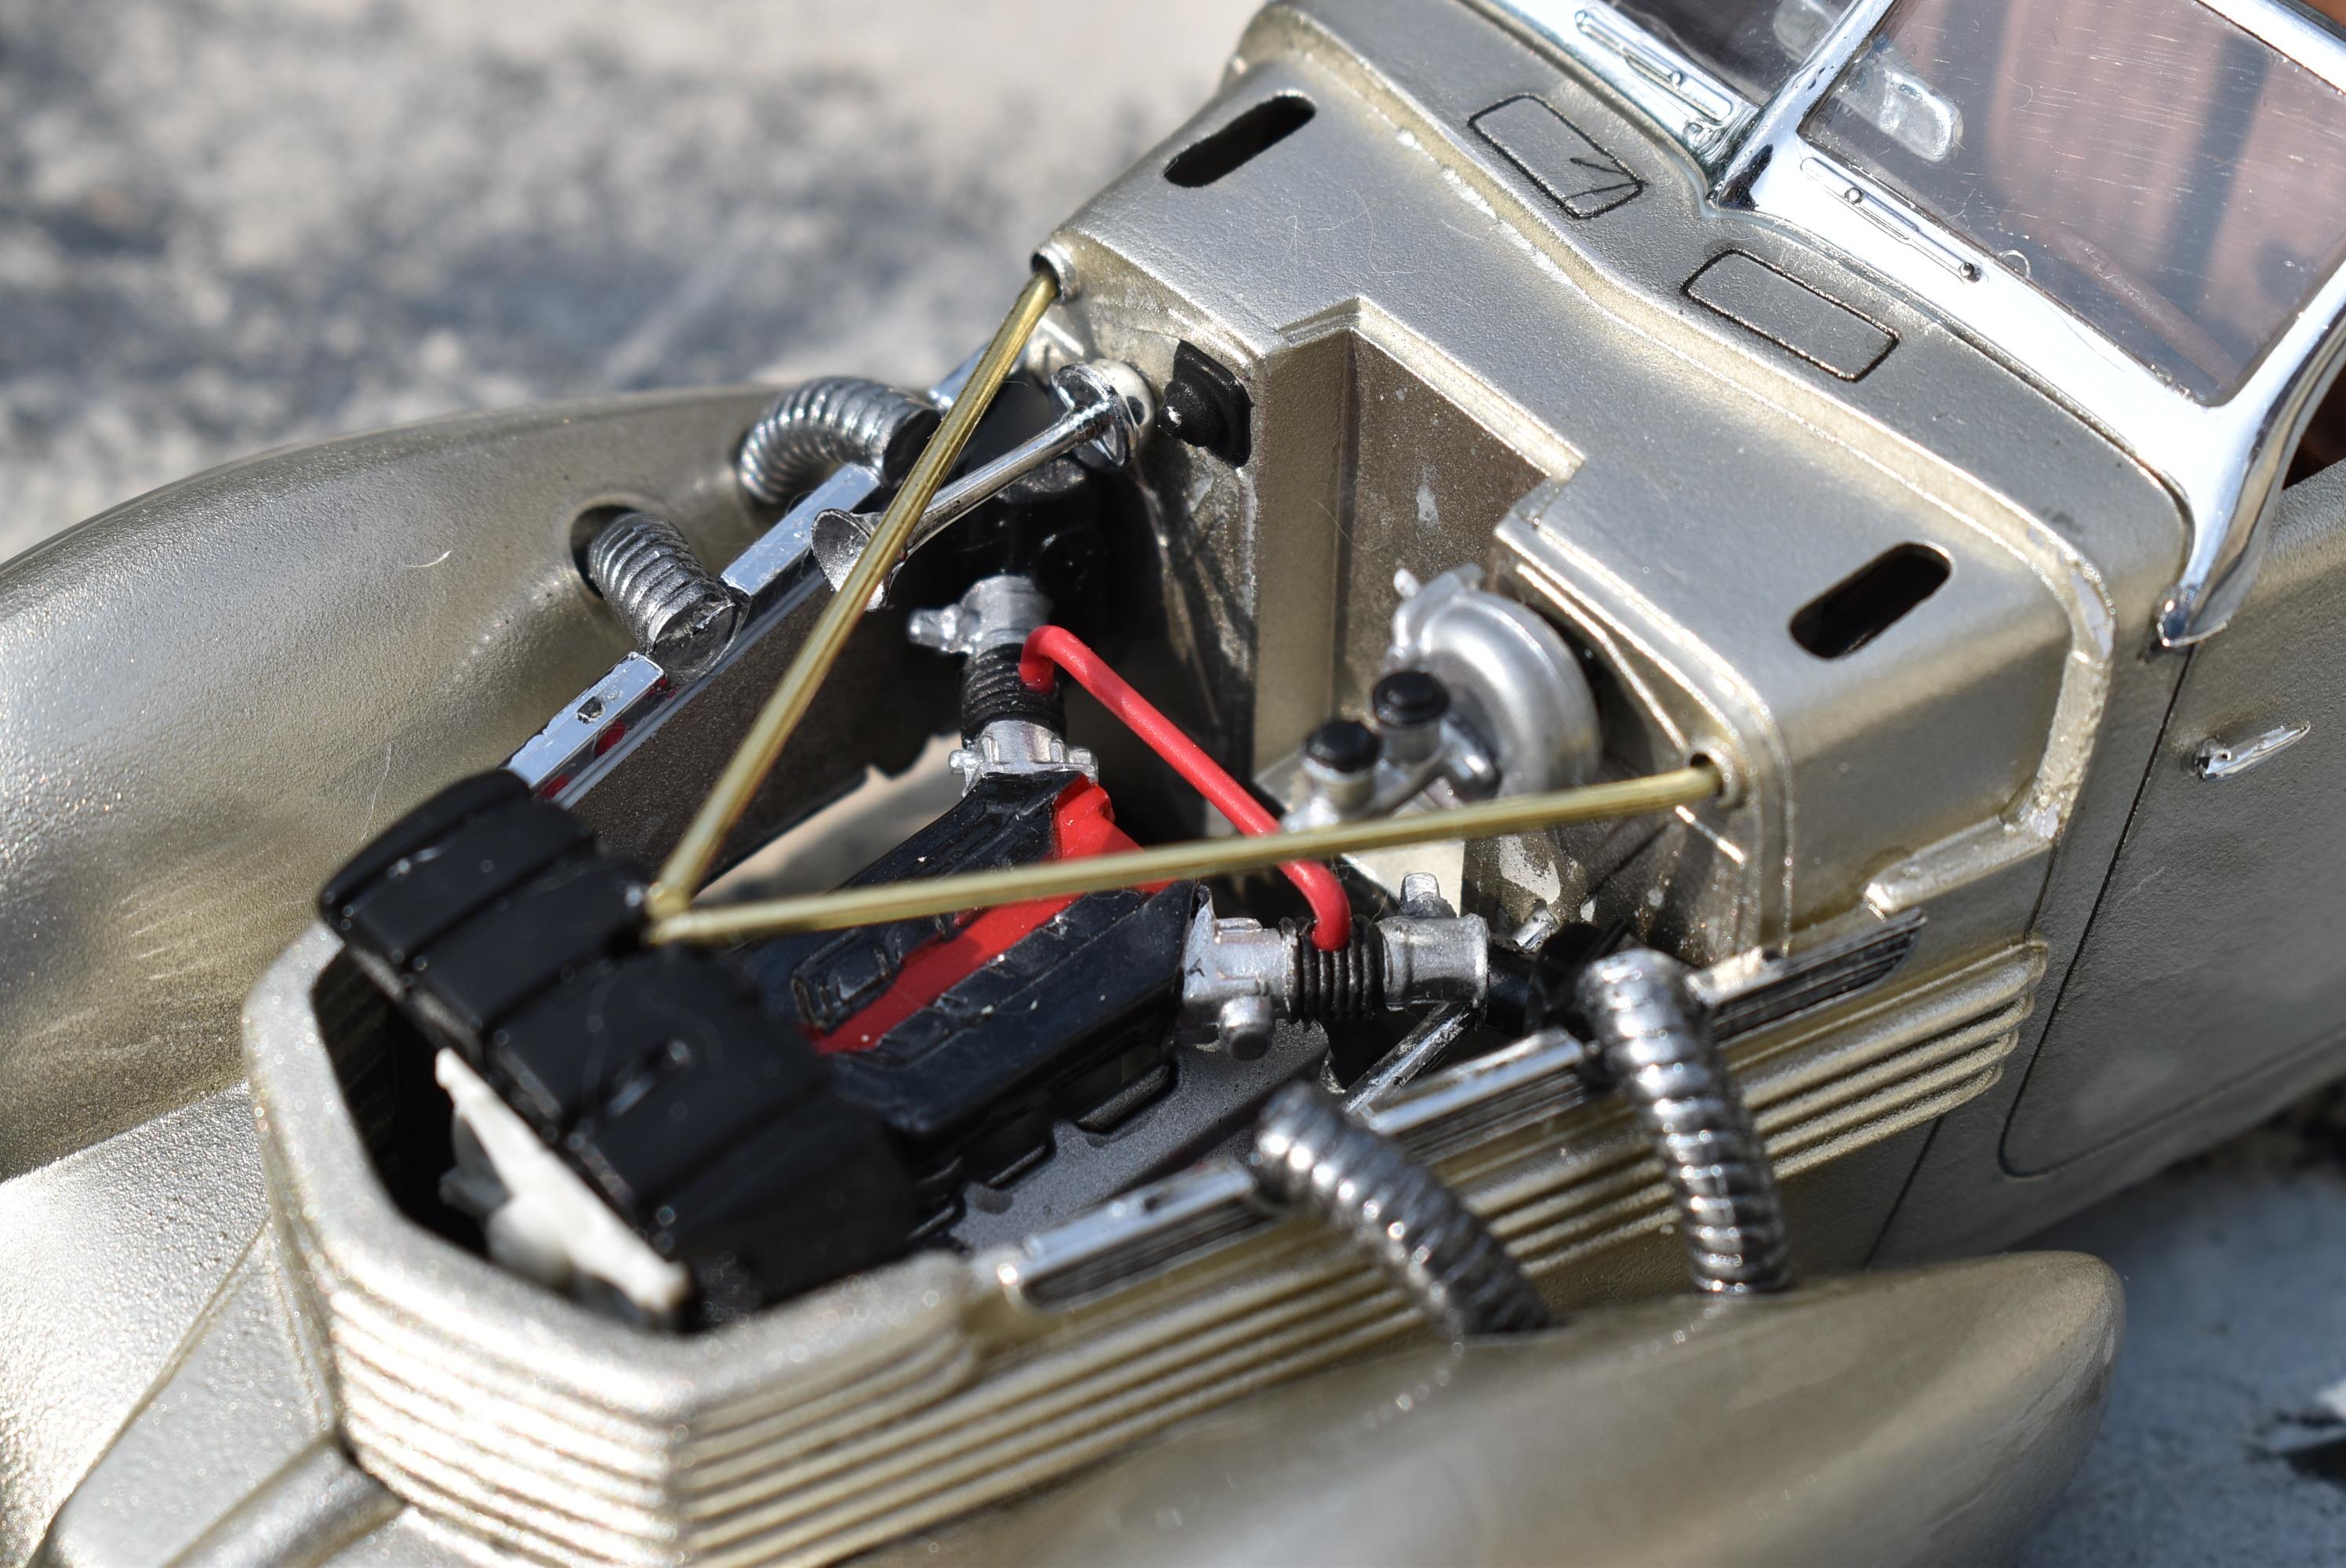
Engine bay is finished. I used gloss black, flat black, metallic black, graphite metallic, silver, flat aluminum, and Moltow chrome to detail it.

-
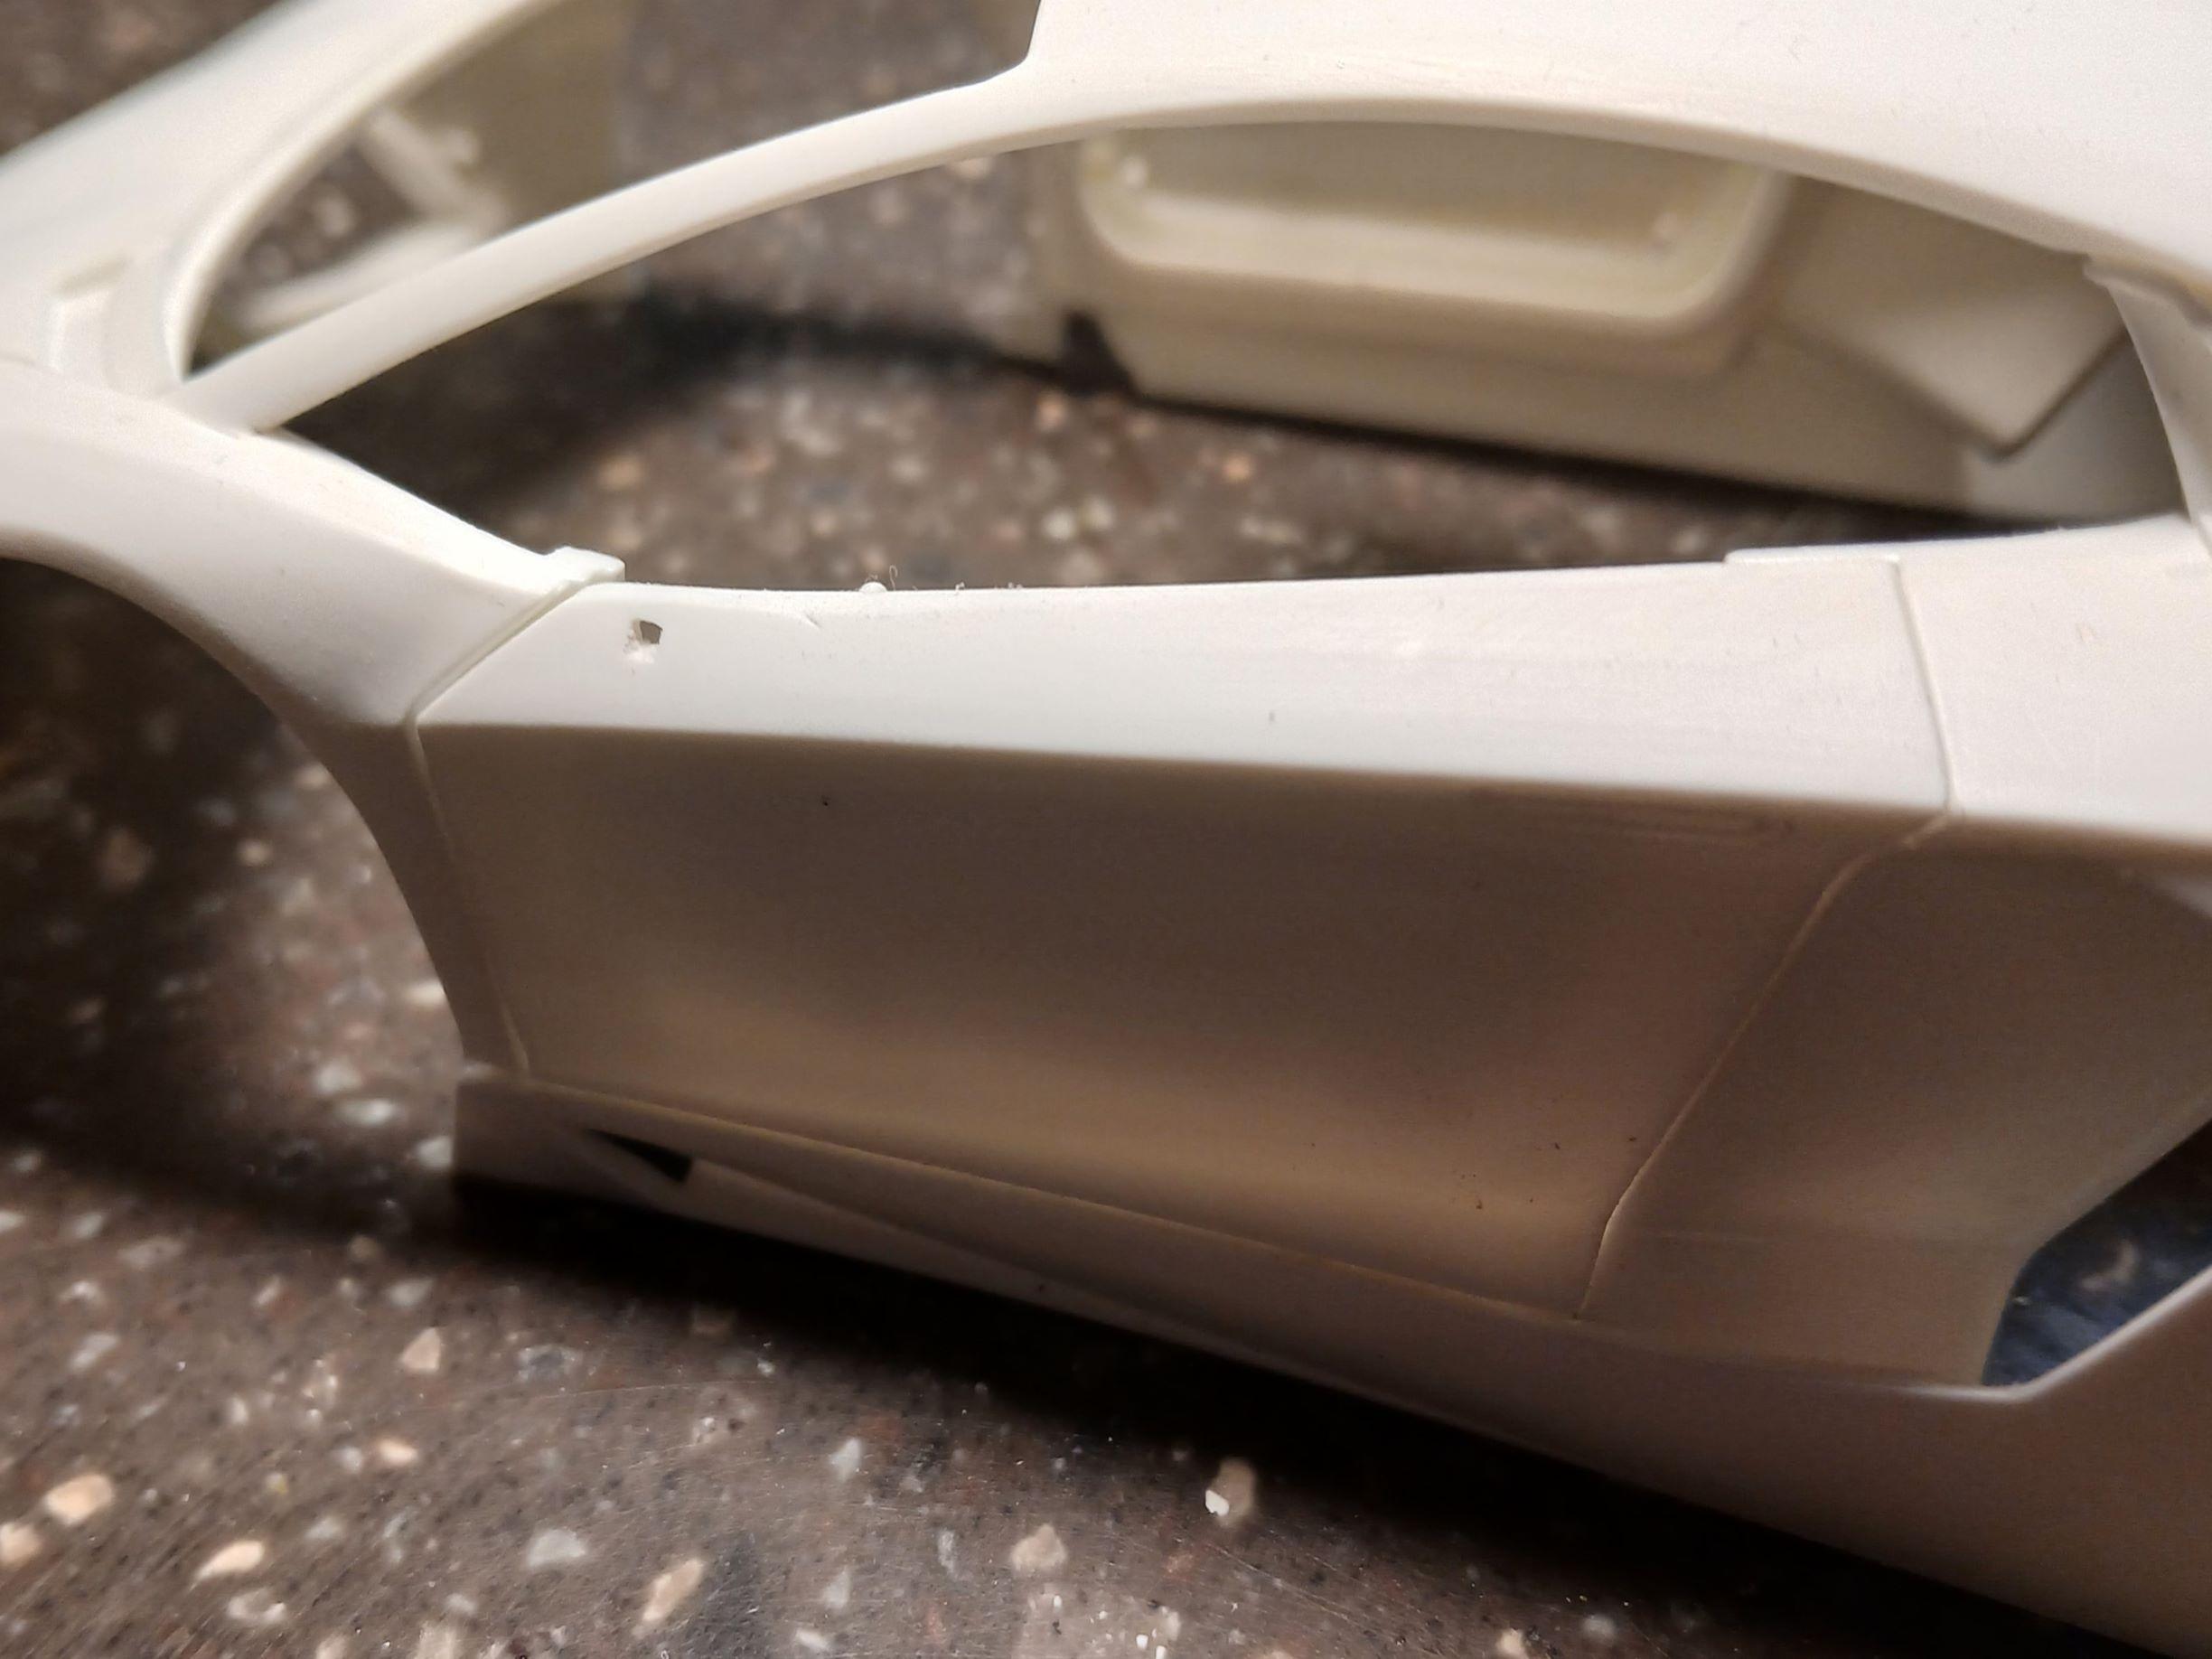
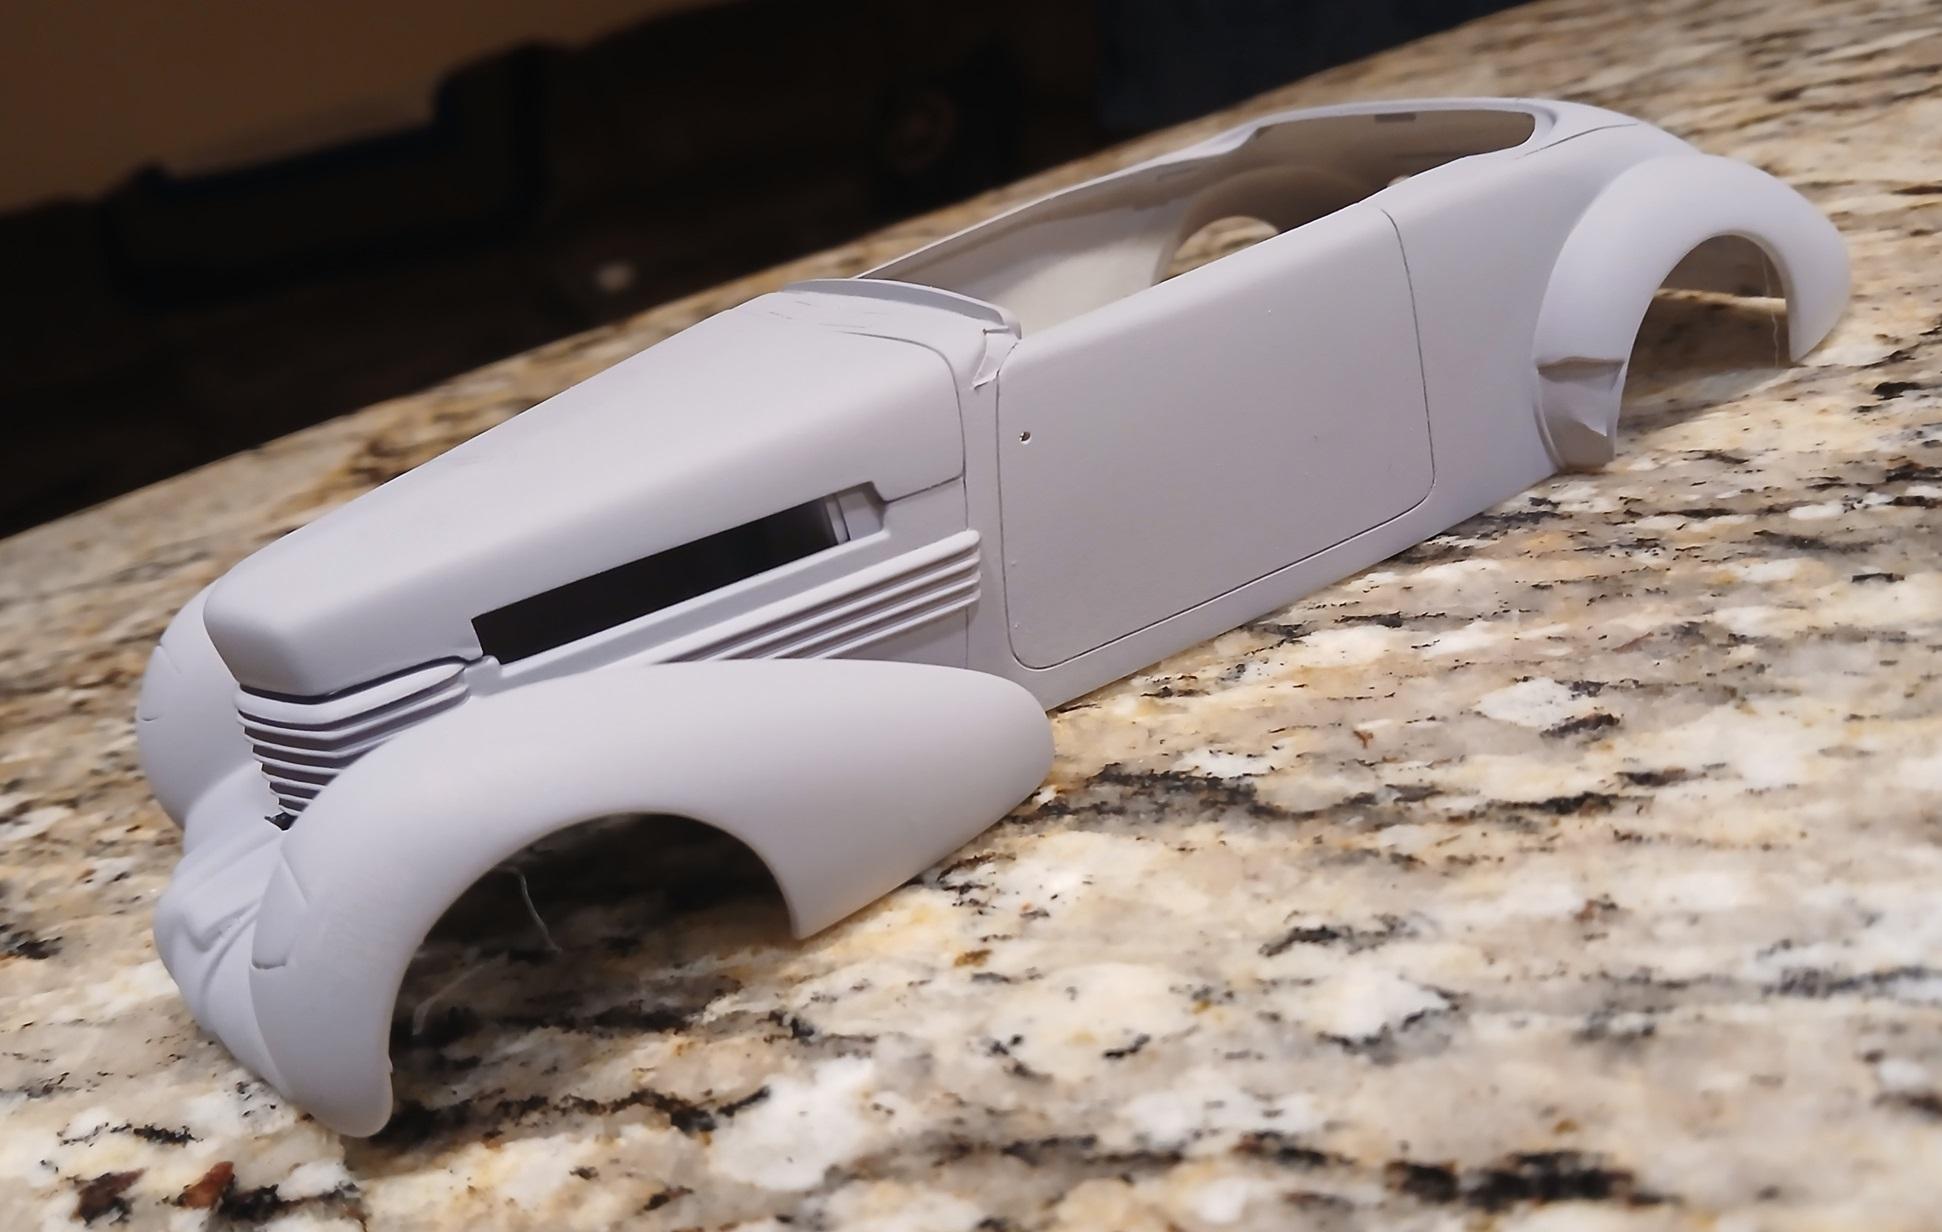
Working on fixing sink marks. Love having a complete set of sanding sticks. Work out any area quickly and smoothly.
-
Working on the door handles. Man, this is a candidate for a separate piece! Ground away with Dremel for a while, then used my X acto with a new blade to cut it smooth. Still needs a little sanding, but much better than original.
-
That Huayra is a wonderful kit. I built it in 2020 at the start of COVID. Hey, I had the time! When completed, just about every part of the car can be seen. Building it as three subkits, front suspension, interior, rear engine and suspension will yield best results. Body part fit is almost impossible, and after it's together the gaps will be hard to fix. Go slow and get it right and it'll come out okay. I built the Aoshima kit, it was pretty nice, but the doors did not work as advertised. I wound up gluing them in place.
-
This is the way. The wings are the tops to the air inlet and open when more cooling is needed. I've been looking at this and will follow your lead on it.
-
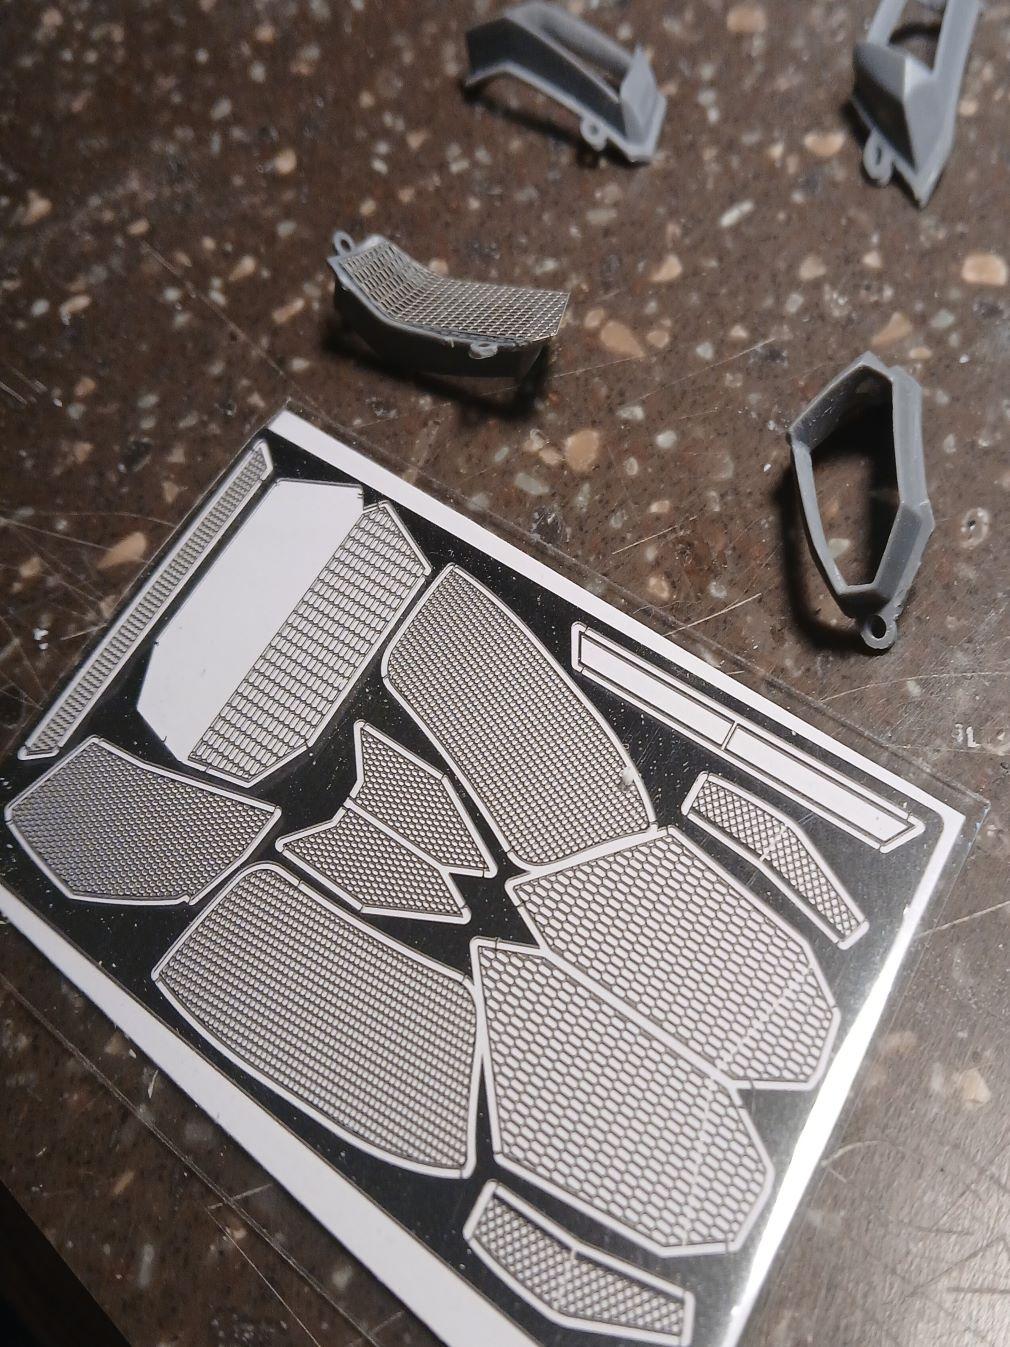
The photo etch are part of the kit. You can build it with the full plastic pieces (grey parts in the one pic) or cut the backing out and go photo etch. My choice is the PE, looks a lot cooler.
-
Onward to a more simple project. Already started working on some of the details a year ago, mainly opening vents to utilize the photo etched grills. I also noted that builders complained about the door alignment. Checking that out, I figured out the back of the door was a tad long. A few minutes of sanding and that was fixed. I also opened all the vents on the bottom, makes it look better. The doors have only options to mount closed or partially open. I'm going to probably have the driver side door open and passenger side closed. Not sure yet, time will tell. Color, going for pearl orange, like a couple others you see in the pics. However, gonna add a touch of yellow and just a hint of pearl white powder to make it really pop. I'm a few days away from painting, so still thinking about that.
-
The build.
-
1937 Cord 812 Custom with Audi R8 v8 Engine
carl63_99 replied to carl63_99's topic in WIP: Model Cars
Completed and in Under Glass. -
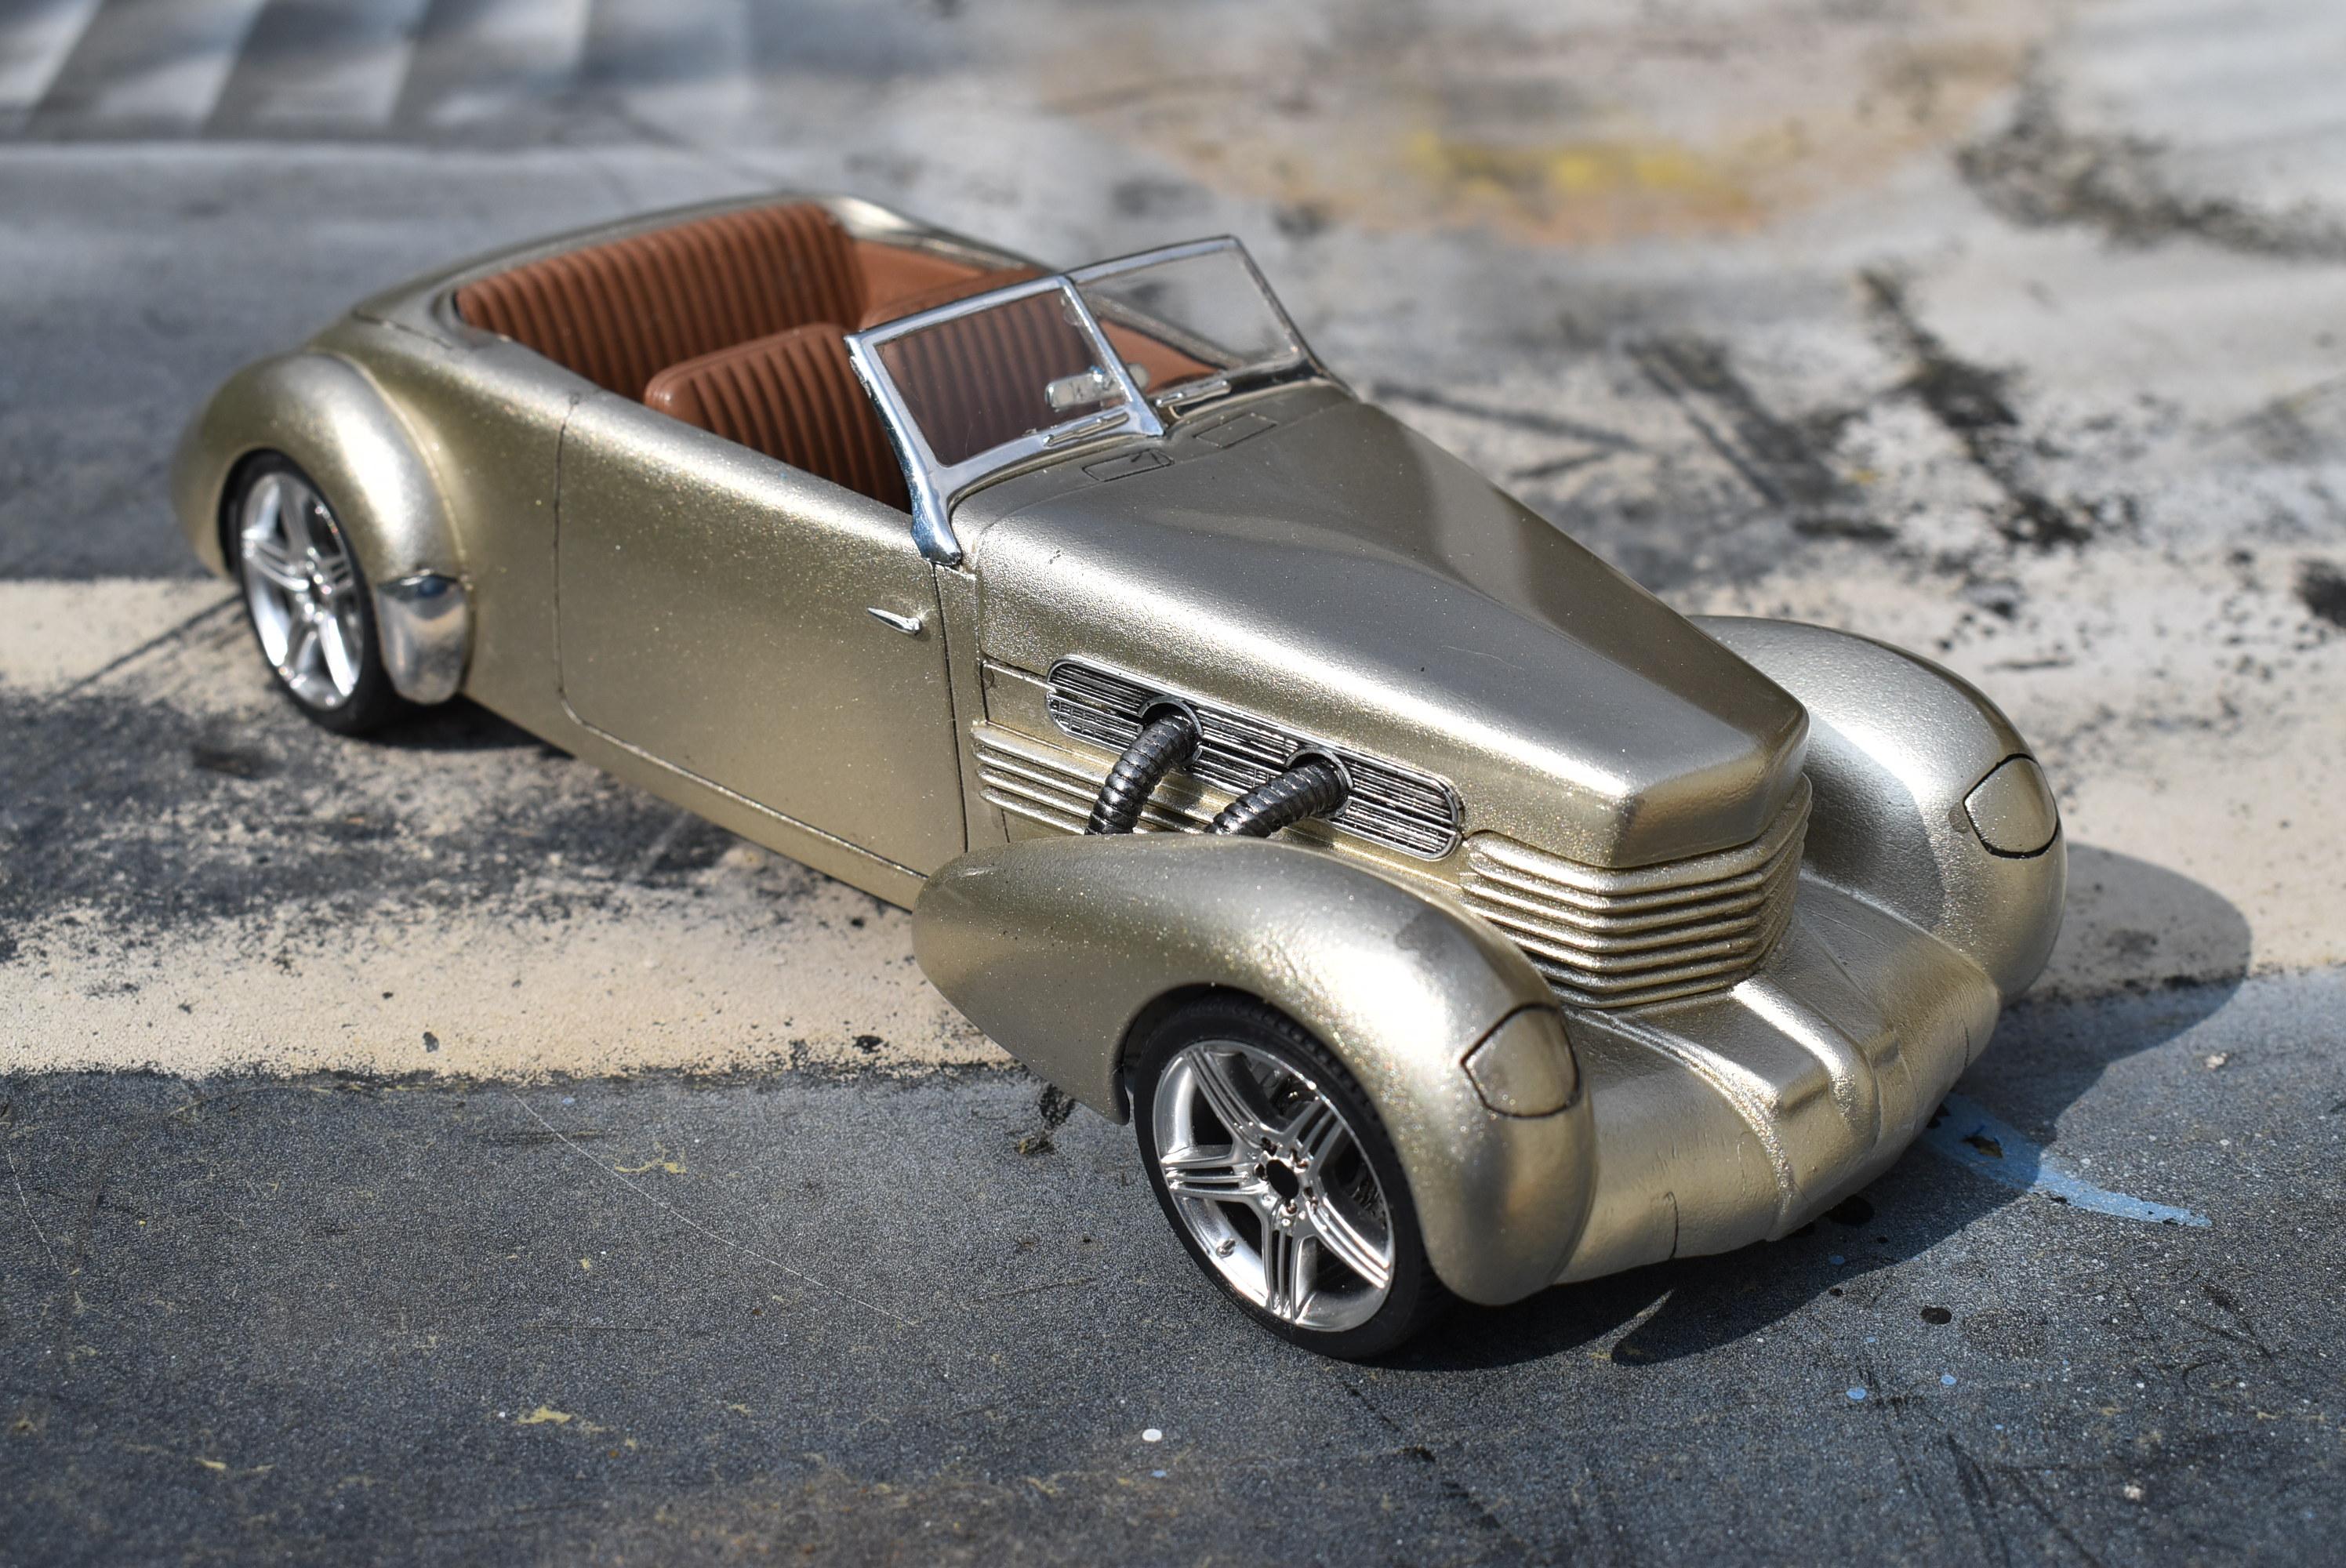
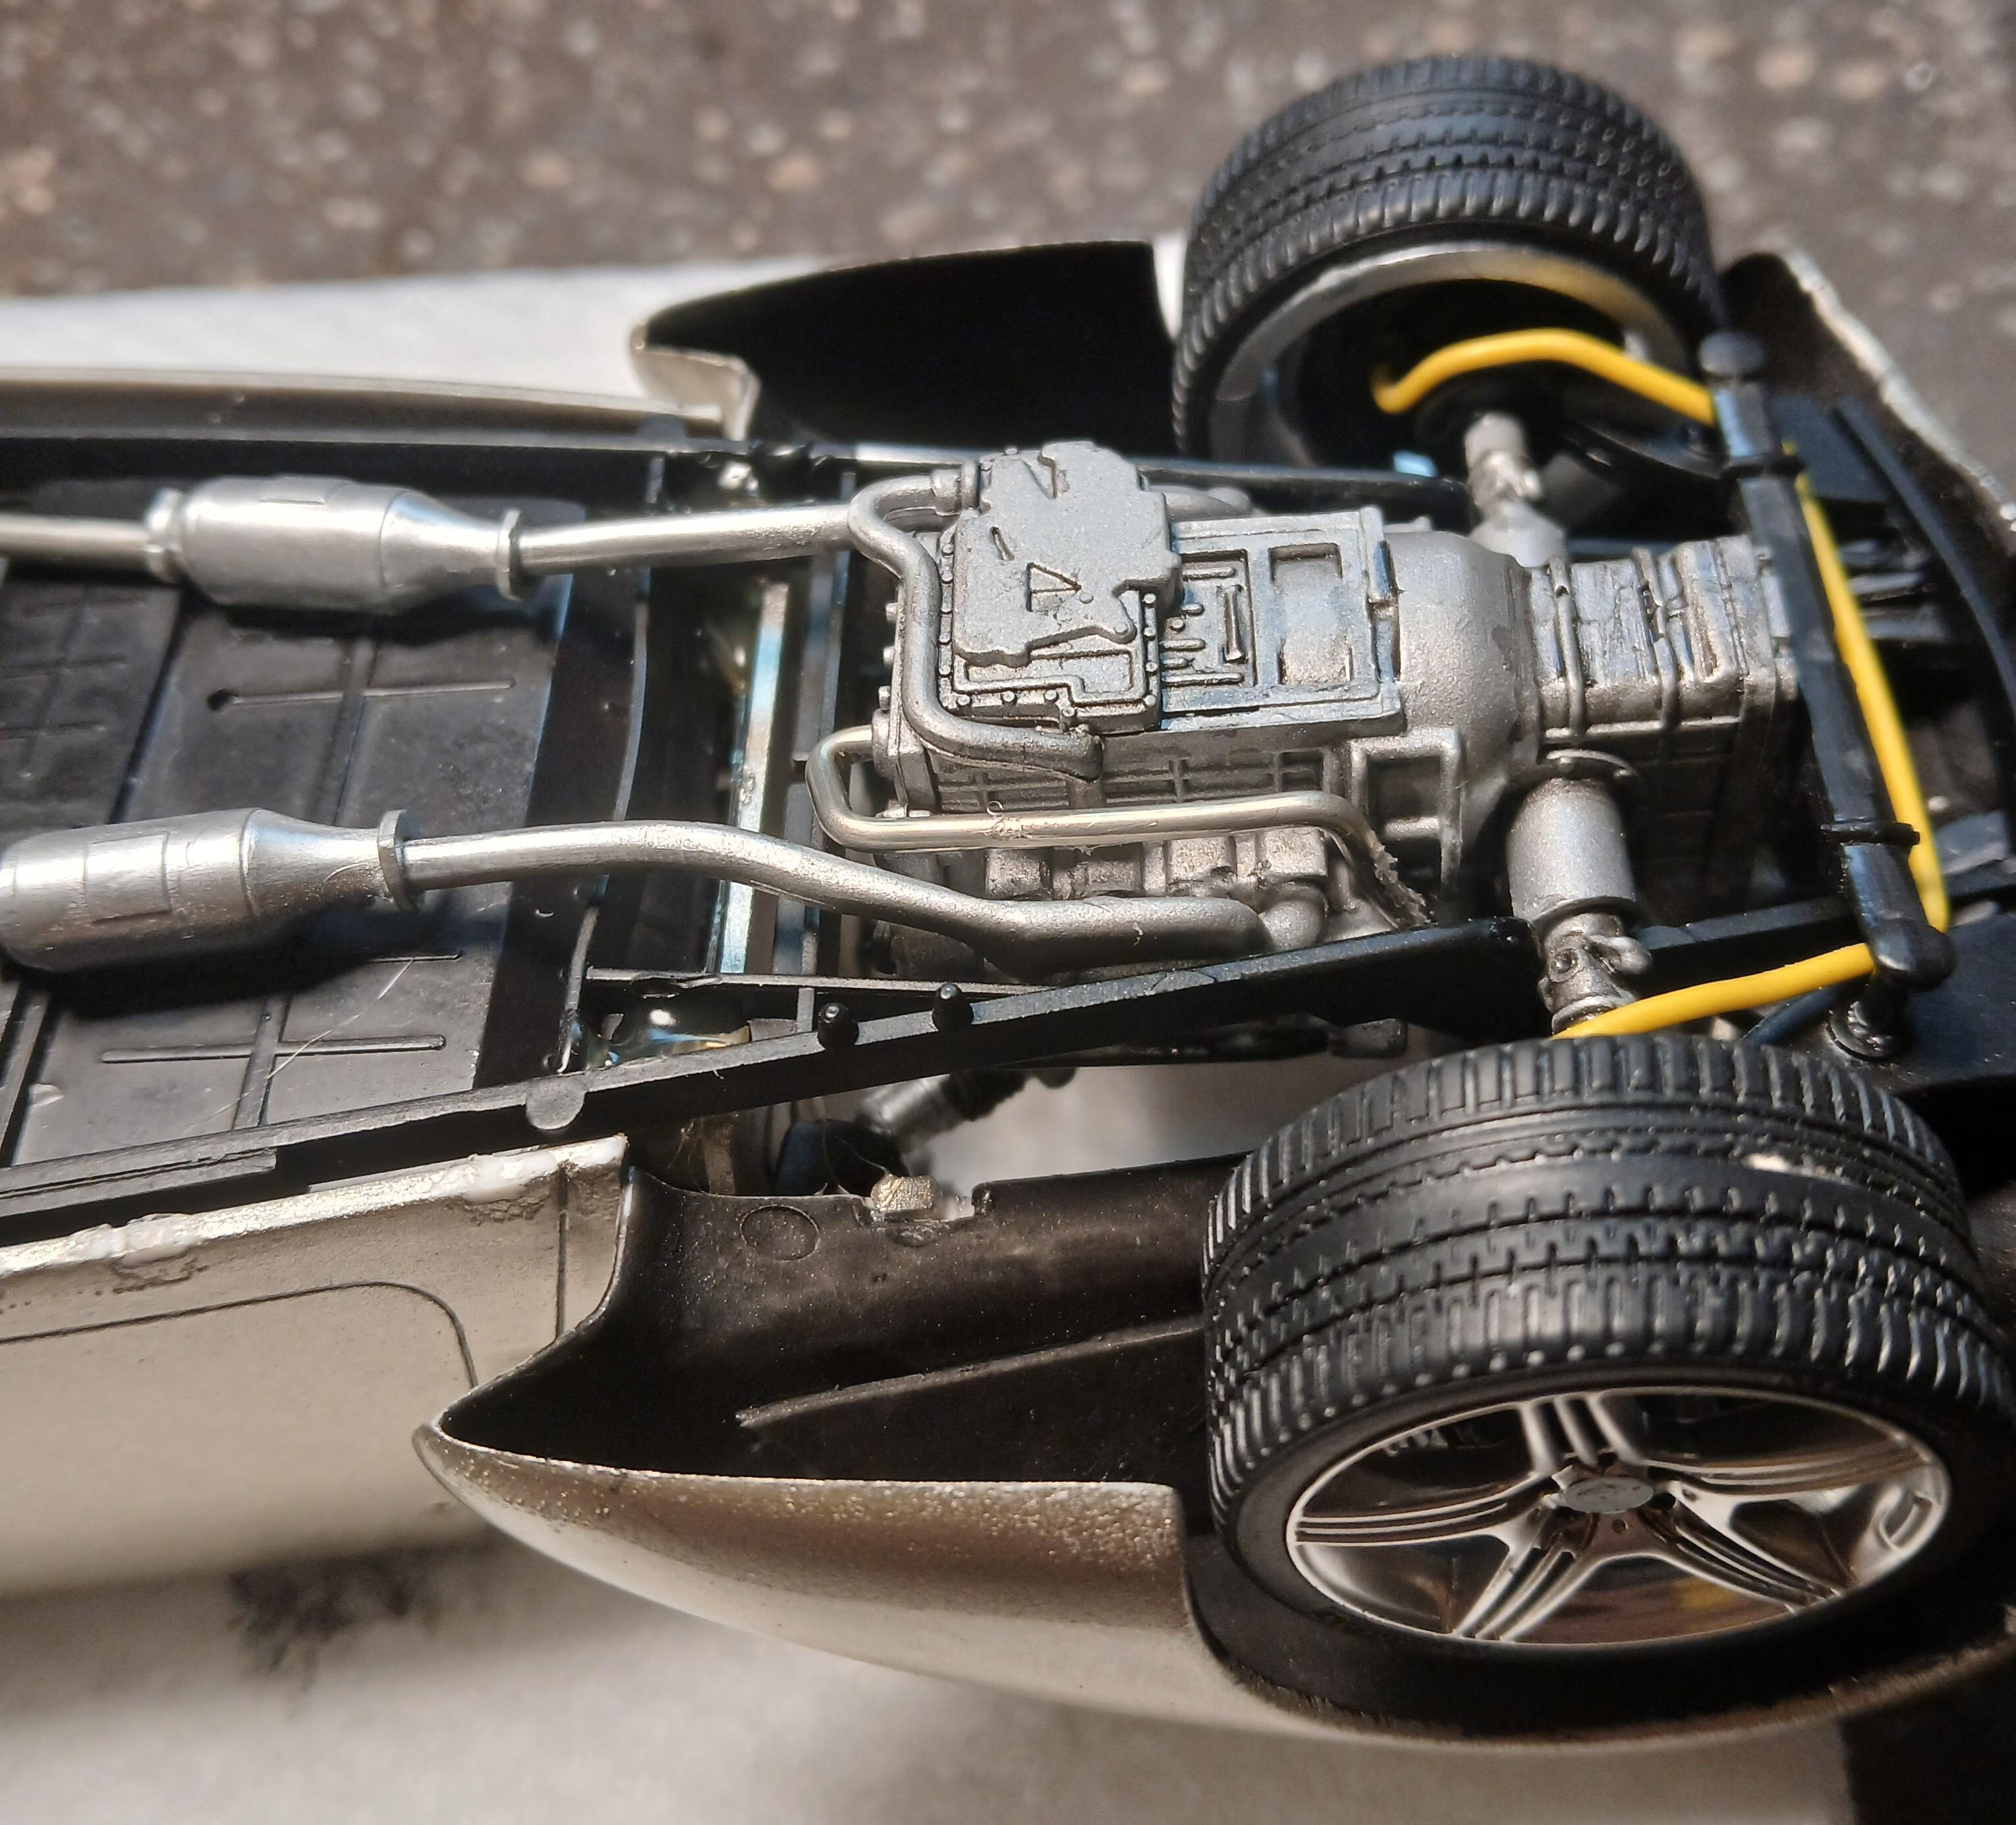
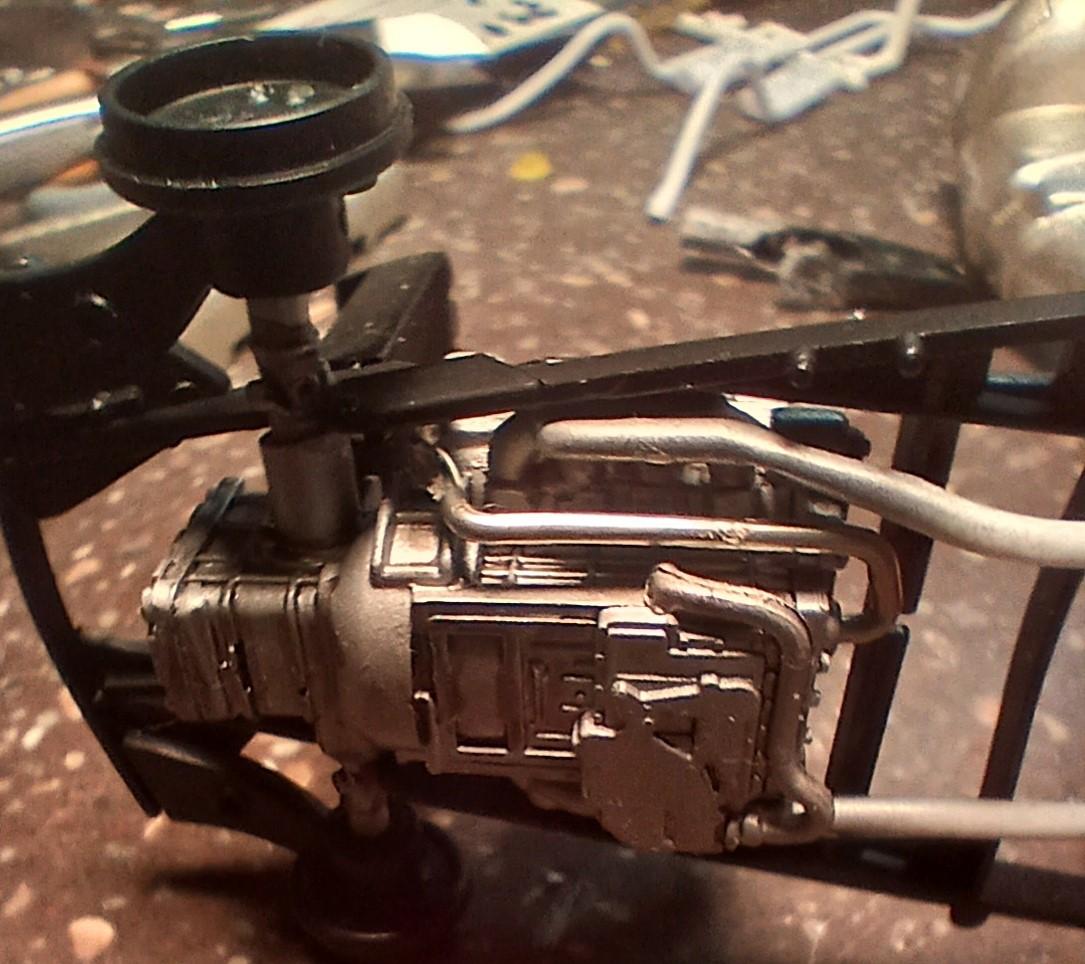
A week turned into a couple days, after I got other business out of the way. My philosophy with builds like this is to capture the iconic look of the classic, while integrating modern 'touches' to take advantage of better technology. So, while she looks like a classic from a distance, up close you notice Mercedes rims and Brembo brakes. Then, under the hood reveals an Audi R8 v8 engine and transaxle to provide a bit more power and reliability. This was a fun build, taking my time and working on each 'problem' until I had a good solution. I'm happy with the results. I was able to add rear shocks, a new steering wheel, as the original disappeared, and set up the exhaust to barely show. Enjoy!
- 20 replies
-
- 11
-

-

-
1937 Cord 812 Custom with Audi R8 v8 Engine
carl63_99 replied to carl63_99's topic in WIP: Model Cars
I am working on rear shocks. I have a couple options that I'm trying out. The gas cap is sacrilege, coming from the R8 that I cannibalized the engine from. -
1937 Cord 812 Custom with Audi R8 v8 Engine
carl63_99 replied to carl63_99's topic in WIP: Model Cars
Final Assembly has commenced! This will be the last post here, as everything I've done is already posted. Next time it'll be under glass. I plan to get some outside shots for that as the champagne gold doesn't shine too well under indoor light, but looks really nice in the sun. Lots of little details so it may be a week or so. Paint polishing and waxing went much faster than I expected. I sanded with 600g wet, 1200g wet then 3M fine cut polishing compound done with my low speed dremel. I waxed and will wax again for pics.
-
1937 Cord 812 Custom with Audi R8 v8 Engine
carl63_99 replied to carl63_99's topic in WIP: Model Cars
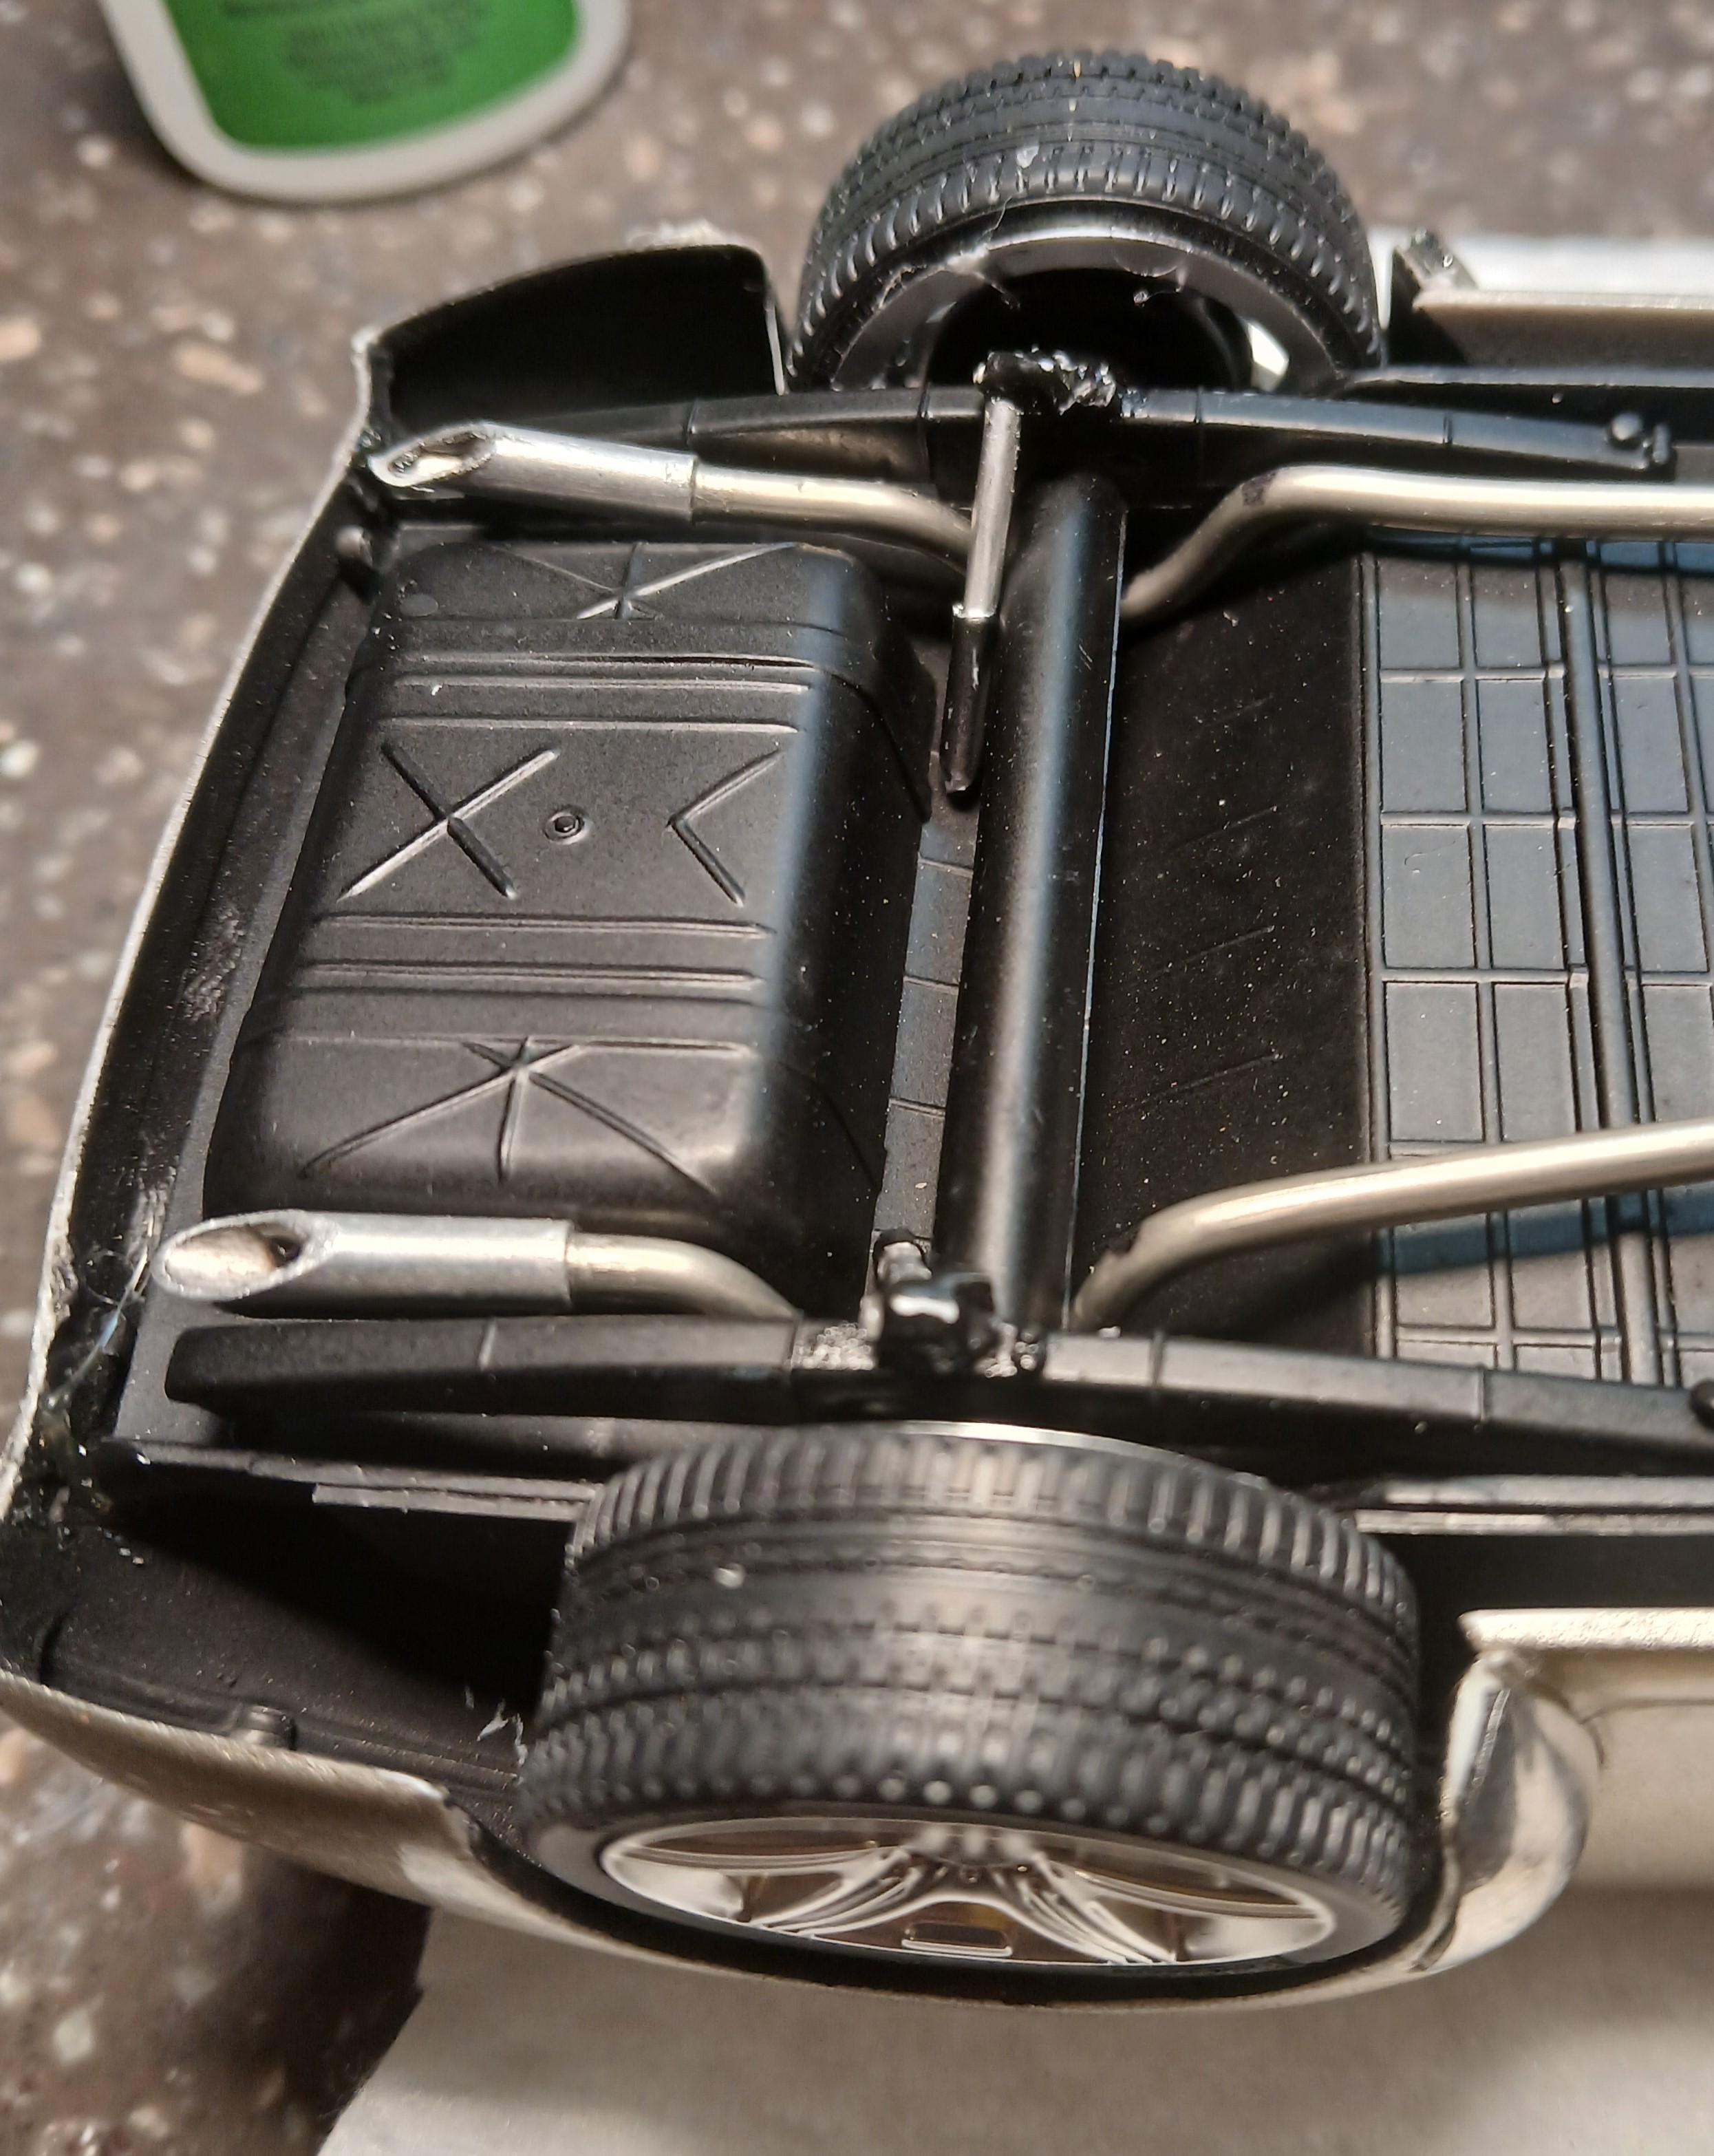
Work on the exhaust and suspension today. Got things lined up on both. Need to paint and do final adjust and superglue in place. Notice something missing? No rear shocks, thanks monogram! Gonna build something up for those next.
-
1937 Cord 812 Custom with Audi R8 v8 Engine
carl63_99 replied to carl63_99's topic in WIP: Model Cars
To check the status of the clearcoat, I wet sanded half the hood then followed up with polishing compound and wax. It's hard to get a good pic of it, but the final look is going to be awesome. This means I can start on about a week of paint finishing. I have to repeat this process for the whole body.
-
1937 Cord 812 Custom with Audi R8 v8 Engine
carl63_99 replied to carl63_99's topic in WIP: Model Cars
I also canibalized a fan from some Corvette somewhere to install as a pusher fan. In 1:1 scale, just wired backwards to push the air through the fan. This allows for room on the back of the radiator.
-
1937 Cord 812 Custom with Audi R8 v8 Engine
carl63_99 replied to carl63_99's topic in WIP: Model Cars
I always make a mess when polishing metal, so I came up with an idea. To polish the photoetched door handles I'm using, I drop them inside a model box and get 'em all shiny that way. My thought is that these handles work like a button, pull up to close windows, down to open them. Thus, they look kinda correct, while allowing modern functionality.
-
1937 Cord 812 Custom with Audi R8 v8 Engine
carl63_99 replied to carl63_99's topic in WIP: Model Cars
Radiator is installed and lines are ran. I used solder because it's very flexible and bendy. While it may not match Audi R8 setup, I only have one radiator, so I'm good.
-
1937 Cord 812 Custom with Audi R8 v8 Engine
carl63_99 replied to carl63_99's topic in WIP: Model Cars
Got the clearcoat on yesterday, sat in the food dehydrator overnight. Many builders will just go final assembly now. Not me. I'll wait a few more weeks, then polish out the paint to a nice smooth gloss, then details and final assembly. I also put one light coat on the interior, gave it a light shine. I can finish up the interior, engine and chassis while waiting for the body to be ready.
-
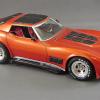
Nice work! 1967 Vette.
-
1937 Cord 812 Custom with Audi R8 v8 Engine
carl63_99 replied to carl63_99's topic in WIP: Model Cars
Yea, so am I! R8 is a complicated setup, and it's not going to replicate very easily. I have some ideas though... -
1937 Cord 812 Custom with Audi R8 v8 Engine
carl63_99 replied to carl63_99's topic in WIP: Model Cars
Working on the engine a little bit. Just about ready to mount in the frame, but I need to think about some radiator hoses first.
-
1937 Cord 812 Custom with Audi R8 v8 Engine
carl63_99 replied to carl63_99's topic in WIP: Model Cars
That is exactly what I plan to do. My vision is to make it look like mild custom from that era, different tailights, some smoothing of features. But things that are iconic to the car, i.e. those header tubes, will remain but in a visual only state. Same for the interior. While updating to modern seating would look cool, it would ruin the era-correct look. Funny thing about the original taillights, in my opinion, they have a very "stuck-on" look to them, almost like an afterthought. -
1937 Cord 812 Custom with Audi R8 v8 Engine
carl63_99 replied to carl63_99's topic in WIP: Model Cars
I've started assembly painting. Interior is a light leather color, one coat of clear gloss to come. Aluminum for the engine, lots more colors to add there. Note that I cut down between the front seats so they look more like the 1:1 scale separate folding units.
-
1937 Cord 812 Custom with Audi R8 v8 Engine
carl63_99 replied to carl63_99's topic in WIP: Model Cars
And the paint coat of Champagne Gold is on. Got to let it sit a couple days then clear. I typically don't clear, relying on wet sanding and polishing to get a good gloss. However, with this color, sanding is not possible due to the nature of this color.
-
1937 Cord 812 Custom with Audi R8 v8 Engine
carl63_99 replied to carl63_99's topic in WIP: Model Cars
One of everybody's favorite stage, primer! First coat, and I'm pleased with what it shows me. I have more filling and sanding to do on the areas where the bumper mounts were, but overall looking good. Panel lines are pretty good. A couple round of prep and I should be moving forward to paint!