

peteski
-
Posts
8,182 -
Joined
-
Last visited
Content Type
Profiles
Forums
Events
Gallery
Posts posted by peteski
-
-
Judging by the logos on the photo of the Hasegawa box (in the initial post), it is the Monogram Cobra with some fancy metal bit added. Fujimi does indeed have their own tooling of the Cobra.
-
I have used that stuff over a tightly-wound spring made from copper wire to make custom vent hose in this photo.

-
I would not recommend Tempera paints for painting plastic models. See https://en.wikipedia.org/wiki/Tempera - they are quite different than the standard water-solvent-based acrylic hobby paints. From what I know, Micro-Mark paints are just custom color mixes of Vallejo acrylic paints which are very highly regarded in the military model circles.
-
Super nice work.
I find it interesting that so many get so excited over issues with a $25 kit and yet there doesn't seem to be that big of a deal with such a high dollar kit. Can you image the review thread on this kit if it was issued today. Would definitely make some of the most recent kit reviews look tame.
I suspect it is all in the expectations. I have build a Pocher kit too and like Harry says, there are lots of problems. But it is to be expected, regardless of the price. Plus back when these kits were manufactured, there was no Internet and online forums for modelers to bitch and complain about poor fitting parts.
Also remember that the master patterns and molds were pretty much made by hand. No CAD/CAM. If Pocher name is revived and new kits are brought to the market, they will get as close of a scrutiny as the other smaller scale kits do. After all we now have means of connecting with thousands of people who have similar interests to us.In the 1:24 scale plastic kits world things are a bit different. Kits are much simpler and they don't have nearly as many details as 1:8 kits. They are pretty much all injection-molded plastic parts. Modelers expect them to fit together right. If you even build a Tamiya or Fujimi kit, you are as close to perfection as possible. Most modern kits are also designed on a computer, and molds are made on CNC machines, so there are fewer excuses not to make the parts to fit well or have incorrect shapes. Because of this, modelers have much higher expectations. Plus we have Internet and online forums to bitch and beat do death even the smallest problems with our kits.
But it wasn't always this way. Many early plastic model kits were out of proportions and had poorly fitting parts. Again, back then there was no Internet or online forums for modelers to gripe and complain. Plus, back then kits only cost $1.50 so nobody complained.
Also to be realistic, back then kits were usually built by teenagers who just wanted to build them to blow them up or crash them. Nobody cared that the rood profile was a bit off. But now, as discerning adults, we strive for perfection. Makes sense? -
It is not unusual for Japanese companies to take a plain kit and add some metal-cast, photoetched or resin parts and charge a top dollar for them. Gunze-Sangyo Ferraris are another example of this (although both curbside and detailed versions vwere Gunze's own kit). Those added cast metal parts are usually not very good quality (often plastic parts they replaced were better).
-
I also wish that the series would have continued. I've built them both. I don't have any photos of the Corvette handy, but here is my Cobra:
For more photos see Peteski's Cobra Album
These kits were revolutionary. Just like much more expensive 1:43 resin kits they included photoetched parts. But unlike the thick and often crude resin-cast kit's parts, the injection-molded styrene parts and bodies were very well executed. Plus the price was so much more affordable than any resin kit.
-
Heating up the stripping fluid bath to 80-90 deg. F makes it more aggressive and it works much better, even on really tough paints. That way you don't have to result to using power tools for stripping. You can leave styrene in the warmed up purple stuff for extended period of time, but be careful with warmed up ELO - it can slightly attack surface of some of the various styrene types.
-
The wire harness looks great! Very realistic.
-
Depends on the area masked - sometimes I pick the edge with my fingernail then use my fingers to pick it off the plastic part, other times (or if the masked area is small (like a small hole I masked) I use pointy-tip tweezers. Like I mentioned, the masking agent I use is slightly more viscous than the stuff you use for watercolors, so it goes on in a thicker layer.
My hands are very clean when I handle freshly painted model (when I pick the masks off). During the final assembly I often wear thin cotton gloves not to leave fingerprints on the car's body. The kind used by museum staff to handle delicate museum exhibits.
-
It is a bit too distressed for my taste, but still, it is a superb model. Nothing looks like more aluminum than real aluminum. That really makes it look like a real Airstream camper.
-
Liquid mask is just latex rubber - the dried liquid mask peels right off the smooth plastic parts - not need for any special removal technique.
Thanks James, one of these day I'll post a writeup on that Cobra. If you like to see more photos go to my Cobra album: http://s1068.photobucket.com/user/peteski7/library/Cars/289Cobra
-
I believe that topic was regarding whether or not a metal frame is necessary when scratchbuilding a frame. And I still say a metal frame isn't necessary in that case. Some people may prefer to work in brass, but it's not necessary. A perfectly good model chassis can be scratchbuilt of plastic.
What I mean here is that I like the metal frame on this Bugatti because it bolts together square and straight and stiff right from the start, unlike the RR plastic frame, which has a lot of flex in it until you add things to stiffen it up, like the axles and engine. Once the Rolls chassis is finished, it's plenty strong enough to support the model. But those are manufactured model kit chassis... as far as building a chassis from scratch, I don't see any reason that you need to build the frame of metal... plastic works just as well.
Got it!
-
I use the liquid latex mask stuff (smells like ammonia) all the time. But I only use it for things like masking areas or holes which will be gluing surfaces for attaching other parts after painting. I do that since glue works best on unpainted surfaces. But the mask used for water colors is too liquid (too thin). I actually ged much thicker masking liquid from electronic parts distributors. That stuff is used for masking areas of electronic printed circuit boards (to protect them from liquid solder) before passing them through wave soldering machine. Sometimes that masking fluid is too thick so I thin it with the stuff you use.
Here are some examples. It is a 1:43 scale 289 AC Cobra molded in yellow plastic.
If you look at the headers with the blue-painted cylinder heads you'll see bare yellow plastic on the cylinder heads. Before painting them blue I masked the top of them with liquid mask (where the valve covers will attach) . Once painted blue, I peeled the masking off exposing the bare plastic. Same with the bottom of the engine block in that photo. The area where the oil pain will be glued on was masked with liquid masking before painting it blue. I find it easier to just apply the liquid mask than to cut pieces of masking tape. Plus liquid masking is easier to apply on uneven surfaces.
Here you see where I used liquid mask on the areas of the front suspension where the wheels will be glued on.
As far as masking tape goes, I used to use standard blue Scotch masking tape but since I found Tamiya masking tape I never looked back at any other brands of tape. Tamiya tape is *THAT* good!
-
The frame on this kit is metal... very stiff and sturdy, and when you bolt it together it's square and flat, unlike the soft, wiggly plastic frame on my Pocher RR woody. The metal frame is a much better way to go.
Interesting how once you personally encountered a large scale kit with a metal frame you have changed you view. Not too long ago you said here that there is no need for a metal frame.
This model is coming along very nicely. I just love all those extra "Harry P. touches"!
-
Model is looking good (especially the paint and weathering), but if you want my honest opinion, your wire harnesses are way out of scale spoiling the overall look of the model. It is thicker than the bikes frame tubes. Details like that are what makes or breaks a model.
If you think about it, most wires in the harness of the 1:1 bike would not be usually larger than 1/8" (that is the overall thickness of the insulation of the wires). Many will be even thinner and few (like battery cables) would be thicker.
To correctly represent those wires in 1:6 you would need something that is about 0.021" diameter (0.125 / 6 = 0.021) or thinner. A 30 AWG wire-wrapping wire has overall thickens close to that. This type of wire is usually available from electronic parts suppliers. If you have a Radio Shack store nearby, they should also have the wire-wrapping wire. For even thinner wire use some of the 1:24 scale ignition wire from Detail Master. It comes in 0.016" and 0.007" diameters. Perfect to represent chassis wiring of a 1:6 scale bike. This will dramatically improve the realism if your model. As far as wrapping the harness, that will be tougher. Some thin-wall heat-shrink tubing might fit the bill. Wrapping regular electrical tape will look out of scale.
-
As mentioned, many Led Zeppelin songs were covers or ripped off old blues songs.
Many Van Halen hits were also covers of old blues songs. Like Pretty Woman or Ice Cream Man.
-
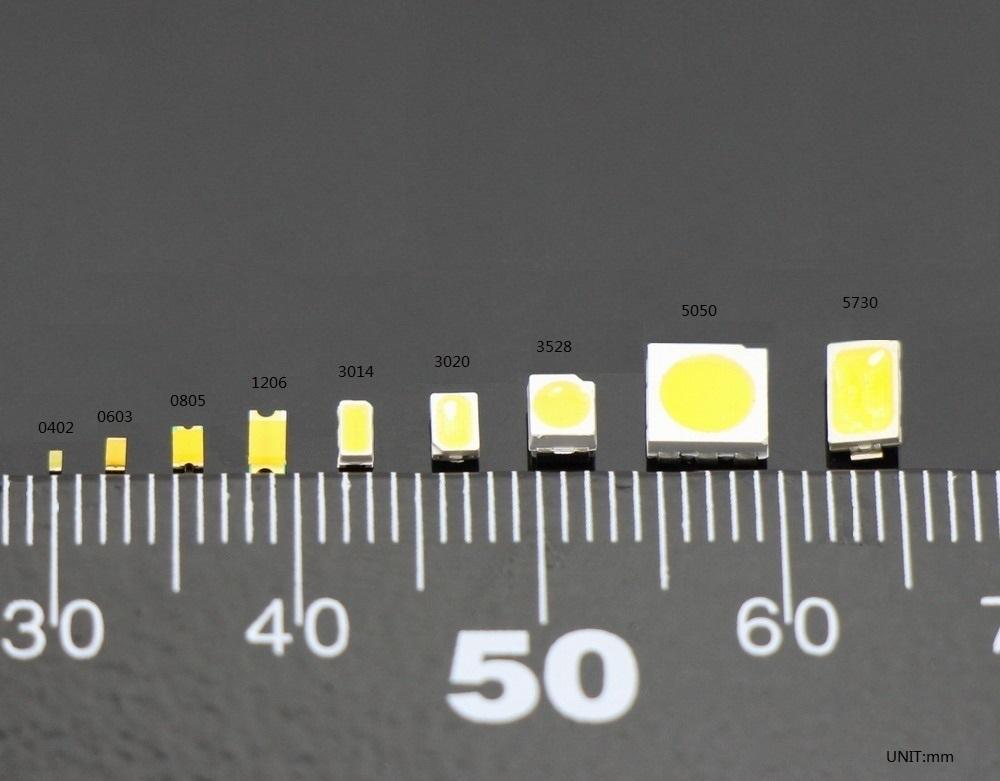
If you want to light it up (while trying to make it look in-scale) you would need to use SMD (Surface Mount Devices) LEDs. You can get them as small as size 0402 (0.040" x 0.020"). Or larger, like 0603 (0.060" x 0.030"). They also come in larger sizes lime 0805 or 1206 or even larger. But wiring/soldering a 100 of them will not be an easy task.
Here is a photo showing various SMD LED sizes. The scale is in millimeters so you can see how large a 5mm LED would be in comparison.
-
I just read through this thread. Quite interesting to learn all the different things people do or like/dislike about the BMF.
I've been using BMF for over 25 years and I still have most of the models I build back then. The BMF is still on them. Slightly more yellowed but no sign of peeling. Still looks good. Here's my 5 cents:
BMF Original Chrome foil is by far the best foil out there. I tried them all (including some home-made stuff). I'll tell you a secret: It is not simply very thin aluminum foil with some adhesive. That is also the reason why it has a warmer color than the bluish-silver of aluminum foil. This foil is made from some pliable metal or some metal alloy. I don't know any specifics. If you don't believe me take a soldering iron and lightly touch it a piece of foil - it will melt. Try that with aluminum foil and it will not melt. That special metal is the reason why this foil is so easy to work with, and why it stretches and compresses easily to create a wrinkle-free surface. Also the its softness is why it polishes so easily. That's the secret to BMF's Original Chrome foil.
All the other brands of foils (even including BMF's own Bright Chrome, Black Chrome and Gold) are just adhesive-backed thin aluminum foils. The colored ones simply have the color applied to the foil's surface. That is why those are much stiffer and not as easy to apply. They also do not stretch and crinkle easily when applied to complex curved surfaces.
As others have mentioned, Naphtha not alcohol is the best for safely removing stubborn adhesive residue. But if the residue is not very heavy, it will come off by just rubbing with a piece of soft cotton cloth, no solvent needed. When I foil my models I often minimize chances of having residue by covering the area surrounding the foiled area with masking tape. When I'm done foiling I simply peel up the masking tape and the remaining foil comes off with it.
WD40's solvent is similar to Naphtha, but WD40 also has lubricants - spray some WD40 on a piece of glass and let the solvent evaporate for a day or two. You will end up with a thin layer of oily film which will not evaporate. That is why I would never use WD40 on a finished model.
If you want to see an example of one of my foiled models, look for the blue '57 Chevy on the BMF's packaging. It is by yours truly.
I feel quite honored to have my model on the BMF envelope and on the website.Gunze Sangyo 1:32 1957 Chevy BelAir
-
Back in the 70s, when I was a kid growing up in Poland, I used to buy a magazine called "Young Modeler". Each issue basically contained a paper model. Some larger models were spread over several issues. I remember building a helicopter and a large destroyer (ship). Those models were quite nice and not expensive like plastic kits.
-
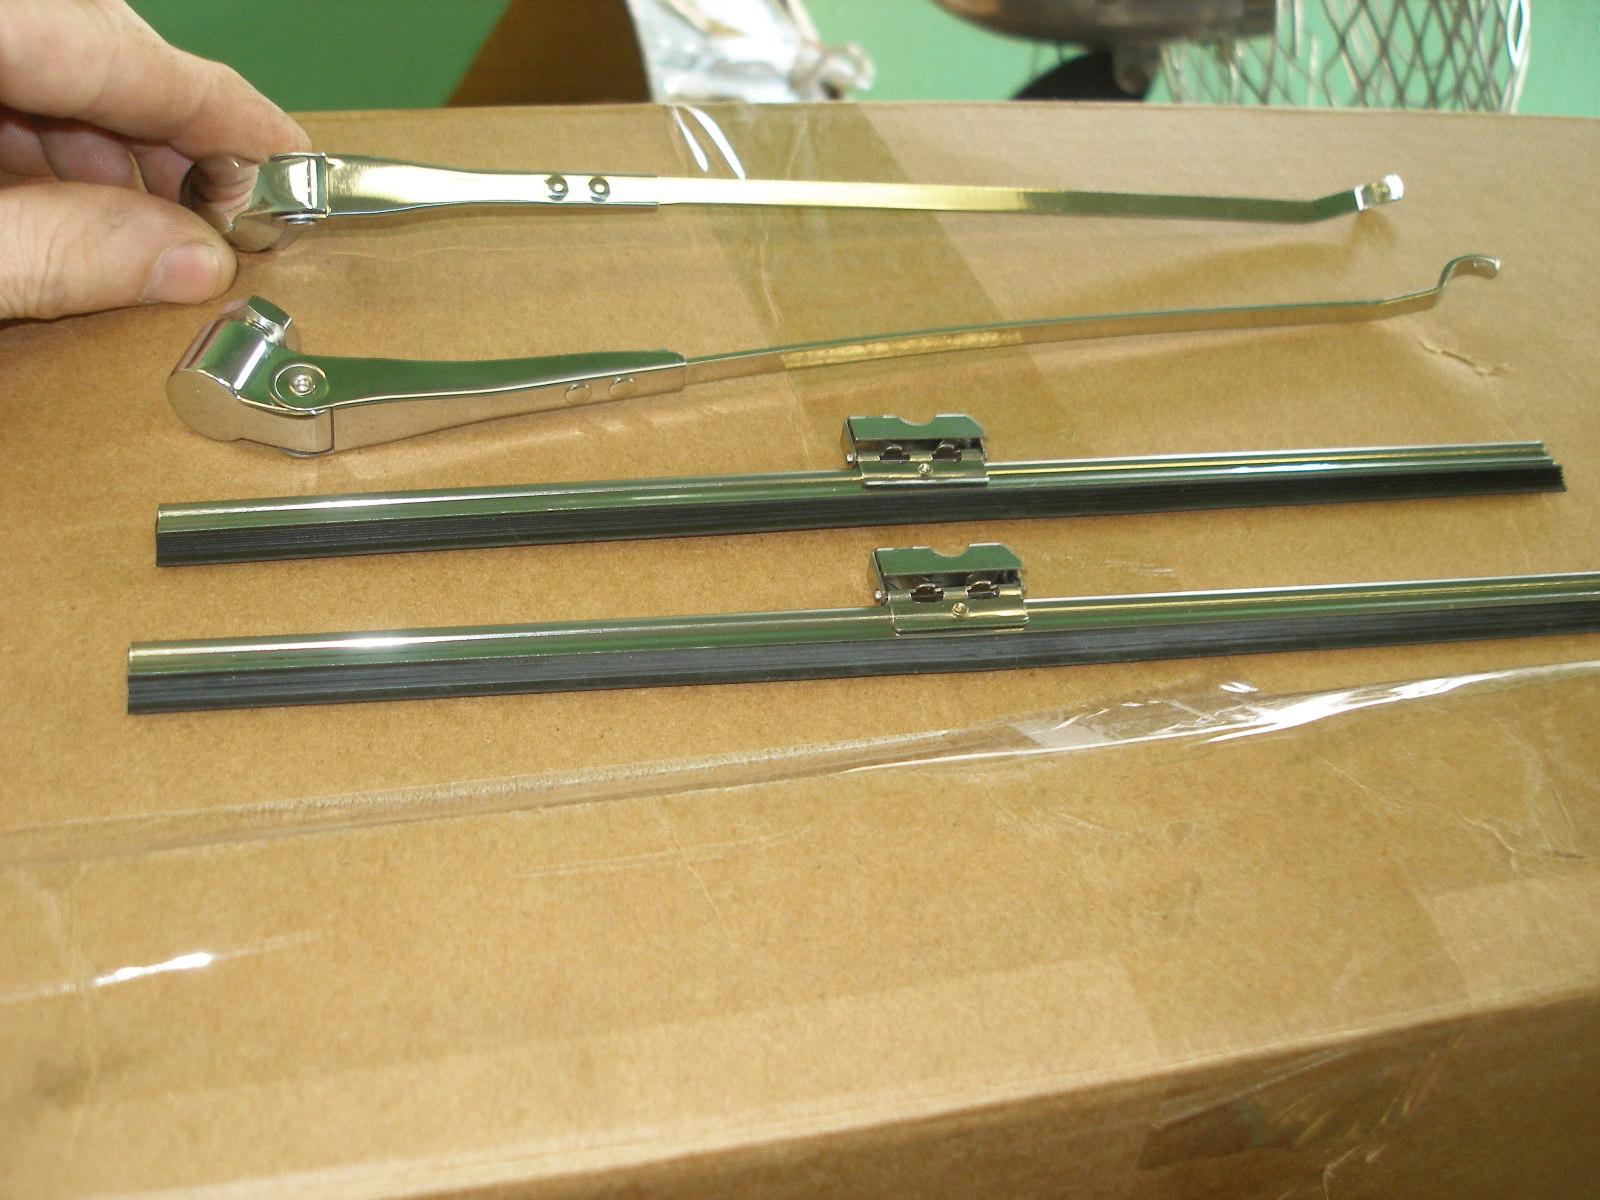
Those Model Motorcars wipers are sweet, bur wick'd pricey! But so are Pocher kits...
Speaking of Model Motorcars, I used to correspond with David Cox back in the 80s (before Internet, using snail mail). Those were early days of their venture. I think I still have one of their early catalogs. I even sent David some photos of the Pocher Mercedes 300K I built back then. One of those photos actually ended up in their online gallery (with my name misspelled).
-
As far as submitting an article to another magazine... I'm pretty sure they wouldn't publish anything I send them due to my connection with MCM.
You could use a pseudonym. Many authors do that.
-
I agree on the clunky wipers. Might have to get a set from Modelmotorcars eventually.
As far as submitting an article to another magazine... I'm pretty sure they wouldn't publish anything I send them due to my connection with MCM.
I was thinking more that with your scratchbuilding skills you should be able to come up witch something good looking rather easily. Those early wipers were rather simple - just like the Pocher version but just using thinner/finer materials. You probably have some good closeup photos of the 1:1 scale blades in your reference materials.
Something like this.
-
Nice build so far. The giant wheel thing doesn't work for me but it is not my model . What is important is what you like.
-
Harry,
I have been following this thread and I have to say that you are building a superb model! One thing that jumped at me though was the that you seem to be using the original thick stamped-metal-arms and clunky plastic-blades windshield wipers. Compared to all the other in-scale details you have added, those look really out of place and out of scale. Hopefully you will eventually replace them with something better looking.
The other comment I have is about having articles of your builds published in a modeling magazine. If you don't feel that publishing such an article in Model Cars is kosher, couldn't you pen an article and send it to another modeling magazine? I have feeling that Scale Auto or even FineScale Modeler would love to publish some of your work! Or would that be then considered conflict of interest?

") Also remember that the master patterns and molds were pretty much made by hand. No CAD/CAM. If Pocher name is revived and new kits are brought to the market, they will get as close of a scrutiny as the other smaller scale kits do. After all we now have means of connecting with thousands of people who have similar interests to us.
Also remember that the master patterns and molds were pretty much made by hand. No CAD/CAM. If Pocher name is revived and new kits are brought to the market, they will get as close of a scrutiny as the other smaller scale kits do. After all we now have means of connecting with thousands of people who have similar interests to us. Also to be realistic, back then kits were usually built by teenagers who just wanted to build them to blow them up or crash them. Nobody cared that the rood profile was a bit off. But now, as discerning adults, we strive for perfection. Makes sense?


")

Too bad the Monogram 1/43rd scale Ultimates" didn't last long.
in General Automotive Talk (Trucks and Cars)
Posted
Thanks guys! It was a fun build. Took me couple of months to complete. I think I only paid less than $10 for the kit, so it was money well spent!")