
.jpg.b9265433dc8c3b550370b1d0e4e4d2fc.jpg)
MarkJ
-
Posts
4,272 -
Joined
-
Last visited
2 Followers

Recent Profile Visitors
19,211 profile views


MarkJ's Achievements
MCM Ohana (6/6)
-
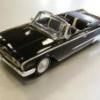
.jpg.b9265433dc8c3b550370b1d0e4e4d2fc.thumb.jpg.915f5b46e3c9402eeaa6972073121c87.jpg) Coming along very nicely. I love chrome.
Coming along very nicely. I love chrome. -
Nova Salt Flat Racer
MarkJ replied to Pierre Rivard's topic in WIP: Other Racing: Road Racing, Land Speed Racers
Thank you, Pierre for the photos. So, I would say you are completely on the right track with your build. Forget any suggestions I made. I was talking from an uneducated view. Those are really cool looking cars -
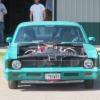
formula 55 chevy
MarkJ replied to charlie libby's topic in WIP: Other Racing: Road Racing, Land Speed Racers
The first car I ever owned was a 55 Chevy I bought for 150 dollars back in 1969. It actually ran and got me to school because I needed transportation other than a bus to get to my disributive education job at midday. Leaked oil profusely and smoked but it did the job for me. This one you are building is a far cry from that one. -
Fujimi Fina McLaren F1 GTR Long Tail
MarkJ replied to Nacho Z's topic in WIP: Other Racing: Road Racing, Land Speed Racers
This looks like fun. I shall be watching. Beautiful car. -
Have to do a house project today but hopefully won't take too long and I can start taking the final photos and get them posted. Sure, has been a long time coming.
-
Wow, Andrew. That's some thinking out of the box on making those pedals with the solder on a screen. Look perfect.
-
I thought I was ready to proceed but the air cleaner just looked too bad so I'm redoing it one last time. That Revell chrome did not work out as advertised except for the wheels. Putting any kind of clear on it ruins it and the air cleaner will be something I need to handle and even with gloves the Revell chrome dulls badly. Only put it on something you never have to handle again.
-
Nova Salt Flat Racer
MarkJ replied to Pierre Rivard's topic in WIP: Other Racing: Road Racing, Land Speed Racers
That would be cool if you could post those pictures. Bonneville cars are completely Greek to me, and I would like to learn more about them. Model on my friend, you are an inspiration to all of us mere mortals. -
Thanks, Pierre and Edgar. It feels great to finally have this one completed. I really learned a lot from it, especially about paint, so I'm hoping that I can get better results faster in the future-on-future builds like my next one that will be OOB and I bought the decals for it. Hopefully only take a few weeks instead of many months to finish it and build another.
-
Nova Salt Flat Racer
MarkJ replied to Pierre Rivard's topic in WIP: Other Racing: Road Racing, Land Speed Racers
And now for something completely different. I never thought in a million years I would see you do this kind of build, Pierre. But I'm sure you will nail it. Love the concept of a Salt flat Rat rod. Very mind blowing indeed. Totally tuned in to this one as always. You think you might need a bigger front air dam to match that huge rear wing? Just sayin. But don't cover up the beautiful grille. -
Just one to go, Helmut. They all look awesome, and I agree you should build it pre accident. Hope the guy was okay.
-
Its finally finished. I just need to clean up my work area so I can take the final photos. That might take some time. But I need to make sure the future is completely dry before I reassemble the model for photos. Don't want to put fingerprints in it. Then again, I could just wear vinyl gloves. But it's hard to work the camera and pose the model with gloves on.
-
Thank you, Helmut for always giving me positive thoughts about the build. I'm pretty sure if I just shave a little off the front of the dash pad the fit to the body at the windshield will be fixed. The trouble when you mock parts together and try them, the assembly is not tight enough to give you accurate results. Tape is not like glue it gives too much. Whatever it takes I'm going to get it right. Thanks again my friend.
-
Thanks for stopping by with the support, Donato. I already noticed a mistake while decaling the model. I did not allow enough space between the bottom of the windshield and the dash and it's not allowing the roll cage to get close enough to the roof. i will put on some thin vinyl gloves to protect the decal work and try to remove enough material from either the dash or the windshield Bottom to allow a tighter fit of the roll cage to the roof. Its bugging the heck out of me now.
-
I sure hope so, Helmut. That's the plan, but it might slip out of my hand and go crashing to the floor. With my luck you never know. Stay tuned.

