Blaze00
-
Posts
21 -
Joined
-
Last visited
Blaze00's Achievements
MCM Member (2/6)
-
HEY, I found the decal kit. Thank you Guys with helping with other builds. Still working on the Duesenberg SSJ, 67 Olds Gasser, 67 GTO. My dad had a 66 F-85 442, bone stock original. What a fast car with the 400 C.I. After these builds on to a 66 442
-
Dirty Trick not to add decals
-

-
Diving in my unbuilt models and found a 69 S/C Rambler. Testors # 7404. I now remember why I didn't build it, no decals. I'm looking for a set of 1/25th decal sheet specifically the hood, roof and deck lid decals. I have no problems with painting the red down the side. Just can't figure out how to duplicate the 390 CU. IN and AIR for the hood scoop. Thanks, Kris
-
Thanks for advise
-
I have 600 to 2000 grit. Just afraid that after a wash to get rid of mold release the paint will bite too much screw up the glass. My paint smells like Lacquer not Enamel. Lacquer is very aggressive. I do not know what Future is. Things have changed in the last 40 years
-
HEY THANKS MAN! I'm ready to build the kit. I just need 2 distributors wired and bend the exhaust, I use old electric cords (striped) for hoses, thinking large tube exhaust. In scale probably 3 inch. Again Thank You
-
great build and love the burnout. I have seen the recreation but did not take pictures. I can build mine without instructions but want the colors correct. I have Black and Gold but not sure about the other colors. And I will use your burnout material, my wife does not have a say with it on the shelf
-
Funny to heat the paint (good idea). When I started selling auto paint one of my shops was still using synthetic enamel and used a hot plate so the paint would flow better. After shooting the vehicle the hack painter would spray the surface with water to shock it. The car looked great, no orange peel but only lasted 6 months and chalked with the paint failing. I'll try heating the spray bomb on my junkyards parts. Thanks for bringing back 35+ years ago of bench chemist's memory's. I'll also the some parts in RIT.
-
can anyone forward the kit instructions, I just opened my Revell Hairy Hurst after 25+ years and found a 69 Olds instructions. Linda and the Hurst shifter is there. By the way I have a singed poster of Linda (shift my gears) and 8x10 of her on the back of a Hurst in a parade in 1972
-
I have a lot of junkyard parts and will try RIT, and try the Tamiya transparent as plan B. I only have one windshield and backglass to really mess up. Thanks man. I have 6 models going on now and want to simplify the process
-
My thought was to heat up the plastic to cure/ dry fast and not eat up the glass. I have a heat gun to bring the surface temp up
-
I dusted one piece ( on the right) and blasted another on the inside to figure out where to start. the problem is chemical reaction that fogged both pieces. I'm not worried about running the paint, I used to paint cars, I can use a spray bomb as good as a gun. I just want one even coat to achieve desired results. just looking for a clear Orange tint glass
-
I have a 67 Olds and will built it as a Gasser. I'm not having good results with Tamia transparent orange for the glass. any ideas on application. Should I heat the plastic up and spray for a quick cure? I have sprayed several junk yard pieces with bad results
-
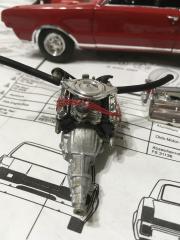
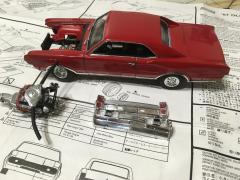
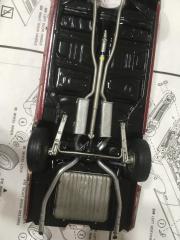 I made this model for a friend who has a real W-30 in Spanish Red. I had a can of red custom made. I did not have a choice in the transmission, looks like a turbo 400, not a M21. The exhaust was a challenge to bend and baffle but turned out great on to 3 models the same time. A Duesenberg, another 67 Cutlass Gasser and a S/C Rambler
 -