
torinobradley
-
Posts
645 -
Joined
-
Last visited
Content Type
Profiles
Forums
Events
Gallery
Everything posted by torinobradley
-
King Cobra Torino
torinobradley replied to Fabrux's topic in General Automotive Talk (Trucks and Cars)
It looks like the left side has a different stripe setup than the c stripe on the right and what you are seeing is the continuation across the front. Torinos of this vintage came with reflective laser stripes down the side so maybe it's a side stripe like those, only in black? -
I had a wierd issue with one of my rentals. They were having trouble with their kitchen and dining room lights. It turned out to be a blown (scorched) wall plug outlet in the living room. It was cross-feeding power so that while nothing worked, I was getting power from the ground as well. There are plug checkers at the home stores that will tell you if the plug outlets are working and wired correctly, though the best advice is to shut it all down until it is checked out by an electrician.
-
Came across this today and thought some of you would like to see it. http://www.space.com/20968-star-trek-galileo-shuttlecraft-infographic.html Turns out Gene Winfield built it.
-
Very nice. I have this one to build as well and I hope it comes out as nice.
-
Awesome build and it even has the correct colors on the chassis, suspension and paint ID marks too!
-
32 Ford Twin Hemi Skull Rod "Mr Sinister" Finished!
torinobradley replied to TFchronos's topic in WIP: Model Cars
This is looking like the HotWheel Way 2 Fast. Is that your inspiration? I'll be watching this one. Keep up the good work! -
I was consolidating some aircraft parts I had gotten many years ago in a trade and came across a drop tank from I believe a 1/32nd scale P-51. Of course, the first thing I think of is "belly tanker" as most of us car guys would. The only problem was it's size. At 3", it was a bit small for my normal scale of 1/24-1/25th. Then, I compared it to one of the 1/43rd cars I had here and it looked about right. A few calculations and at 1/43rd, this guy was just over 12' in scale. Real belly tankers ran 13 footers so I liked it. What to do about the motor, wheels and tires? I found a Miasto Model A and a Hot Wheels Model T Roadster, both about 1/50th or so. THe Model A donated it's wheels & tires while the T donated it's dual carbed flathead and radius rods. While the parts aren't as accurate as I would like, they're still a fair starting point. I'll be detailing them to be more accurate and in scale. Still need to source a trans, rear end and front axle but hey, got the major parts in short order. Here's just a size-comparison mock up: Size comparo with my iPhone: The carnage... I don't know how much time I can devote to this guy anytime soon but it's a start. As always, comments welcome.
-
'39 Scrape Okay, tried to include a picture but failed miserably... Just do a search on Lincoln Scrape and bring up the purple monster.
-
Wow, talk about memories. I had one of these in this color! The 1:1 that is. Engine was a bit warmed up with my friends Hooker, Holley and Crane. Fun little car! Thanks for the memories. BTW, yours looks much better than mine did when I got it...
-
Mustang 2 frontend?
torinobradley replied to John Pol's topic in Car Aftermarket / Resin / 3D Printed
If you can find an old R&D Unique independant front suspension, it has the entire setup including coil overs, crossmember, steering and disk brakes. They are cast in white metal. R&D is no longer around but they still pop up from time to time on epay. -
AMT Shelby USRRC Cobra Update 5/23
torinobradley replied to torinobradley's topic in WIP: Model Cars
Thanks AFX! I've been watching your build and checked out your red one too. I've been itching to get back to mine but right now my life has too many other demands from me, so I am living vicarously through the other builds on this site, especailly the Cobras. I am just building mine in my head till I can get back to the bench. I almost bought the HRM Cobra kit for the AMT but it wasn't the direction I was taking with this one. I did, however, get a pair of the front brake scoops from him (thanks Harold!). I am curious about your oil cooler located on the fender skirt. Which cars had that modification? Originally, I was going to make the #98 black car with the yellow stripes but I was unable to secure another set of the kit decals (they were very thin according to the box art model). So, I found a place in New Zeland that creates decals for slot cars and they had the Executor. I also need to find the little red oil cap decals and a cobra vin plate, though I might try to make them. I was going to try to print the cobra vin plate on BMF and see how that worked out. Would look awesome if it worked. -
I think Modelhaus and/or Rep & Min Co of MD offer them with whitewalls. You can just paint the sidewalls and use vintage racing tire decals to put on the side markings.
-
Looking good so far! Don't forget the swan hood ornament with the light-up orange wings!
-
Awesome so far, another one to watch!
-
Looks awesome! Love the Spaulding! The Spaulding Flamethrower was also in the AMT parts pack motors (I think the hemi). I have the decals for this one but need to finish the Coventry Executor first... Very nice build. Love the detail! Did you just get the parts individually from HRM or did you get the trans-kit for the AMT?
-
Very nice! I kept expecting to see "Retouched photo of actual model" at the botom of the pictures...
-
Nice pics of the Javelin! I have one of these on the slate for restoration (at least in 1/25th scale. Would love to see many, many more photos of that one, as it is the one I plan on replicating. Thanks for the pictures, Mustangs and Javelins!
-
'63 Vette GS #004 doubts
torinobradley replied to Drago's topic in Model Building Questions and Answers
From my research, the car was painted Mecom blue which was a modified Pelham Blue. I had planned on just using the pelham blue as no-one currently (that I know) is producing the Mecom blue. The black hoses for the PCV system was not on the car when it raced as #004, from what I have been able to dig up. Nor was all the other, now required, safety bits and pieces like fire suppression system and external shut-off sticking out of the fender vents in your picture of the door. VRM (Vintage Racing Miniatures) makes an awesome decal sheet that includes this car. You can read the odometer on the guages and it has all the stickers this car raced with, including the copper strips for the CB radio. -
AMT Shelby USRRC Cobra Update 5/23
torinobradley replied to torinobradley's topic in WIP: Model Cars
Thanks for the encouragement! I was able to find the ferrules from an electronic supply store. A bag of 100 was going to cost me about $3 but they shipped fed-ex which would have been in the $15 range. I called them direct and worked something out. Depending on where you find them (if your looking), you might want to give that a try. One other thing I learned, those little guys are a pain to cut. Even though they are tin-plated copper and cut easily with an xacto, the blade tends to wander. I clamped a piece of plastic rod, the largest that would fit into the ferrule, into my desk vise and used a un-cut carb as a depth guage to cut them. Then used a digital micrometer, my finger and some fine sandpaper to get them all about the same height. I messed up twice as many as I made so it was good I got lots of them... Are you going to do a build thread on your team and will they be FIA or USRRC? -
AMT Shelby USRRC Cobra Update 5/23
torinobradley replied to torinobradley's topic in WIP: Model Cars
Thanks for the comments. Progress has been slow as of late with the holidays and all. 250, If your asking about the jack points (the little downward facing hooks on the front and rear of the body in place of the bumpers), the Coventry car I am working on had them on the rear only. My plan was to use thin plastic or aluminum to create them from scratch. There is photo-etch items for the 427 Cobras that would work but I'm not willing to spend the $20-$30 for a set I might use 3 or 4 parts from. There are some nice ones in the Revell 427 kits but they face outward instead of inward. I'll get the pictures uploaded and post an update soon. -
Hobby Shops on Manhattan
torinobradley replied to torinobradley's topic in General Automotive Talk (Trucks and Cars)
Thanks for the reply! I did a search and came up with a couple within a few blocks from our hotel. Just wanted to see if anyone had any specific shops they reccomended. Kinda late notice though. Leaving tomorrow. -
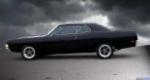
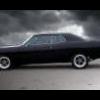
Good looking Formal! Great color on her as well. One thing specific to these Torinos is the windshield trim covers the sides all the way to the side window trim. There is no body color on the A pillar. Easily overlooked. Only someone like me (with a 1:1) would notice it, though.
-
I appologize in advance if this is not where it is supposed to go. In that case, please move. Heading to New York next week and wanted to know if there were any hobby shops on Manhattan worth visiting. Thanks in advance!
-
Out of The Box In Shoebox In-Work Model Storage
torinobradley replied to Skip's topic in Tips, Tricks, and Tutorials
Not only do I store kits I'm working on in them, I also have boxes for complete engines in zip-bags, aftermarket wire, photo-etched/metal/resin detail parts, etc... Easier to grab the box and have all my detail sets right there. Also, they are very handy for rebuilders too. I have two of the flat, under-the-bed ones as well, one is full of bagged rebuilders and the second is my "Junkyard". -
AM Corvette Grand Sport Chassis #4
torinobradley replied to torinobradley's topic in WIP: Model Cars
Wow... Saw this topic and thought "Great! Another GS Vette" then saw it was mine and now I'm ashamed because I haven't done much on it. I got bogged down in this one with every detail so I wanted to do another, less detailed project to re-spark my motivation. I started the Penske '66 L88 thinking it would be an easy one and, well, my "high detail-correct everything wrong with the darn kit" personality took over and that one is another stalled high-detail project. Destined to repeat, got my USRRC Cobra started and we'll see where that one goes... Would love to get this one done as I love the subjects, research and doing the details but it's sometimes hard to scrape out hobby time with an involved family life. Either way, thanks for the reminder and encouragement! I'll try to update this a bit more often than every three years. As for the clips, I have some extreemly fine wire but the trick is bending it to the shape. I don't have a die that small and at that size, even needle nose tweezers look grossly mis-aligned and mis-shapen.