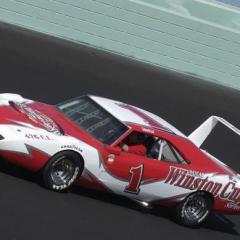
CoyoteCrunch Posted October 4, 2015 Posted October 4, 2015 (edited) Built pretty much box stock. I did add a row of blue flames on the rear, just to add my own personal touch. Made the decals myself. Edited October 4, 2015 by CoyoteCrunch
CoyoteCrunch Posted October 4, 2015 Author Posted October 4, 2015 dont know what or why the pictures are not posting - will try again some other day I guess
aurfalien Posted October 4, 2015 Posted October 4, 2015 At least the links work and man that thing is hot.I'm really starting tp appreciate the drag, altered, funny etc class vehicles.
Harry P. Posted October 4, 2015 Posted October 4, 2015 Click on the "Share" link, then copy the URL info and paste it here...
CoyoteCrunch Posted October 4, 2015 Author Posted October 4, 2015 Thanks Harry P - it worked! I do appreciate it!!
HotRodaSaurus Posted October 4, 2015 Posted October 4, 2015 A great model from probably the most colourful Funny car era. Who would be your favourite, a driver or a make of car? Would it be the Hawaiian If dad drove a Charger or Chevy because mum drove a Vega, despite both running Chrysler based engines with the occasional Ford thrown in Homemade decals wow, these look as good to me as originals, probably better in close up. How about a tutorial?
DeeCee Posted October 4, 2015 Posted October 4, 2015 A beautiful build mate, i know the work you put into this one, and i am impressed !!!
disabled modeler Posted October 4, 2015 Posted October 4, 2015 Man that is nice Tom...really cool build...
CoyoteCrunch Posted October 4, 2015 Author Posted October 4, 2015 A beautiful build mate, i know the work you put into this one, and i am impressed !!! Hey - Dale!!! I know you man!! Too cool!! Thanks bud And thank you everyone else. This was a fun build, As far as a tutorial on decals. I will take some pictures of the steps I do when I make another sheet and post them. I just use the regular Testors decals sheets, and decal bonder spray. I Googled some flames pictures, saving the image to the computer. Then I start a document, insert the picture, stretch it and size it to what I want. I do this so I can cut out the decals and lay them against the model to see if they need re-sizing for where I want to place them. The biggest tip I could give would be to test print, several times, using the "draft" option so you do not waste so much ink each test print. Once you have sized everything, and when you are ready, put a piece of decal paper on a page you test printed. The Testors sheets are like 1/2 the size of a regular 8 x 11.5 sheet of paper, and depending on where and how you have your images on the document to print, it may be in a different area on the page. By test printing, you can move your images to get them to all fit within the size of your decal paper. Then I just tape down the decal paper in each corner, print and spray with the decal bonder and walk away for 24 hours or more. What I need to get and see if it helps is this microsol stuff I have heard about, to see if would help these to be more limber, they are pretty stiff decals. Also, it's not like the kit decals you get, or those made with an ALPS printer. There are two types of Testors decal sheets you can buy, one is a white background, and one is a clear background. If you print on white backing paper, you do get the vibrant colors - BUT - you would have to trim right to the flames, and thats nearly impossible. I mostly make my own when I can use clear backing paper, so I can just cut out the decal I want to use close to the image, But, when using clear backing sheets, you are limited to the color you apply them to. As a rule, if my build is white, anything goes, but like this one, the blue flames only showed on the silver really. Which in this case was ok by me, as I wanted them to blend in if you will with the cars blue paint job. This reminds to get to work on your decals Dale I keep forgetting about them!
HotRodaSaurus Posted October 4, 2015 Posted October 4, 2015 Many thanks for that quick tutorial But yes the pic steps would also be a great help. These big scale funny cars and dragsters were great back then(still are now) but here in the UK we saw so few of them.
Silver Foxx Posted October 4, 2015 Posted October 4, 2015 A nice looking build , lots of great detail work .
CoyoteCrunch Posted October 5, 2015 Author Posted October 5, 2015 Thanks again everyone - I must say I do like this build. Thinking to do another, but some other paint scheme - Hmmmm.....
CoyoteCrunch Posted October 25, 2015 Author Posted October 25, 2015 Thank you Danno and Magic M - was a fun build, I recommend to all.
426-Hemi Posted October 26, 2015 Posted October 26, 2015 Built pretty much box stock. I did add a row of blue flames on the rear, just to add my own personal touch. Made the decals myself. Can it be.... Tom? CC? -Bet you can't guess who I am LOL
CoyoteCrunch Posted November 1, 2015 Author Posted November 1, 2015 I remember you Hemi - oh yes - I do!!Especially the thong in the sleigh build!!! LOL
Twokidsnosleep Posted November 2, 2015 Posted November 2, 2015 Superb build, hit it out of the parkGotta love this era of funny cars
Recommended Posts
Create an account or sign in to comment
You need to be a member in order to leave a comment
Create an account
Sign up for a new account in our community. It's easy!
Register a new accountSign in
Already have an account? Sign in here.
Sign In Now