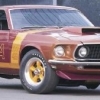
bogger44 Posted February 6, 2016 Posted February 6, 2016 Here's my first completion of 2016. Painted in factory color Grabber Orange from a Model Master rattle can. I updated it to a '70 by adding the hood stripes and a chin spoiler. The front splash pan is too wide for the body, so I cut it in half and narrowed it by maybe 1/16th? of an inch (I just eyed it up). I had to do the same with the chin spoiler as well as reshaping it a bit for a better fit. I robbed it from a beater Revell '69 Mach 1 I've got. Oh yeah, I also molded the splash pan into the body, and in doing so pretty much obliterated the side marker lights, so I just trimmed out some BMF in their shape and put them on the body. The rear taillight panel/valance was a bit of a pain to get in decently. It's still not a great fit, but it was the best I could get it. Other than that, it was a pretty easy and straightforward build. Thanks for checking her out and any comments/questions.
Snake45 Posted February 6, 2016 Posted February 6, 2016 Very nice indeed! I've built two of these and had exactly the same problem with the front pan that you did on both. Well done!
landman Posted February 6, 2016 Posted February 6, 2016 Love it. I'll watch out for the pan when I get to the one on my stash.
tomsheehy Posted February 7, 2016 Posted February 7, 2016 Beautifully done, love the "Grabber" colors on these...
Sixties Sam Posted February 7, 2016 Posted February 7, 2016 Very nice, clean build! Great paint and engine details. Great work!Sam
Old Nasty Posted February 7, 2016 Posted February 7, 2016 Very well done. Where did you get the Torque Thrust mags? Did they come with the kit?
W-409 Posted February 7, 2016 Posted February 7, 2016 That's very nice, probably the best '70 Shelby that I've seen in a long time! Really nice and clean work all over, good looking paint job and sharp BMF. Those wheels and tires look just right too. Great job.
bogger44 Posted February 7, 2016 Author Posted February 7, 2016 Thanks guys. Very well done. Where did you get the Torque Thrust mags? Did they come with the kit? I stole those from the Revell '68 Mustang GT. They really did a good job on them IMO.
Dann Tier Posted February 7, 2016 Posted February 7, 2016 Here's my first completion of 2016. Painted in factory color Grabber Orange from a Model Master rattle can. I updated it to a '70 by adding the hood stripes and a chin spoiler. The front splash pan is too wide for the body, so I cut it in half and narrowed it by maybe 1/16th? of an inch (I just eyed it up). I had to do the same with the chin spoiler as well as reshaping it a bit for a better fit. I robbed it from a beater Revell '69 Mach 1 I've got. Oh yeah, I also molded the splash pan into the body, and in doing so pretty much obliterated the side marker lights, so I just trimmed out some BMF in their shape and put them on the body. The rear taillight panel/valance was a bit of a pain to get in decently. It's still not a great fit, but it was the best I could get it. Other than that, it was a pretty easy and straightforward build. Thanks for checking her out and any comments/questions. The nicest, cleanest build of this kit I've ever seen!! Perfect color, and wheel/tyre choice. AMT Parts Pack tyres?
D. Battista Posted February 8, 2016 Posted February 8, 2016 Beautifully done, love the "Grabber" colors on these...Great craftsmanship....!
Canso65 Posted February 8, 2016 Posted February 8, 2016 Very nice clean build. All of the details you added are awesome!
Ulbo Posted February 8, 2016 Posted February 8, 2016 Fantastic built. Very clean and good paint job, especially great choice of color. Like it vey much!!!
Helix Posted February 8, 2016 Posted February 8, 2016 Very nice Tony, good colour choice, nice details....well done
bogger44 Posted February 11, 2016 Author Posted February 11, 2016 Thanks again guys for the comments. I absolutely love these in Grabber Orange, so it was a no-brainer when it came to color choice lol. The nicest, cleanest build of this kit I've ever seen!! Perfect color, and wheel/tyre choice. AMT Parts Pack tyres?Yep, those are the beautifully done AMT pieces.
Dann Tier Posted February 11, 2016 Posted February 11, 2016 Thanks again guys for the comments. I absolutely love these in Grabber Orange, so it was a no-brainer when it came to color choice lol. Yep, those are the beautifully done AMT pieces.Agreed
Recommended Posts
Create an account or sign in to comment
You need to be a member in order to leave a comment
Create an account
Sign up for a new account in our community. It's easy!
Register a new accountSign in
Already have an account? Sign in here.
Sign In Now