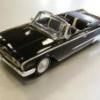
Ron Hamilton Posted September 30, 2016 Posted September 30, 2016 2016 Chevrolet Camaro SS - AMT by Round 2 Kit #A978/978M20D- 1/25 Scale This review is on the “Full Detail” version of the 2016 Chevrolet Camaro SS Coupe from AMT Models, which contains 106 Pieces + Decals. The manufacturer of this model kit also offers a simplified version of this car with less detail, in that the hood is fixed, with no engine, a well-engraved. Chassis with wire axles, in other words, an unassembled promo. This kit marks the return of newly tooled “full detailed” model kits from this manufacturer, and I am quite satisfied with this offering. Let’s take a look at what is in the kit. When I review a kit, I like to “Pre-build” it, in other words I will prepare the body and other parts for paint (removal of mould lines and seams, filling seams and blocking), glue together multiple piece parts that are painted the same color, i.e. the engine, suspension, and seats, and dry fit them to the car. I will also mount the wheels and tires to the car, so that I can see how the car sits as it comes from the manufacturer. If I choose to make any changes, it is easier to do so before the paintwork. In the case of this model kit, the results can be pretty good for some modelers. There is quite a bit of detail in this kit, and the fit of some of the assemblies is ”fiddly”, to say the least, so if you have never tackled a “Full Detail” model kit, or if you are looking for instant gratification, I suggest that you get the other version of the kit. First and foremost before you tackle either version the kit, I suggest that you read the instructions in order to understand how, and where the parts go, painting instructions, and decal placement. There is a comprehensive paint chart on the first page of the instructions, which I found is accurate for most of the various assemblies, save the body and its associated parts, and interior trim colors, other than Black. I suggest that you use paint that is meant for use on styrene plastics. I like to use acrylic paint from Testors or Tamiya, as they clean up easily with water, or their thinner, and will spray through an airbrush with good results if the manufacturer’s instructions are followed. One final suggestion. If you do not have access to the real car, go to www.Chevrolet.com, which has a comprehensive section on the 2016 Chevrolet Camaro SS, colors, trims or optional equipment. I am quite fortunate in that there is a large Chevrolet dealership close to my home, with a very good assortment of Camaros. I was able to see the various details which are a great help in decision making concerning the various colors used on the car. Let’s look at the various assemblies per the instruction sheet: The engine assembly consists of a 12 piece iteration of GM’s 6.2 Liter LT1 V8 engine and 6-speed Manual transmission. The assembly is well engraved, and with the exception of the exhaust manifolds, go together well. There are no tabs on the cylinder heads to locate the exhaust manifolds so extreme care must be taken to make sure that they are in the correct place in relationship with the exhaust pipes. As installed in the model with the engine cover installed, it looks like the real article, once properly detail painted and decaled. The front suspension assembly is quite unique in that it has a feature that allows the front wheels to be poseable. The system works pretty well, and once the lower suspension is attached to the chassis, the overly out of scale tie rod will be hidden. There is also good disc brake detail. The kit wheels are a good representation of the 20” Split Spoked wheels offered on the Camaro. I question the use of bright chrome plating on the kit, as they do look great on the model; current trends in the real world utilize different finishes on the wheels from the factory. The soft vinyl tires, while they have no manufacturer’s logos, are a good representation of performance uni-directional tires. The rear suspension assembly is 13 pieces, and represents the factory independent rear axle with a well-defined center section, half-shafts, the suspension cradle links and arms. The rear disc brakes are well-defined, and mount over the ends of the half-shafts. There are also well defined upper and lower rear control arms, as well as the rear sway bar with links. The lower control arms and engine cradle is a simplified, well-engraved part, which along with the separate upper control arms allow the front suspension assembly to mount into the chassis with tabs on their edges, as well as the transmission mount, which positively mount into holes on the chassis pan, which should be painted body color without a gloss finish. The rear tire/wheel assemblies mount onto the rear disc brakes at this time. The exhaust system consists of 11 pieces, which include a set of exhaust pipes, a separate muffler, mounting links, and 4 chromed exhaust tips. These assemblies are well-engraved, and mount to the chassis in the same manner as the suspension. The 11-piece interior assembly is also well done, with a separate floorboard with the rear seat, package tray, and floor console moulded in. The left and right interior sides are separate parts, as are the dashboard, two-piece front bucket seats, steering wheel, column, and shifter. The engraving is top notch, and there are decals for the instruments, radio cluster, seat emblems, and steering wheel center. Note, the Instructions call for the interior to be painted Flat Black, which is the predominant interior color on most Camaros, but there are different color variations available for the seats, carpet, headliner, door inserts, and headliner if you choose to go that route on your build. Also not noted in the instructions, there are aluminum accents on the doors and instrument panels, floor console, and the air conditioner vents are chrome plated on the real car. The completed engine assembly mounts into the chassis with tabs that positively mount it securely to the engine cradle and chassis floor. The radiator framework has a cooling fan which mounts to it, but curiously no radiator fin detail, which will be hard to see once everything is assembled. There is also an upper inner fender detail, which is very well engraved, and is very important, as it is the central mounting point for the chassis to be properly aligned with the body, and should be painted predominately body color, with black added to different moulded in parts on it. The cooling hoses, coolant tank, and air cleaner mount to it, and the engine. The body is the star of the show, and it does not disappoint. The shape is accurate, well engraved, and represents the one-to-one as well as any model I have seen. There are a few mould lines to be addressed. Most of them are on the fender edges, and are easily removed; however there are a couple on both rear quarter panels and the sail panels that will require a bit more work to remove cleanly. I used a combination of mild sandpaper, and various sanding sticks to remove them, as well as level out a couple of mild sinks on the roof, the panel in front of the hood, the hood, and rear deck spoiler. If you are careful, an additional application of filler will not be necessary to make these areas smooth. There are a total of 17 pieces on this assembly, which include the wipers, grilles, headlamps, mirrors, glass assembly, headlamp and running lamp lenses. The glass assembly has the edges of the windshield, rear window, and rear quarter windows edged from the inside with black, which gives a nice effect, and saves the builder a lot of work. Also on the glass unit is rear defroster detail, which gets mixed reviews. It looks nice, but to me it is rather pronounced in the color used, and scale thickness of the elements. It may have come off better if a darker color was used. The exterior mirrors mount via tabs which mount in the sides of the doors using pre-drilled holes, which attach to the car cleanly. The mirror caps and arms are body color, but the head detail should be handled with your choice of foil or chromed Mylar, which is not included. The top of the firewall where the windshield wipers mount should also be painted a semi-gloss black, but this step is not noted in the instructions. Also I suggest that you deepen the door and trunk shut lines. The final assembly consists of the body drop onto the interior and chassis assemblies. The interior assembly mounts to the chassis assembly by way of pegs on the chassis pan, which align with appropriate holes in the floorboard hidden by the seats, and a tab under the rear package tray. The body should easily slide over the wheelhouses, where I feel the edges of the wheelhouses and the under-hood structure be the gluing surfaces to the corresponding edges of the body. The hood is a separate part, with a good under-hood detail, but no hinges. The rear spoiler mounts to the trunk lid in the same manner as the side mirrors, and the well-executed pre-painted tail lamps, rear valance panel, and license plate finish the assembly process. From my research from the internet, and real cars, this model kit represents the 2SS version of the car, which is the well-equipped version of the car in the one-to-one world. The factory exterior color choices on the 2016 Chevrolet Camaro SSare: Black White Red Hot Silver Ice Nightfall Gray Blue Velvet Metallic (dark) Hyper Blue Metallic(bright) Bright Yellow Tintcoat* Garnet Red Tintcoat* Mosaic Black Metallic* While the instructions do not mention it, the standard SS hood vents are Gloss Black, with color-matched vents optional equipment. On the decal sheet, a set of black sport stripes are included, which accent the car, and are optional. The factory leather interior color choices on the 2016 Chevrolet Camaro 2SS are: Jet Black w/ Gray accents Medium Ash Gray w/Black accents Kalahari (Rich Tan) w/Black accents Black w/Adrenaline Red Inserts* Black w/Ceramic White Inserts* In the Gray interior, the headliner, door inserts, and carpets, as well as the seat cushions are Gray. In the Kalahari interior, the door inserts and seat cushions are Kalahari. In all other cases, the interior is black, with the exception of the door inserts, which are Red, with the Red seat inserts, and White, with the White seat inserts. A coordinating color for the front of the console can also be added as an option from the factory. The factory wheel choices with the split spokes are: Gray with Machine Silver edges Bright Silver Painted Low Gloss Black I am happy with this kit, I hope that the manufacturer can follow up with more. Can we say 2017 F150 Supercrew 4X4 Short Bed, 2017 Dodge Charger or Challenger Hellcat, 2017 Chevrolet Silverado K1500 Z71 Short BedCrew cab w/ Short Bed, 2017 Ford Police Interceptor (Sedan or Sport Utility), 2017 Chevrolet Tahoe, or Suburban with a Police Version? Please? Ron Hamilton By the way, if it was not for Tim Boyd's excellent review of the kit, I would have waited to buy and work on this kit. Thanks Tim!!!!!
mikemodeler Posted September 30, 2016 Posted September 30, 2016 Love the off road ride height.I noted that as well. Hopefully it is a simple fix as the kit sounds like a winner otherwise.
chadrob30 Posted September 30, 2016 Posted September 30, 2016 Love the off road ride height.It's the Z71/SS package.
Nova-ss Posted September 30, 2016 Posted September 30, 2016 The ride height looks like there is no engine in it.it has to set down.maybe that a bit out of the spring up front to get it to set down.thats what I'll be doing to mine.there seems to be some wild colors on the net.I'm thinking the yellow or orange.I spec will see the 50th anniversary camaro next year......Chris
Nova-ss Posted September 30, 2016 Posted September 30, 2016 Thanks Ron for your smokin and informative review.I enjoyed the colors available on interior an exterior. your reseach helped me..thank you....Chris
Ron Hamilton Posted September 30, 2016 Author Posted September 30, 2016 (edited) Love the off road ride height.It hunkers down pretty good once the underhood area and chassis is glued in. About 1/4" in front, and 1/8 in back. I tested it. Edited September 30, 2016 by Ron Hamilton
martinfan5 Posted October 1, 2016 Posted October 1, 2016 It hunkers down pretty good once the underhood area and chassis is glued in. About 1/4" in front, and 1/8 in back. I tested it.Alright, good to know
Recommended Posts
Create an account or sign in to comment
You need to be a member in order to leave a comment
Create an account
Sign up for a new account in our community. It's easy!
Register a new accountSign in
Already have an account? Sign in here.
Sign In Now