mecklm Posted October 27, 2017 Posted October 27, 2017 (edited) Here's the first of quite a few 1/160 (N scale) antique trucks I will be building. They will have been built from 1910 to 1930 and generally fall in the 1 to 5 ton size range. Back in the mid 80's, my fascination with model trains took an extreme turn when I decided to model N scale narrow gauge equipment. My primary interest revolved around scratch building the small geared locomotives and supporting items necessary for logging in the backwoods and mountainous areas. Of course, key items necessary to depict a complete and accurate scale scene are era correct vehicles. However, vehicles that fit my 1910-1930 time frame were nonexistent in N scale. Fast forward ten years later to the mid 90's and I couldn't wait any longer for model suppliers to create vehicles for my working era. I decided then to create my own trucks and do it in such a way as to make them available to other modelers in kit form. My first attempt was the well known Mack "bulldog". My desire for accurate details ended up requiring a multitude of media, including resin and metal casting and photo etching. While the results met my goals of accurate detail, in the long run, it proved too complex and expensive to offer any for sale. Having spent nearly 6 months designing and building the Mack, I decided it was altogether too labor intensive to try to create any additional trucks. Fast forward to a few months ago and my dreams for accurate, era correct truck builds finally seemed possible, both technically and financially. 3d printing is the manufacturing process that makes this feasible. Using some old, 1/24th scale plans, I set out designing my first build, a 1922 International Model 61 3-ton truck. I intentionally chose this one since the plans only showed a bare chassis, meaning I could focus on the truck only and keep things simple for the first design and build. I quickly found that the majority of detail elements would be at or below the minimum printing size requirements so quite a bit of time was needed to enlarge all of these elements to allow successful printing yet still attempt to present accurate details that didn't come across as way oversized and toy-like. So, this is the 3d CAD file I ended up with. First image shows the built-up truck, second image shows an exploded view and the third image shows the as-printed configuration, with a central sprue tieing all the parts together. In my next segment I'll show the 3d print and how I prepared it for the build. Stay tuned... Mike Edited October 27, 2017 by mecklm Typo
mecklm Posted October 27, 2017 Author Posted October 27, 2017 (edited) Okay, below are some pictures of the 3d print, as it arrived and after the individual parts were separated from the sprue. Edited October 27, 2017 by mecklm Missing word
mecklm Posted October 27, 2017 Author Posted October 27, 2017 Here are the parts after being clipped off the sprue... I found this particular cutter to be absolutely perfect for snipping off the parts...
mecklm Posted October 27, 2017 Author Posted October 27, 2017 Next step in the process is a 24 hour soak in a mix of tap water and Dawn dish detergent. This removes most of the wax and oil residue from the parts. That's actually a different truck soaking than the subject build... I forgot to mention, I'm using Shapeways for the printing service and the material is their "frosted extreme detail".
mecklm Posted October 27, 2017 Author Posted October 27, 2017 This photo shows one of the downsides of the printing process for the FED material... The fuzzy areas are a boundary zone between the plastic and the wax used as a support structure. Since details like the wheel spokes are right at the allowable minimum print size of 0.3mm (0.012"), it kind of precludes conventional clean-up tools and techniques. What I found as the ideal solution to this problem is what is referred to as an air eraser - basically an air brush sized instrument that blows abrasive media rather than paint. Here's the one I chose, and I'm using baking soda as the abrasive... This next photo shows how nicely the baking soda cleans up the parts...
mecklm Posted October 27, 2017 Author Posted October 27, 2017 (edited) Once the parts have been soaked and then blasted, I super glued plain, round toothpicks to each one, making sure it was at the most inconspicuous spot possible. The parts then got several light coats of gray primer (Grey Surface Primer 73.601). I'm using Vallejo model paints for everything except shiny chrome, for which I use a Molotow pen (Liquid Chrome 4mm 703.103), "decanted" and applied with a small paint brush. Tomorrow I'll post some photos as the painting process gets underway. Mike Edited October 27, 2017 by mecklm Added paint info
mecklm Posted October 27, 2017 Author Posted October 27, 2017 Upon first glance, you may have thought you were looking at a Mack bulldog, given the unconventional radiator placement that was surprisingly often used in those early years. However, this is, in fact, an International truck. Apparently, the very early Model 61 builds had the radiator placed behind the motor. In later years, the radiator was moved to the front, giving this truck an appearance not unlike many other trucks of the day.Since I am fond of models that are a little bit out of the norm, I definitely had to work with this early version and not one of the later styles. Mike
Chariots of Fire Posted October 27, 2017 Posted October 27, 2017 You've done some amazing work, Mike. Thinking outside the normal modeling box for sure!
Jim B Posted October 27, 2017 Posted October 27, 2017 That's pretty incredible. I guess the plus side of this scale is the completed models don't take up all that much room.Do you have any photos of your layout?
mecklm Posted October 27, 2017 Author Posted October 27, 2017 Thinking outside the normal modeling box for sure! Thanks Charles. Based on your avatar, I had a feeling you'd appreciate the subject matter. I think you'll get a kick out of the next few builds that are already in progress.
mecklm Posted October 27, 2017 Author Posted October 27, 2017 Do you have any photos of your layout?Hey Jim, you're correct - I'll be able to fit the first five trucks on one palm.Regarding the layout - well, after a few false starts over the years I realized I was trying to create a layout largely because that's just what was expected. I didn't enjoy too many aspects of building a layout and discovered it really felt more like work than a relaxing hobby.My true enjoyment comes from the planning and building of the variety of models associated with model railroading, especially the vintage vehicles that these build threads will be dedicated to.Once I get a few of these trucks successfully built, I think I'll create a small warehouse diorama to allow displaying them in a meaningful context.
Foxer Posted October 27, 2017 Posted October 27, 2017 Thanks for this post showing the process. I've done a few 3D printed parts and showing how cleaning with that "airbrush" helps.
mecklm Posted October 27, 2017 Author Posted October 27, 2017 Okay, back to the truck build. You may have noticed the roof construction in the CAD image above, and how it's basically a convex panel supported by four posts fastened to the corners of the cab. There was no question that these four posts would not be possible as part of the print. What I elected to do was provide holes in the cab and the underside of the roof and cut the posts from some brass rod (wire). I used 0.008" diameter rod, which equates to 1.28" in 1:1 - not too bad, especially considering it would be fairly strong given the short lengths. As accurate as the printing process is, I still had to chase the holes, mainly to remove that plastic/wax boundary layer. I happen to have a variety of micro drills so I used a 0.21mm diameter (0.0083") to clear out the holes. To be honest, a #80 drill would have worked just as well as sometimes a little extra clearance can be an advantage. I cut the four rods long and fastened them to the cab with super glue. At this time I also cut the parking brake and shift levers to correct length and fastened them to the floor. I used 0.006" diameter rod for these two items. Here's where we now stand... I put a tiny spot of white glue at the ends of the parking brake and shift levers to represent grips, knobs or any other contraption that might be found at the ends of these levers. Next up I trim the four roof posts and fasten the roof to the cab permanently. Mike
bigred63 Posted October 27, 2017 Posted October 27, 2017 Wow, I like it! I will be following this build. I have ordered some 1/87 truck parts from Shapeways, just now need to put them together.
Chariots of Fire Posted October 27, 2017 Posted October 27, 2017 I've done some HO scale trucks and I thought those were a bear to work on! I can't imagine trying to work on something that is only half as big! One thing I know! I would not try and plumb the engine!
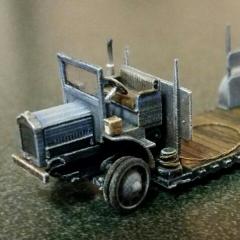
mecklm Posted October 27, 2017 Author Posted October 27, 2017 As mentioned, I cut the roof posts long to be able to get them all the same height. I cut a plate of styrene that matched the theoretical distance from the bottom of the cab to the top of the posts. I also had to create a styrene plate that fit against the bottom of the cab and form the surface on which the other plate would rest. I needed this plate because the bottom face of the cab has two protrusions that mate with two holes in the top of the frame for locating purposes. Here the roof has been permanently attached to the posts and all parts have been sprayed Clear Orange (70.956). You can see the fenders in the background have received the first detail paint by way of the black portion of the running boards.
mecklm Posted October 27, 2017 Author Posted October 27, 2017 Here the rest of the detail painting is complete... Next up will be a black wash followed by a lightened mix of orange for the interior portion of the major body panels. Last will be a pure white dry brush along all the panel edges. Once that's wrapped up the final assembly should go really quick. Mike
mecklm Posted October 27, 2017 Author Posted October 27, 2017 Finally, here are all the parts after getting a black wash. You'll note the frame also received a black wash. This is the very reason you never paint black parts with black paint, at least in the model railroading world. Floquil used to have a "black" paint that they referred to as "grimy black" and that was the go-to color to represent black parts. In reality it was a dark gray. But using this lighter shade allows you to add shadows with a black wash, which really adds to the depth of the part. Somehow I failed to snap a photo of the next step which is a dry brush of a lightened mix of the orange paint. Likewise, the frame received a similar treatment with a lightened mix of the dark gray. Lastly, all the parts got the dry brush treatment with pure white. This was concentrated on all edges as a highlight. Only thing left is assemble all the parts together. Mike
mecklm Posted October 28, 2017 Author Posted October 28, 2017 It was a little awkward taking photos during the assembly stage so I went straight from the final painted parts to the completed build. I need to empty out my photo booth so I can get some decent photos of the truck. Once I do that I'll create a new post in "under glass". If anyone really wants to see photos as each part is attached, please let me know and I'll see what I can do on the next build. Thanks for humoring me and checking out this build. Mike
Jim B Posted October 28, 2017 Posted October 28, 2017 Awesome build, Mike. Very nicely detailed for something so small.
Chariots of Fire Posted October 28, 2017 Posted October 28, 2017 Now for the stake body with individual pieces.
mecklm Posted November 10, 2017 Author Posted November 10, 2017 I knew I wasn't going to leave this truck bare and I had some free time this past week so I drew up this refrigerated box based on several photos I downloaded. Back in this era, these truck boxes were cooled the same as the "reefer" railroad cars - using big blocks of ice. Hard to see in these photos but there are hatches on the roof for loading the ice. There's also various side doors for access. Right next to the cab is a drain pipe to get rid of the water as the ice melted. I couldn't get any good images of the inside so I did some generic studs and partition - basically what I imagine the inside could have looked. I already did the 24hr Dawn soak so next up I'll blast with some baking soda, prime and then match the orange paint of the truck. This one will remain rather clean when it's finished. Thanks for looking. Mike
mecklm Posted November 12, 2017 Author Posted November 12, 2017 Here are images of the CAD file for the "reefer" body. It's easier to see the intended details this way, at least until I get the real parts painted and detailed. Mike
Flat32 Posted March 9, 2019 Posted March 9, 2019 Fascinating. This thread came up when I was searching for air eraser and besides the baking soda being used on 3D prints the subject trucks are a special interest of mine. The detailing of tiny parts is my current problem and seeing this done in N scale gives me hope. Most interesting is the CAD mastery and adjusting for print-ability at very small scale. Very good result that can be even better with 10 micron DLP printing. Mack and International were intertwined companies.
liberty22 Posted August 25, 2022 Posted August 25, 2022 1/160 1922 International Model 61 3-ton truck or the 1/24 scale. Good day Our fire company had a 1922 International, just like yours. I have been searching for model or toy for years. The 1/160 is small but very nice. the 1/24 scale any information on that, can you do a 3d scale in that? let me know Please Thank you Mike
Recommended Posts
Create an account or sign in to comment
You need to be a member in order to leave a comment
Create an account
Sign up for a new account in our community. It's easy!
Register a new accountSign in
Already have an account? Sign in here.
Sign In Now