adamelvis Posted February 1, 2022 Author Posted February 1, 2022 3 hours ago, Mattilacken said: Huge improvement! Almost looks like a Tamiya part now ? LOL ! Yes, it does. As a matter of fact, the next two models in my “Paul Walker Tribute” series are the Supra and Skyline kits from Tamiya. Looking forward to those future builds. ? 1
Steve H Posted February 1, 2022 Posted February 1, 2022 Hi Adam, you are doing some really nice surgery on this. I had missed this thread, but now I’m in for the ride. Cheers, Steve 1
adamelvis Posted February 2, 2022 Author Posted February 2, 2022 On 1/31/2022 at 7:22 PM, Steve H said: Hi Adam, you are doing some really nice surgery on this. I had missed this thread, but now I’m in for the ride. Cheers, Steve Thanks Steve. Working on engine assembly and interior modifications now.
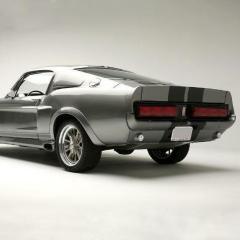
adamelvis Posted February 22, 2022 Author Posted February 22, 2022 Just a clean & simple black door panel. Just added the window cranks. This was the original back seat with the amplifiers, sub woofer and speaker panel and rear hatch cover. This was not the set up in the original Hero Car, so I completely re-purposed all the parts. - Amplifiers were cut out of their original seat position. The speaker panel was made into a sub box and the rear hatch cover was made into the platform that was installed over the back seats. This platform had both NOS bottles (which are seen behind the front seats, when Brian reaches back to turn them on before his first race). Not shown would have been the rest of the back hatch area with the sound system components. Unfortunately, most of this will not been seen as the rear windows will be tinted black. Unless of course …… I hinge the rear deck lid. LOL 3
adamelvis Posted March 12, 2022 Author Posted March 12, 2022 Detailing these seats was a slow & patient process, but I definitely liked the results of the 4-point seatbelt harness. Added the two buttons for the Nos 1 & Nos 2 shots !! 2
Modlbldr Posted March 12, 2022 Posted March 12, 2022 You are doing some great work on this! I love to see how you have been improving on the details. Nice work! Later- 1
Mattilacken Posted March 13, 2022 Posted March 13, 2022 Great work! Watch out for the floor board falling out on you;-) I wonder how that is replicated on the model. 1
bisc63 Posted March 13, 2022 Posted March 13, 2022 Maybe it's your photography, but those door panels have a really nice, leathery appearance! What paint did you use for your "simple black"?
adamelvis Posted March 13, 2022 Author Posted March 13, 2022 1 hour ago, bisc63 said: Maybe it's your photography, but those door panels have a really nice, leathery appearance! What paint did you use for your "simple black"? Perhaps it’s both the paint and the lighting. But I used Tamiya Semi-Gloss Black. Speaker grills were done in Flat Black and the door handles and window cranks were done in Gloss Black. Adam 1 1
adamelvis Posted March 13, 2022 Author Posted March 13, 2022 Added the carbon fiber accents to the dash and center console. 2
adamelvis Posted April 18, 2022 Author Posted April 18, 2022 License To Drive! Had to cut the license plate frame down to size to fit the decal and rear panel. Fun Fact: cut out two slots to show the mesh that will be installed behind the license plate! TCB, Adam
adamelvis Posted April 18, 2022 Author Posted April 18, 2022 Keep those old electric shaver screen replacements. Over the years, I have kept my old screen replacements. The blades and screen is a one unit assembly, so I had to rip it apart to get at the screens. Finally, I have an opportunity to now use these screens as the mesh that is installed behind the air intakes on custom body kits. 2
adamelvis Posted April 18, 2022 Author Posted April 18, 2022 17 hours ago, adamelvis said: License To Drive! Had to cut the license plate frame down to size to fit the decal and rear panel. Fun Fact: cut out two slots to show the mesh that will be installed behind the license plate! TCB, Adam 1
adamelvis Posted April 19, 2022 Author Posted April 19, 2022 Rims & brakes from the AMT kit. Rubber from the Revell kit. 2
adamelvis Posted April 27, 2022 Author Posted April 27, 2022 5 hours ago, Jonathan said: I've enjoyed your work on this! Thank you ! Adam
adamelvis Posted May 3, 2022 Author Posted May 3, 2022 Sadly, this body had to take a bath in Super Clean. First time I had to do this, so went to Walmart and picked up a jug. Had to redo all the body work that I had on there previously. I had a base layer of Tamiya Grey primer, then a top coat of Tamiya white primer. Sprayed a few layers of my Zero Paints Lime green and afterwards I noticed that the plastic body had a bit of a reaction to it all. After stripping it with Super Clean, I can see the plastic body surface is all textured now. Spent a couple days sanding it down as best as I can without loosing too much body contours and edges. I bought Zero paints grey primer and I will stick with the same brand for primer, base & 2K clear. Going to wash it with Dawn, then wipe it down with a cotton pad with diluted thinner. Air dry and then use latex gloves when handling it again, prior to paint. Prime it nice & easy, with 2-3 thin coats. Will wait a few days then spray base color coat with 2-3 thin coasts. Wait another day, then finish off with another 2-3 coats. Wait a week then proceed with spraying the 2K clear. Haven't used the airbrush in about 20 years AND I haven't used basecoat/clear coat paints before either. So, there could have been many factors that might have caused my paint issues: Bad mix, dirty surface, sprayed outside, sprayed too hot, getting old in age... etc. Anyways...... I bought a new air compressor with tank and a new gravity feed airbrush. I will disassemble the new airbrush and give it a good cleaning before my first use. After this, we will see if the techniques and skills pull of a decent paint job !! TCB, Adam
Sandboarder Posted May 4, 2022 Posted May 4, 2022 (edited) I think the thinners in the Zero paint ate into the plastic. Try trying on your spare body the Zero primer and paint first. doing an excellent job on the build as well. You’ve captured some great details!! Edited May 4, 2022 by Sandboarder Spelling 1
Recommended Posts
Create an account or sign in to comment
You need to be a member in order to leave a comment
Create an account
Sign up for a new account in our community. It's easy!
Register a new accountSign in
Already have an account? Sign in here.
Sign In Now