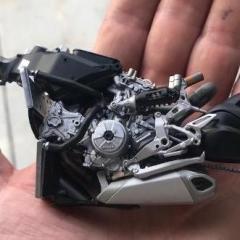
rightrudder Posted January 17, 2022 Posted January 17, 2022 Hi guys, Well, the kit finally showed up this morning and I'm digging right in. Verrryyy impressed with the level of detail here. Noodling on whether to do a resto-mod approach with some Tamiya BBS 3-piece wheels from a Porsche kit, or go relatively stock. I'm not a stickler for factory colors, so I just make it up as I go. It'll be done up in Tamiya acrylics, Metallic Blue for the body and a blue/gray and silver combo for the interior. Here's the body setting on the Tamiya wheels. Rears just barely fit width-wise, and chassis sits level but needs at least a 1/8-in. drop all around to look right. Dunno...the Kelsey-Hayes wire wheels that come with the kit look pretty trick... Here's an example of the detail...not sure how this compares to other AMT stuff as I'm new to the brand. Great sand-casting texture molded into the block. Gotta go with the Tri-Power setup but kit includes a single 4-barrel with a round air cleaner too. Here's the little 390 so far. I'll add some ignition leads at some point, so I pre-drilled "spark plug holes" in the heads. The whole thing is looking a little too shiny, so I'll probably hit it with DullCote before I put the chrome stuff on. Check out how even the valves/valve springs are represented. Last shot is the two sets of tires provided. Lower set accepts plastic inserts for the wide whitewall look, while top set comes as shown with skinny stripe.
rightrudder Posted January 17, 2022 Author Posted January 17, 2022 I posted this on another thread, but here's how the metallic blue looks. I sprayed another test panel over a light gray primer, but it turned out significantly lighter, so I think I'll shoot the paint onto bare plastic that's been sanded. I really like the idea of a somewhat darker, richer blue. The paint sticks like crazy, so I think I'll be fine.
JollySipper Posted January 17, 2022 Posted January 17, 2022 It's nice to see another of these being built! That's a really nice color, too........ 1
rightrudder Posted January 18, 2022 Author Posted January 18, 2022 7 hours ago, JollySipper said: It's nice to see another of these being built! That's a really nice color, too........ Thanks! I just love the lines of the '62. Yours is turning out great! I do think the faired head rest cover is a bit much, so I'll probably display it with an open interior, no roof. Have you reached the dry fit stage yet? I'm curious what needs to be done. I've messed around a little and it looks like the rear seat needs to be sanded down a little for the head rest piece to sit flush, but others have said the interior side panels need to modified in some way for the body to fit nicely. I'm on the fence as far as tack-gluing everything together for this, or just whittling plastic away later and touching up paint on the tops of the door panels.
JollySipper Posted January 18, 2022 Posted January 18, 2022 8 hours ago, rightrudder said: Have you reached the dry fit stage yet? I have a plan as to how I'll fit the interior/chassis into the body....... I want to build up the interior onto the chassis without the engine or suspension, then test fit that. I haven't painted the body, yet, so I can remove any material that needs it from the body. Then I'll finish assembling the guts and paint the body..... Hopefully it will work out without much drama....
Sledsel Posted January 18, 2022 Posted January 18, 2022 Lookin good!!!! Love the color! Interior color thoughts? Personally I'd do the engine black as it came from the factory, but thats me. What release is this? Mine had no options
rightrudder Posted January 18, 2022 Author Posted January 18, 2022 (edited) Hey Andy, Thx!! Gonna go with a blue-gray/silver interior combo. I know these 'Birds came with black blocks, but I just wanted a little more "pop"! This release is from round2models.com So I did the dry fit and the problem was obvious...interior just a little too wide for the body opening, especially near the dash. I used an emery board to taper the tops of the door panels toward the windshield in plan view. You can see that the notches that accept the vent windows are now less than half the original depth. Problem No. 2 is the uneven gap between leading edge of dash and cowl. A little carving and sanding and it's a good fit now. There are some little square gaps where the rear door panels meet the bodywork, so I'll extend a little bit with some styrene chunks before paint. So glad I did the dry fit...would've been more complicated to deal with it later. Edited January 18, 2022 by rightrudder
Oldcarfan27 Posted January 18, 2022 Posted January 18, 2022 I do like the silver steel freeze plugs on the engine block. Nice detail. But don't you think they should be brass, so they don't rust?
JollySipper Posted January 18, 2022 Posted January 18, 2022 Seeing how much material you had to remove, I should go ahead and test fit mine before I get too much further along.....
rightrudder Posted January 19, 2022 Author Posted January 19, 2022 (edited) Thanks guys! TJ, I think the dry fit is worth doing; could save some headaches later. You could enlarge the opening in the body, but it just seemed easier to shave the door panels. Or you could narrow the dash a bit, but then you'd lose the locating tabs on the ends. Patrick, the freeze plugs are done in Testors bronze, but they do look silver in that photo. Waiting on my sheet of PE parts. I started shaving all the script/badges off the car and will use the metal parts. A man's gotta know his limitations, and I suck at painting tiny letters! Edited January 19, 2022 by rightrudder
rightrudder Posted January 19, 2022 Author Posted January 19, 2022 More progress. Got the mighty mini 390 done and the plug wires turned out well. Ignition coil in red is a little too loud, so I'll probably repaint in a different color. PE parts came in and I love the airbox top. Still need to add the PE T-bird badge to the front. Man, is that piece small! I'm glad I got a magnifier setup before this build. On to the chassis and interior. 1
Paul Payne Posted January 19, 2022 Posted January 19, 2022 I'm half wat through a build on mine- what you encountered fit wise will be a big help!
rightrudder Posted January 20, 2022 Author Posted January 20, 2022 5 hours ago, Paul Payne said: I'm half wat through a build on mine- what you encountered fit wise will be a big help! Glad I could help!
rightrudder Posted January 20, 2022 Author Posted January 20, 2022 13 hours ago, slusher said: Good looking detailed engine ?…. Thanks, Carl! I've made a lot of progress...finished up the interior and I'm starting on the chassis. Lost one of the rear shocks...grrrr!...so after spending 30 minutes on my hands and knees looking for it on the carpet, I gave up and made some out of toothpicks and bits of styrene. I posted some interior shots on another thread, but I'll repost here to keep all the build photos together.
rightrudder Posted January 21, 2022 Author Posted January 21, 2022 (edited) Well, I managed to lose one of the shocks, and I couldn't find it after a thorough search. But a toothpick is about the right diameter, so I made a couple and painted them. But here's the problem: shock brackets on the leaf springs lead you to believe it's a staggered setup, i.e. one in front of the axle and one behind. But upper attachment points don't really work with this idea. Maybe I'm doing it all wrong? So I shaved the attachment ears off the brackets and glued the shocks in like so. Good enough for me! Here's the engine installed. A shame that the engine bay is so tight that you can't see a lot of the engine detail on the finished model. I shaved the pins on top of the coil springs. They locate with holes in the body shell, but it's difficult to get them aligned right, and the body already locates super solidly on the frame rails just forward of the engine. Here's the underside. After about 17 attempts to re-glue the broken anti-roll bar, I may just cut it off. If not having it bugs me, I might make another out of piano wire. The piece that comprises the lower control arms, anti-roll bar and steering linkage is the most fiddly, fragile part of the whole kit. It was a race to get the spindles fit and everything aligned before the glue dried. The engine just kinda "floats" on two pins between the freeze plugs on the block, and have no real corresponding holes. It works pretty well, as it's attached by the transmission mount, driveshaft and exhaust system. Edited January 21, 2022 by rightrudder
rightrudder Posted January 21, 2022 Author Posted January 21, 2022 Thanks, guys! I totally appreciate the encouragement. She's a roller now. ? Too tired to post photos, but the stance is just a tiny bit nose-high for my liking. Don't get me wrong, as I think these 'Birds look proper with a little reverse rake. I didn't want to use the optional lowered spindles because I didn't want it too slammed. I may fiddle with the stock spindles toward the end, but it looks good...but not ideal. I think when I paint the wheel wells black it will look lower without all that white plastic showing. Big word of caution when you get ready to fit the wheels. Rears go onto the axle fine, but fronts are really snug. So pre-fit the wheel retainer pieces to the spindles & rear axle and sand/shave things as necessary before you put them inside the wheels. If you have to push too hard, the spindles pop out of the suspension arms and you fear you might break something. Very fiddly and frustrating! Did another dry fit and things are looking good. Need to shave the top of the firewall just a little for body to fully seat as it should.
rightrudder Posted January 22, 2022 Author Posted January 22, 2022 One more observation about the kit...the hood didn't fit quite right, and it turns out that the right edge where it meets the body is noticeably thicker than the left. I don't really care about the detail on the underside of the hood, so I just started carving and sanding away on the right side. Fixed!
bisc63 Posted January 22, 2022 Posted January 22, 2022 Progressing nicely! Learning a lot from this thread.
Recommended Posts
Create an account or sign in to comment
You need to be a member in order to leave a comment
Create an account
Sign up for a new account in our community. It's easy!
Register a new accountSign in
Already have an account? Sign in here.
Sign In Now