CrazyCrank Posted September 10, 2022 Posted September 10, 2022 Morning guys It's an old Revell kit 1:24 of another iconic car, the BMW 507 cabriolet. I bought it 1 or 2 years ago for cheap on EBay This car was supposed to be the direct competitor and rival of the Mercedes 300SL Gullwing, but never really broke through. Only 252 examples were built and BMW lost a lot of money with this production. Elvis Presley bought a pearl-white one during his military service in Germany and brought it back to the United States, where he quickly had it repainted in red, tired of regularly seeing the lipstick marks left by his fanatic admirers on its beautiful bodywork.... funny isn't t ? His car had next a very complicated story and was abandoned during 30 years by his last owner. Fortunately, it was found in 2014 by an automotive journalist in Jack Castor’s pumpkin warehouse near San Francisco, but in a ad state. After many discussions, the car came back in Munich, Germany, where BMW Group Classic finally received in 2016 permission to restore it to its original condition. I've started this one early July and I'm progressing slowly since it will be widely modified to get the trunk, the doors , the fuel flap openable but also because The kit depicts a BMW 507 series 1, while Elvis's one was a Series 2. So a lot of surgery is needed ! What's in the box ?: A lot of clusters (not sure of word is appropriate, "sprues" would be better ? ), with very well done and nicely detailed parts, except for the chrome parts one. Clear parts are just good, a lot of burrs, but no distortion through them. Obviously, this kit is at its time's standards (1991) and the quality can't rivalise with Tamiya's one, but is far better than the MB 300 SLR Mille Miglia one I've decided to paint it Pearl White, as it was when Elvis bought it. As this car has been recently restored, a lot of videos and photos or press articles is available, what will allow to improve the model by correcting any errors and adding as much details as possible in this scale So, let's go for a new adventure 1 1
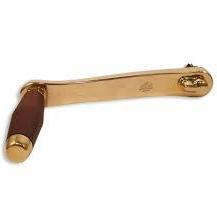
CrazyCrank Posted September 10, 2022 Author Posted September 10, 2022 Hi everybody So, I began the kit with the body and my first job was to cut out the trunk and the doors: But I had a first issue, when the body broke juste in front of the trunk ! I repaired it with some styrene glued by the underside and putty: Next, I strengthened the body on the area of doors and boot aperture, taping some thick styrene structs on the body to enhance its rigidity while working on it. And I glued the nose : And I modified the fuel flap location, which is different between series 1 and 2, and filled with putty the right side mirror location on the kit body (cause it doesn't exist on Elvis's BMW ) Of course, I had to open the body for the new fuel flap: I drawn on Fusion 360 and 3D printed a fuel chute: And I scratch-built the flap hinge: - A short section of 0.6 mm brass tube - Drill à 0,3 mm hole at an end - Thread a 0.3 mm copper rod in the hole, protruding on both sides - Solder the stuffs in-between , right angle, clean etc. I fabricated the second part of the hinge with 2 short sections of square styrene rod 2.0 mm, drilled 0.6 mm on their centre And I installed the system on the inside of the right rear wing, then installed and glued the tank filler neck, and finally adjusted and glued the hatch on its hinge. More on this in a later post Stay connected if you like ? 7
CrazyCrank Posted September 10, 2022 Author Posted September 10, 2022 Well guys Let's get on with it ! Work on the chassis: The bottom of the trunk is absolutely wrong in the Revell kit, whether it's series 1 or series 2 ! I cut out the bottom of the wrong trunk, and scratch-built a new one with styrene sheet. I also began to modify slightly with putty the shape I got, in order to round the angles and join correctly (flush) the walls of the old tank And I began to work on the interior design of the new trunk, above the fuel tank, in order to manage the spare wheel housing. In order to be closer of the real: And I started to work on the trunk lid hinges: But, August 1st, I faced several issues: Not only, while handling, the kit body broke several times at doors level, but I made a major mistake while working on the underside of the the trunk lid, and it distorted to such a point that I couldn't repaired it and remained unusable ! So, I was lucky to find a new kit on "LeBonCoin" ("The Right Place") and I ordered it. And of course, all the job had to be redone ! To be continued 2 1
1959scudetto Posted September 10, 2022 Posted September 10, 2022 This will be another outstanding model, Thierry (I do have it in my stash also, bought the very first release, will build it some day but won't get that far like you). Another famous car belonged to former motorcycle and F1 champion, John Surtees, who got a 507 as a present from his former boss, Conte Agusta, when winning the bike world championship on MV Agusta in 1956. He kept the car all his life, and when he died a few years ago, it has been sold (at an auction, I believe). 1
CrazyCrank Posted September 10, 2022 Author Posted September 10, 2022 5 hours ago, 1959scudetto said: This will be another outstanding model, Thierry (I do have it in my stash also, bought the very first release, will build it some day but won't get that far like you). Another famous car belonged to former motorcycle and F1 champion, John Surtees, who got a 507 as a present from his former boss, Conte Agusta, when winning the bike world championship on MV Agusta in 1956. He kept the car all his life, and when he died a few years ago, it has been sold (at an auction, I believe). You're right ! It's been sold at an auction by BONHAMS, for nearly 4000000 £ on July 2018 13th during Goodwood Festival od Speed. It wasn't a convertible but a Coupé Thanks for the kind praise
CrazyCrank Posted September 11, 2022 Author Posted September 11, 2022 Morning guys My new build with the second began early August, slowly but surely At the moment, I've cut the trunk lid out. The underside of the trunk lid has also been improved, with the addition, as on the real, of a peripheral frame and the housing of closing/opening system (not functional). Furthermore, I dug a groove on the edges of the lid, to reducing its thickness and allowing the installation of a trunk lid seal on the body. The jaws of the trunk closing system were shaped with files from 0.3 mm aluminium plate, after making and testing a temporary styrene template, and they will be glued later. I've begun to redo the underside of the trunk, because the kit one is absolutely false. I've also done the interior of the trunk with the fabrication and installation of the side partitions, those delimiting the spare wheel storage space and the fuel tank, the fuel line from the filler neck to the tank, as well as the removable trunk floor in 2 parts. These last plates will be carpeted later The almost vertical front bulkhead of the trunk has been fabricated, and installed on the underside of the body. I dug a groove on the underside of the horizontal portion of the reinforcement bar, in which I had planned to glue later the alu part of the hinges I made and installed the trunk lid hinges Initially, I thought I would install the hinges in the groove I dug previously on the horizontal portion of the reinforcement bar in front of the front bulkhead of the trunk But it appeared that in this position, it was impossible to open the trunk because its front edge hit quickly the body when lifting it, so, I placed it in front of the reinforcement bar, and trapped it in this position with a second plastic bar stuck on the first one by its underside . At last, I've done the new fuel flap and its hinges. [ All that remains to be done is to 3D print a new chute and glue it in place to complete this part of the assembly. Have a look at the future trunk: Stay tuned if you like ? 6
kelson Posted September 11, 2022 Posted September 11, 2022 Absolutely incredible craftsmanship!!i wish i had this kind of talent. 1
Oldcarfan27 Posted September 12, 2022 Posted September 12, 2022 On 9/10/2022 at 12:29 AM, CrazyCrank said: Stay connected if you like I like, I like!! 1
iamsuperdan Posted September 12, 2022 Posted September 12, 2022 That is some excellent work you're doing! 1
CrazyCrank Posted September 12, 2022 Author Posted September 12, 2022 17 hours ago, kelson said: Absolutely incredible craftsmanship!!i wish i had this kind of talent. Many thanks for this kind praise 13 hours ago, Oldcarfan27 said: I like, I like!! I'm happy to see that my editing pleases passionate modelers Thanks so much for all the photos you posted...of course, I'd already found them....For me it' a proof that you're a passionate 2 hours ago, iamsuperdan said: That is some excellent work you're doing! Thousand thanks, my Lord
CrazyCrank Posted September 12, 2022 Author Posted September 12, 2022 Afternoon guys Time for an update, that is actually 15 days old ? I've redrawn and 3D printed the fuel chute, and also designed and printed the filler cap, on Fusion 360. The first 3D print came out nicely but, while testing the fit, I noticed that the fuel cap was too wide and didn't look realistic, so, I modified slightly my drawings: Hereunder the result of the second 3D printing, very clean and nice I've of course glued in place the chute, The cap is juts put on it for the photo, but I'm going to put it aside for now; it will be painted differently, and will be glued later. Furthermore, I've finished to improve the bottom of the trunk, and primed all the chassis with an automotive grey filler primer, to reveal defects, that have been fixed immediately afterwards I've take inspiration from the first picture below: It remained to add in the trunk: 1/ on the top of the fuel tank: - the fuel gauge - the fuel pump and supply line 2/ On the bottom of the spare wheel housing: - The holding straps of the wheel As on this ref. photo: So, I did them: On the photos below, you'll see the copper fuel lines that I've drawn, but I'm not going to 3D print, since they will be made of real 0.3 mm copper wire. The 3D print of the top of fuel pump came out nicely but the 2 holes were not visible and some details were missing. I so redrew the stuff and I took opportunity to modify slightly the design and to add the top of fuel gauge. [ The slicing under "Chitubox" I cut out on the fuel tank top a housing for the fuel pump: A groove has also be dug above the fuel tank to accommodate this part and the fuel lines, but not above the level of the tank, so that the floor over it will not be wobbly. A little try in place on the chassis before painting them separately and place wiring To be continued 1
absmiami Posted September 12, 2022 Posted September 12, 2022 Crazy C - following your postings on Britmodeler - great stuff - thanks for crossing the Atlantic - do you have this - very good feature - mite be helpful … 1
CrazyCrank Posted September 12, 2022 Author Posted September 12, 2022 32 minutes ago, absmiami said: Crazy C - following your postings on Britmodeler - great stuff - thanks for crossing the Atlantic - do you have this - very good feature - mite be helpful … Wow ! No, I haven't ! ? I just found it on Bay UK and ordered it for cheap bt will: receive it at the latest in 15 days ☹️ What's inside ?
absmiami Posted September 12, 2022 Posted September 12, 2022 If you were American - I would make a joke about Cracker Jack - since you're not: good drawings - cutaway - 3 view studio photography - I think you'll find it helpful let me know ... abs - miami by the way - contrary to what you may have heard - Elvis has, in fact, "left the building" ...
CrazyCrank Posted September 12, 2022 Author Posted September 12, 2022 8 minutes ago, absmiami said: If you were American - I would make a joke about Cracker Jack - since you're not: good drawings - cutaway - 3 view studio photography - I think you'll find it helpful let me know ... abs - miami by the way - contrary to what you may have heard - Elvis has, in fact, "left the building" ... OK, I'm waiting for the delivery to check by myself ! And you can buy a lot of popcorn for the next episodes of my build ? if you like it (my build, and Cracker Jack .."More you see/eat, more you want")
absmiami Posted September 12, 2022 Posted September 12, 2022 they don't have Cracker Jack in France, do they ??
CrazyCrank Posted September 12, 2022 Author Posted September 12, 2022 1 hour ago, absmiami said: they don't have Cracker Jack in France, do they ?? Oh yeh, we can find them: American grocery online and on Amazon.fr: Cracker Jacks on Amazon France
absmiami Posted September 13, 2022 Posted September 13, 2022 4 hours ago, CrazyCrank said: Oh yeh, we can find them: American grocery online and on Amazon.fr: Cracker Jacks on Amazon France Can you get the sugar free Cracker Jacks ? just kidding … 1
CrazyCrank Posted September 13, 2022 Author Posted September 13, 2022 10 hours ago, slusher said: Outstanding detail!! Thank you very much for this huge comment ?
CrazyCrank Posted September 13, 2022 Author Posted September 13, 2022 Afternoon, guys To complete the making of trunk, I had to fabricate the retaining straps for the spare wheel, and the fasteners for these straps Fabrication of the straps: I used: - 0.4 mm Nickel-Chrome wire for the buckles - 0,4 mm brass tube, flated on an end, to make the barb of the belt buckle - Paper-leather to make the straps First, I did the central ring where attached the 2 rear straps and the front fixing one Then, I made the belt buckle and its barb (functional ) I glued 3 straps around the centre ring I glued the belt buckle on the front strap And I fastened the belts to give an idea And, for attaching the 3 holding straps, I needed to install 3 movable buckles in the wheel housing, so I made them: - 0.4 mm Nickel-Chrome wire - A section of about 1 mm length of 1.0 x 1.0 mm styrene square rode, that I drilled 0,5 mm in its centre - Tweezers and a lot of patience - The square rod is trapped in the metal wire before it is shaped - And the buckle can spin around the plastic rod And the same for the 2 other buckles With the straps just pu to see out it comes out: It just remain to cut the straps at the right length when I attach them, at the very end of this build. Then, time came for serious - and risky - things: cutting out the driver's door and fabrication of its hinges and of all the parts that will connect the tub to the body at this level. So I had to find a solution that would allow this cutting in a safe way. And the only option I saw and chose, after thinking about it for several days and checking a thousand times that it was technically and chronologically possible, is not to follow the assembly instructions that ask you to assemble and complete the "bathtub", then to glue it on the chassis, and only then to put the body on top of it! No, you have to do the opposite: - place the bathtub in the body without gluing it, then install the whole thing on the chassis, which allows a perfect positioning of these elements in relation to each other - then glue the bathtub to the body with a few well placed glue dots - Let it set and harden - then take the body and bathtub out of the frame and finish gluing. - Once dry and solid, put the whole on the frame, cut the doors, make the hinges and install them, without gluing them permanently on the doors, make all the missing elements of the inner body, which connect the bathtub and the body - take the whole thing out of the frame - Paint the whole thing, with different masking operations for the body, and the interior - etc... That said and planned, several remarks: The BMW of Revell is a series 1 and the one of Elvis a series 2 I already listed some differences between the two series, but there are others ! 1/ the dashboard is very different.So I have to model and print a new one, and this has to be done BEFORE gluing the bathtub under the body, because necessarily, there will be drawing mistakes that will have to be rectified step by step, and many blank installation tests will have to be done. Of course, it would be much more difficult with my big fingers if the cabin was already fixed! 2/ the rear of the body at the cockpit and soft top housing level is very different, which will require a lot of surgery on the bathtub, in order to stick as close as possible to the real thing Let me show you the differences: Here is a 1 series: (Photos found on the Youtube channel of RMP-Styling.com and other websites) As you can see, there is no room under behind the seats. A partition wall is situated just there, and the car cover housing is placed behind a wide metallic and painted part of the body placed just behind the seats The cover of the car's cover is maintained on the body with 12 eyelet locks Hereunder now various photos of a 2 series: As you can see, there's a large space behind the seats, and the car cover mechanism is placed into it The cover of the car's cover is maintained on the body with only 9 eyelet locks So surgery began on the tub: This is the parts supplied by Tamiya (tub and bulkhead) Hereunder the first phase of the operation: I cut out the excess part of the tub top. And the "dressing" of the part of the bathtub started... The bottom: The left side: The unavoidable gaps between the different walls have been filled with Tamiya Light curing putty, which also strengthens the bonding, and I can assure you that despite the thinness of the rear edge (about 1 mm), it is now very rigid on the left side. Rear and left sides: 3 layers of putty have been applied and sanded. It remained some slight surface imperfections, more visible after I've sprayed a primer coat. To achieve a perfect surface state, I ordered a new spray can of thick primer filler. And achieved the job: Of course, it remained some little imperfections that my iPhone 13's camera highlights, but don't forget that all this part of the tub will be carpeted ! And then, before glueing the tub under the body, I'd first to 3D design and 3D print a new dashboard, and as I guess that several tries will be mandatory before getting a perfect thing, I'll have to test fit the 3D prints on the body to check if they fit correctly with it, the doors and the windscreen frame. This attempts will be easier ro realize if the tub isn't glued on the body. So let's go for some hours on Fusion 360 ? Stay connected if you like 1
CrazyCrank Posted September 13, 2022 Author Posted September 13, 2022 21 minutes ago, 1959scudetto said: Outrageous work, Thierry ! Outrageous ? really ? It's not an outrage to turn a pumpkin into a flamboyant coach ( Cinderella said ?) ?
Modlbldr Posted September 16, 2022 Posted September 16, 2022 Wow! Amazing efforts to get the details right! You're doing a fantastic job on this beautiful little car. I've wanted this kit for quite a while but have yet to get it. After reading through this entire post I'm back on the hunt for one. Thank you! Later- 1
Recommended Posts
Create an account or sign in to comment
You need to be a member in order to leave a comment
Create an account
Sign up for a new account in our community. It's easy!
Register a new accountSign in
Already have an account? Sign in here.
Sign In Now