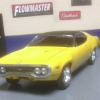
LMDAVE Posted September 14, 2022 Posted September 14, 2022 It's been a while since I've visited the forum, and a while since I've built a car. My wife bought me this kit, and thought I'd give it another go. I've already started some of it, so I'll jump in with a kit intro and where I'm at. I feel it's a pretty simple kit. A bit more cutting off and sanding of the styrene pieces than I'm used to, but all part of the build. I plan to model the kit around this car I saw for sale online (minus the rims). I always like the Mopar Orange color, and I happen to have a can on official Mopar Hemi Orange in my shed from another project. I primed the body first with flat white and gave it two coats of hemi orange, and did a slight wet sand between the coats. Also, started with some of the wheels. I'm getting paint on various parts on the tree and assembling the engine next. 4
Mopar - D Posted September 14, 2022 Posted September 14, 2022 Nice start looking good with Hemi Orange on it. I just ordered one of these kits for a future build. Looking forward to seeing more progress! 1
kelson Posted September 14, 2022 Posted September 14, 2022 If you change your mind on the rims,Revells 70'Roadrunner came with those wheels and hubcaps,but they are 1/24 scale. 1
LMDAVE Posted September 15, 2022 Author Posted September 15, 2022 (edited) I started some sub-assembly and paint on the engine parts. I decided to go red on the engine instead of the traditional hemi-orange (since body color is that). I like the look of red on orange, still need to paint a few items on the engine. Painted most parts either aluminum or flat black, I didn't leave much chrome except a few pieces. Hopefully the assembly of it will look good. Edited September 15, 2022 by LMDAVE 1
Mopar - D Posted September 15, 2022 Posted September 15, 2022 Nice start on your engine Dave. If your interested in 74 Plymouth painted the 400 engines blue. Mine arrived today. 1
LMDAVE Posted September 16, 2022 Author Posted September 16, 2022 Oh I was unaware 74s were all blue. Yeah I could have went stock on the engine color, but taking some liberties on it. Good info though, thanks
LMDAVE Posted September 16, 2022 Author Posted September 16, 2022 Assembled the engine and put it in the engine compartment. Not super thrilled with the detail on it, but it'll do. 1
Sam I Am Posted September 17, 2022 Posted September 17, 2022 A friend of mine has one of these that I helped restore. Petty blue. I have this kit, and will be using the chassis from the 71 Charger...when I get around to it. ? 1
LMDAVE Posted September 17, 2022 Author Posted September 17, 2022 Thanks Slusher. Moving on to some interior work. Wanted to mimic the interior color of the car I'm modelling after. Used an off-white (ivory) emanel for the interior. Will have to dress up the shell. Floor and console will be black, like dash. Bringing out the chrome on the doors panels will be a little challenge. Will have to get me a gel pen to play with.
Mopar - D Posted September 17, 2022 Posted September 17, 2022 Nice progress Dave. I use a 1mm Molotow chrome pen for adding chrome trim on the interiors of my builds. Hobby Lobby sells them.
LMDAVE Posted September 17, 2022 Author Posted September 17, 2022 Thanks for the Info, I had some old Bare-metal foil for my body trim but it’s like 6 years old and the adhesive is super sticky and thick so I’m waiting on more of that to come in. I may go to hobby lobby tomorrow to look for that pen and practice with it.
LMDAVE Posted September 18, 2022 Author Posted September 18, 2022 Did some detailing on the dash this morning to add wood trim. And I decide to just do the chrome bezels with a silver pen because I didn't want it too pronounced on such a small scale instrument panel. 1
LMDAVE Posted September 19, 2022 Author Posted September 19, 2022 Finished up the interior today. No matter how much detail you do, you always feel you could have went a little further. Put flocking in for the carpet. Looks a little shaggy, but hey it was the 70's 1
LMDAVE Posted September 22, 2022 Author Posted September 22, 2022 (edited) Finally got some Bare-Metal foil in and starting some trim work on the body. I tried the Molotow pen, but just couldn't it to flow out consistent enough to work with it. So, I went back to what I worked with in the past, the foil. EDIT: Finished the rest of the chrome trim Edited September 22, 2022 by LMDAVE 1
slusher Posted September 23, 2022 Posted September 23, 2022 Beautiful paint, Dave! I painted mine the same color… 1
LMDAVE Posted September 23, 2022 Author Posted September 23, 2022 Thanks Mopar-D Thanks @slusher , it’s a great color when I saw it on that reference pic at the top.
LMDAVE Posted September 24, 2022 Author Posted September 24, 2022 Switching to the under carriage. Painted the one piece mold with a combination of aluminum and silver sharpie to bring out the pipes, muffler and gas tank. 1
LMDAVE Posted September 24, 2022 Author Posted September 24, 2022 Some misc parts completed, almost ready for final assembly 1
slusher Posted September 25, 2022 Posted September 25, 2022 Very nice work Dave, your getting close! 1
LMDAVE Posted September 25, 2022 Author Posted September 25, 2022 This will probably be my final teaser shot before doing an “under glass” completed. I had a mishap with the decal for the hood. Messed up the small pin strip bezel around hood intake. So made a strategic cut (saw this same mistake on another model). Still have the rest of the decals. Look for the final in the under glass in a day or so. Thanks for watching. 1
Recommended Posts
Create an account or sign in to comment
You need to be a member in order to leave a comment
Create an account
Sign up for a new account in our community. It's easy!
Register a new accountSign in
Already have an account? Sign in here.
Sign In Now