MrMiles Posted June 17, 2023 Posted June 17, 2023 (edited) I got this kit a couple of years ago I think and I kept it locked away. I stored it in a plastic bag so it would be safe. Today I decided it was time to build it. It's been stuck in this box since 1965 (I believe). My kit is missing the parachute and I think the driver only. I guess I will find out. I'm building it as a street car, not a racer Here is my progress The door lines were very shallow so any amount of paint would fill them. I used my razor to add depth. There was also some chips in the doors on both sides in the window area. I fixed that as well Then I removed all the mold lines I could find. Tomorrow I'm going to give a full sanding to clean up the 1000 grit used to get rid of the junk. I will also prep some other parts. One side note. The plastic is incredibly hard. It's really nice to work with. Mine was pretty yellowed but sanding cleaned it right up. Not a ton to look at yet. I spent about 1 or 2 hours only Final pictures Edited June 21, 2023 by MrMiles 3
bisc63 Posted June 17, 2023 Posted June 17, 2023 Fun project, and that box art is the coolest. I've never seen that particular box. Will be following!
MrMiles Posted June 17, 2023 Author Posted June 17, 2023 (edited) 3 hours ago, bisc63 said: Fun project, and that box art is the coolest. I've never seen that particular box. Will be following! If my original research is correct. This kit was released in 1965. It looks like it was reboxed a couple of years later but has a different product number. Originally I wasn't going to build it because it's so old but then I thought that it would be neat to do. No sense in keeping it boxed up. Plus once it's done the box will look the same as it did before. I don't collect models to collect, I do it to build https://www.scalemates.com/kits/mpc-2-149-65-corvette--944622 Edited June 17, 2023 by MrMiles 4
MrMiles Posted June 17, 2023 Author Posted June 17, 2023 The instructions have browned unless they were printed on brown paper. Not sure. I have run my 1500 grit and then I used my 3m pad and polish to clean up the plastic to make it uniform. Washed it up and ready to go.
David G. Posted June 17, 2023 Posted June 17, 2023 Looks like fun, lot's of cool accessories to consider. David G.
MrMiles Posted June 17, 2023 Author Posted June 17, 2023 I got all the pieces primed now and the body is mostly prepped for primer I found the figure. It was in the box all along.
MrMiles Posted June 17, 2023 Author Posted June 17, 2023 (edited) The chassis is painted and dry brushed. I painted the engine as well but it will take a bit to dry before I can continue it. I still have not decided if I'm going to paint the body white or blue. I think I would prefer white. I guess after I primer it I will decide. I'm going to paint the interior blue either way. The razor slipped while working on this and sliced my finger pretty bad. My wife nearly passed out from the blood. Since it's razor thin I don't think it will need stitches Edited June 17, 2023 by MrMiles 2
MrMiles Posted June 18, 2023 Author Posted June 18, 2023 I sprayed the interior a navy blue but it almost looks black. It's too dark but I'm going to keep it as is. I have lighter color flock material so it will help lighten it up
MrMiles Posted June 18, 2023 Author Posted June 18, 2023 (edited) A quick note in case anyone is interested I compare the body shape of this to the 63 amt, 63 revell, 65 monogram and 67 revell kit. All of the ones mentioned are incredibly similar in size and shape. However this kit, the MPC looks much smaller in the roof area. It also doesn't peak out in the roof by the windshield. I suspect this is the least accurate for the body shape I can take pictures of them all side by side so you can compare Edited June 18, 2023 by MrMiles
ea0863 Posted June 18, 2023 Posted June 18, 2023 I'm digging your build! And I'm with you; I don't care if it's a 50 year old model in a sealed box going for $200 on ebay, it was meant to be built!
David G. Posted June 18, 2023 Posted June 18, 2023 The chassis looks great. Sorry to learn of your injury, I hope it heals well for you. David G.
MrMiles Posted June 18, 2023 Author Posted June 18, 2023 Here is the engine. The paint wasn't fully hardened but the ford engine I painted almost 2 weeks ago with the same brand is still not dry so I decided to glue the transmission on and hold it from there. Hopefully the glue holds ok. I need to put on the starter still and paint the oil filter. I started to detail the interior as well and need to put the flocking for the carpet 1
MrMiles Posted June 18, 2023 Author Posted June 18, 2023 I tried a black wash on the engine. Looks a little better 2
MrMiles Posted June 19, 2023 Author Posted June 19, 2023 oof, the working suspension is dog poo on this. im gluing it down in place because any movement and the axle falls off. i will let it sit overnight and hope that it holds for good
MrMiles Posted June 19, 2023 Author Posted June 19, 2023 (edited) The glue looks like it held against the spring. Unrelated I looked at my finger where I cut it and the skin around it is dead and completely pale. Anyway, I think on the Corvette I just need to primer and paint the body and finally put everything together. All the other bits have been painted and detailed. Edited June 19, 2023 by MrMiles
David G. Posted June 19, 2023 Posted June 19, 2023 It looks like the flocking turned out well. David G.
MrMiles Posted June 19, 2023 Author Posted June 19, 2023 (edited) 3 minutes ago, David G. said: It looks like the flocking turned out well. David G. It's not actually flocking material. I use embossing powder. This one is straight navy but typically I mix a little if a different color like the 2 shades of green to make it not straight one solid color. For the navy I didn't have another color close Edited June 19, 2023 by MrMiles
Ace-Garageguy Posted June 20, 2023 Posted June 20, 2023 (edited) Starter's on backwards, upside down, and the small diameter projection on the kit part should stick into the bellhousing. Edited June 20, 2023 by Ace-Garageguy CLARITY and ACCURACY
MrMiles Posted June 20, 2023 Author Posted June 20, 2023 4 hours ago, Ace-Garageguy said: Starter's on backwards, upside down, and the small diameter projection on the kit part should stick into the bellhousing. i actually fixed that this morning, thank you 2
MrMiles Posted June 20, 2023 Author Posted June 20, 2023 i finally primer the body. tomorrow i will paint it. im going with the blue. im going to do the 63 in white
MrMiles Posted June 20, 2023 Author Posted June 20, 2023 I did the first 2 coats of paint and I don't like the color. I used testors extreme lawyer in silver blue and there is so much flake in it that it looks like the Corvette summer car Also the panel lines are staying white so I'm going to have to do a black wash on it.
MrMiles Posted June 21, 2023 Author Posted June 21, 2023 I gave it the last gloss coat right before bed. Tomorrow I will post a picture of it. I did the black in the edges but I do not know if it is enough or if I need to do more. I think next time I will do it after the prime but before the color coat
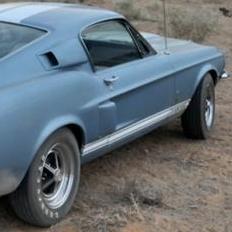
MrMiles Posted June 21, 2023 Author Posted June 21, 2023 The gloss coat helped even out the color and it looks much better today. I still think there is too much metallic but it's not horrible
MrMiles Posted June 21, 2023 Author Posted June 21, 2023 I added the chrome to the windows and such 1
Recommended Posts
Create an account or sign in to comment
You need to be a member in order to leave a comment
Create an account
Sign up for a new account in our community. It's easy!
Register a new accountSign in
Already have an account? Sign in here.
Sign In Now