TheBEAUMONTGURU Posted December 19, 2023 Posted December 19, 2023 Hi All. New to the site but not new to model cars. Been doing it my whole life. Belong to the Winnipeg Model Car Club. Thought i would walk you thru the build of my 73 Beauville Window van. Its quite an undertaking! Im starting out with a 70's Nirvana kit. I found over the years that this chevy van gets released as a slab-sided shaggin wagon(or the A-team), but never has it been done as a stone stock Beauville passenger van. Yes, i am aware that the first ever release of this kit did include a camper with an option to install side windows, but after looking at one of those expensive original kits, i found the slabs for the side windows to be horribly simple and not realistic, so i am glad im going this route. Starting with careful measurments and cutting out 6 windows. Adding evergreen 1/2 round frames. also using evergreen strips for the roof ribs, a proper rain gutter, taillight trim, and better enhancing the front windshield trim. Did i mention how horribly inaccurate these old MPC van kits are!!!! 2
TheBEAUMONTGURU Posted December 19, 2023 Author Posted December 19, 2023 I decided to cut open the hood and build a set of simple hood hinges. Here we also see the roof ribs and the taillight trim added. I also shaved off all the moulded in door handles, i will build all my own from evergreen strips 2
TheBEAUMONTGURU Posted December 19, 2023 Author Posted December 19, 2023 A window van is useless without a complete interior. The Nirvana kit only has a dash and 2 seats, so here i am adding a complete headliner, and cladding the entire inside of the body with evergreen sheets to act as door panels and door frames 3
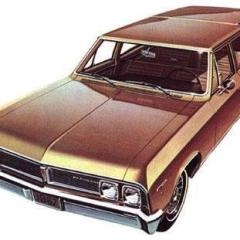
TheBEAUMONTGURU Posted December 19, 2023 Author Posted December 19, 2023 Moving on to the interior details. I have a clear vision of how i want this van to look. Here is what i am going for based on original GM brochures. I want this model to have a 350, TH350 Automatic with Air Conditioning. Here i am making all the A/C vents and controls on the dash from scratch. i also modified the ashtray to be in the proper place. and updated the knobs and the heat controls to represent a 73 van dash rather than the 1971 kit form. The rear seats are from the parts bin, lucky i had 2 the same, the button tufting will be removed later. armrest and a more accurate resin th350 replaces the wierdly shaped kit transmission 3
TheBEAUMONTGURU Posted December 19, 2023 Author Posted December 19, 2023 Here are the seats, i tried resin casting them but too many pinholes so i sanded off all the button tufting and made my own patterns using evergreen strips. i bent up some plastic tubing and scratch built a set of armrests. the front seats are custom built by cutting up a parts box one and resin casting a pair. Stay tuned for more later! And thanks for looking. 3
dino246gt Posted December 19, 2023 Posted December 19, 2023 Dave I'm so glad that you're showing us how you built this amazing replica stock van! I love it!!
TheBEAUMONTGURU Posted December 19, 2023 Author Posted December 19, 2023 Thanks Dennis. I will keep adding pics and stories soon 1
TheBEAUMONTGURU Posted December 20, 2023 Author Posted December 20, 2023 Here is the engine detailing started. I swapped out the valve covers for some better ones, and scratch built all the pulleys and belts for the A/C and the power steering. minimal wiring as it will mostly be hidden under the floor. i used a fireball carb and have made a better steering column(added a lever to represent a tilt wheel. and made all the PRNDL indicator. the little white parts are scratch built front armrests 4
TheBEAUMONTGURU Posted December 20, 2023 Author Posted December 20, 2023 The interior mostly finished. a made separate interior panes that will glue into place. all made with evergreen strips. i foiled them and custom made some tartan uphoustry pattern decals in Photoshop then printed them on decal paper. i also did a correct guage cluster in photoshop too. Here we also see the body now painted using PPG OMNI automotive single stage urethane. just like the real ones! 3
TheBEAUMONTGURU Posted December 20, 2023 Author Posted December 20, 2023 More engine detailing, added a steering box and steering column and rag joint and hoses, also added a heater box and blower motor. None of these details are in the kit. The body and interior are coming together. note i decided to make things difficult and 2-tone the body. Flocked carpet, seatbelts and photoshop GM buckles 3
TheBEAUMONTGURU Posted December 20, 2023 Author Posted December 20, 2023 The kit grill Sucks! so i cut it all up and scratch built the majority of it. i used evergreen strips for the grill bars, and drilled out the headlights for a much more realistic look and to get rid of the center pin in each bulb. i managed to salvage the bowtie for use later 2
TheBEAUMONTGURU Posted December 20, 2023 Author Posted December 20, 2023 This was a massive project in itself. the kit has the most horrible version of a truck dogdish i have ever seen. So i decided to turn one out of aluminum on a metal lathe. I added some raised areas seen in black and then cast them with the Amazing white resin. Painted them with Molotow sprayed out of an airbrush. The decals for the centers were done in Photoshop and sized acordingly to fit the resin castings. I printed Blue Bowties, Ochre Bowties, and GMC versions for future projects. The wheels and tires are Fireball 15" 70's era truck bias Ply, they look awesome! 5
Bills72sj Posted December 20, 2023 Posted December 20, 2023 All I can say is WOW! You have mad scratch building skills. I do some scratch building but not like that!
espo Posted December 20, 2023 Posted December 20, 2023 Beautiful looking scratch building with great attention to detailing.
TarheelRick Posted December 20, 2023 Posted December 20, 2023 Some mighty fine scratchbuilding. Really like all the extra details you are adding, and that interior looks awesome.
TheBEAUMONTGURU Posted December 21, 2023 Author Posted December 21, 2023 Thanks for all the positive comments!!! I hope my build inspires you to built a better MPC van kit, its got a fairly crisp and well proportioned body lines, but the rest of the parts sure need work! HA! Here is some of the bottom. I made up a set of vintage Alberta Canada mudflaps, these things were on just about every farm Pickup in the 1970's. The trailer hitch is scratchbuilt from evergreen square stock. I updated the diff with a nice 12 bolt cover, and scratchbuilt the shock from tubing along with new mounting points, all the kit stuff i junk! The exhaust is modified a fair bit to make it fit right and the front and rear tires have been relocated to fit the wheel wells properly, again a detail the kit really lacks. 2
TheBEAUMONTGURU Posted December 21, 2023 Author Posted December 21, 2023 I painted the grill and front bumper with the new revell chrome, sprayed straight out of the can. very good results, but you still have to be careful handling. The outside mirrors are from the kit, but i added a thin framework around the glass for a more realistic look, also sprayed the revell. Ignore the white headlights in this photo as my Microscale is still drying! Also note my decals i made in photoshop for the side marker lights, BEAUVILLE Sportvan 20, and the CHEVROLET rear door emblem. I also have my new scratchbuilt door handles in place in this pic. 6
NOBLNG Posted December 22, 2023 Posted December 22, 2023 (edited) Yes, thanks for posting this build DA. I can see a lot more of what went into it….which IS A LOT! ?Absolutely outstanding attention to detail, and beautiful execution.? Edited December 22, 2023 by NOBLNG 1
Bainford Posted December 22, 2023 Posted December 22, 2023 Cool project. Excellent attention to detail and skillfully executed.
hct728(Bob) Posted December 22, 2023 Posted December 22, 2023 Wow, you're a master at shaping that Evergreen tubing! Those window trim and detail corners are perfect! So many other upgraded parts as well, coming along spectacularly! 1 1
Recommended Posts
Create an account or sign in to comment
You need to be a member in order to leave a comment
Create an account
Sign up for a new account in our community. It's easy!
Register a new accountSign in
Already have an account? Sign in here.
Sign In Now