carl63_99 Posted February 12 Posted February 12 You remember the mockup I shared of my Cord with Mercedes rims and tires? Well I got busy on it and am slowly solving all the challenges of putting modern German components in an old pre-war car. When I do customs, often my goal is to capture the essence of the original, while improving on things that really need to be improved. Classic example here, I'm using a Revell Audi R8 v8 mounted reverse from its normal position. The Cord, being front wheel drive, actually accepted this motor nicely. I am tweaking the intake to fit, exhaust will drop and go out the rear. The Cord exhaust pipes will be left in place to retain the original look of the car. I already sanded down the radiator from a Corvette for the radiator fans, and will also go with Corvette tail lights. 7 1
stitchdup Posted February 12 Posted February 12 very cool and custom, and very very close to an idea i haven't got around to yet. honestly the only difference is i was going to use a pagani engine and box!
David G. Posted February 12 Posted February 12 What a cool idea Carl! The Cord body style is both timeless and immediately recognizable. Not to mention way ahead of its time. It's a great platform for limitless customization and updating options. I'll be following this with much interest. David G.
carl63_99 Posted February 12 Author Posted February 12 4 hours ago, stitchdup said: very cool and custom, and very very close to an idea i haven't got around to yet. honestly the only difference is i was going to use a pagani engine and box! Having built a Pagani, it would be interesting to see how that engine would fit in this space. I think it would be pretty tight.
dino246gt Posted February 12 Posted February 12 Using a mid-engine configuration for a front wheel drive car is brilliant! Can't wait to see more!
carl63_99 Posted February 13 Author Posted February 13 I'm using old Corvette half shafts to do the driveshafts. I will cut them to length when the time comes, so the U joint is in the open space between the frame and the hub. Also, with the Mercedes rims, lots of light comes through the wheel wells. I attached some sheet plastic to the frame so you won't be able to see through the back end. This doesn't have to be perfect as I'm not opening the truck. 6
Kenmojr Posted February 14 Posted February 14 What a cool idea. This looks like it's going be "a must follow" thread.
carl63_99 Posted February 27 Author Posted February 27 I've been busy with a lot of other things, but I did get the final shape of the tail lights, finally. I then put sheet plastic behind them so the Corvette lights set in place. I also took the gas filler cap from the Audi and mounted it. After a lot of checking, testing and mulling, I decided not to use inset, exposed headlights. As original, they don't give you much to work with and I couldn't come up with something custom that looked good. Sometimes, you have to try things to see if/how they might work. I saw a pic of a 1/1 Cord and the soft top was cut short. Since my original plan was open cabriolet, I wasn't worried about destroying the top. However, I do not like the look on my car and won't be using it. 2
carl63_99 Posted February 28 Author Posted February 28 Smart phone are great for taking lots of pics, cheap, disposable, no worries about cost, because there is practically none. I can't stress enough the importance of test fitting and taking lots of pics. 1:1 scale builders will disassemble a car as many times as needed to verify fit and look. What I learned from last night and this mornings test fitting is that I have to be very careful with installation of the radiator. It has almost no room for error and will look like BLAH_BLAH_BLAH_BLAH if not installed perfectly vertical. I also tested out the ride height and fit of the tires. I'm actually going to have to trim a small amount off the inside of the rims to get them snug and not touching the outer fenders. Another thing I'm going to do is leave the exhaust pipes in place from the engine bay to the fender. But, I will trim them as I will be using modern exhaust. I added sheet plastic under the fender cutouts so the pipes will rest on those when installed. This keeps the look of the original. 4
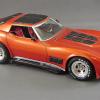
carl63_99 Posted March 6 Author Posted March 6 I have chosen the color, champagne gold. I got a couple bottles of automotive touch up paint and splashed it on a junk body to see how it looks. Based on the sample, black primer with the c gold. Body is ready for primer, I just need to get some from the store. 4
bill_67 Posted March 12 Posted March 12 Nice color choice looking forward to seeing more. Great concept and build
carl63_99 Posted March 12 Author Posted March 12 One of everybody's favorite stage, primer! First coat, and I'm pleased with what it shows me. I have more filling and sanding to do on the areas where the bumper mounts were, but overall looking good. Panel lines are pretty good. A couple round of prep and I should be moving forward to paint! 2
carl63_99 Posted March 13 Author Posted March 13 And the paint coat of Champagne Gold is on. Got to let it sit a couple days then clear. I typically don't clear, relying on wet sanding and polishing to get a good gloss. However, with this color, sanding is not possible due to the nature of this color. 2
carl63_99 Posted March 14 Author Posted March 14 (edited) I've started assembly painting. Interior is a light leather color, one coat of clear gloss to come. Aluminum for the engine, lots more colors to add there. Note that I cut down between the front seats so they look more like the 1:1 scale separate folding units. Edited March 14 by carl63_99 2
Zippi Posted March 15 Posted March 15 That is coming along nicely Carl. Love the light leather color on the seats.
David G. Posted March 15 Posted March 15 It looks like you've made some great progress on this Carl. I like your treatment for the tail lights and the color will look fantastic. I'm a little confused about your plans for the header tubes. You plan on just keeping them as a design feature with no connection to the engine or exhaust, yes? David G.
carl63_99 Posted March 15 Author Posted March 15 32 minutes ago, David G. said: It looks like you've made some great progress on this Carl. I like your treatment for the tail lights and the color will look fantastic. I'm a little confused about your plans for the header tubes. You plan on just keeping them as a design feature with no connection to the engine or exhaust, yes? David G. That is exactly what I plan to do. My vision is to make it look like mild custom from that era, different tailights, some smoothing of features. But things that are iconic to the car, i.e. those header tubes, will remain but in a visual only state. Same for the interior. While updating to modern seating would look cool, it would ruin the era-correct look. Funny thing about the original taillights, in my opinion, they have a very "stuck-on" look to them, almost like an afterthought.
David G. Posted March 15 Posted March 15 1 minute ago, carl63_99 said: Funny thing about the original taillights, in my opinion, they have a very "stuck-on" look to them, almost like an afterthought. That they do! The tail lights always reminded me of those add-on trailer lights from the Sixties. So I guess since these lights are from the Sixties... the car is still ahead of its time! =D- 1
carl63_99 Posted March 20 Author Posted March 20 Working on the engine a little bit. Just about ready to mount in the frame, but I need to think about some radiator hoses first. 2
Bugatti Fan Posted March 20 Posted March 20 Sacrilege ! Shocking ! Disrespectful ! Irreverent build of that classic Cord ! Having said all that, doesn't it look fantastic though. !!!! Brilliant conceptual build ! Will look great when finished. 1
David G. Posted March 22 Posted March 22 I'm interested to see how you get the radiator hoses worked in there Carl. David G.
Recommended Posts
Create an account or sign in to comment
You need to be a member in order to leave a comment
Create an account
Sign up for a new account in our community. It's easy!
Register a new accountSign in
Already have an account? Sign in here.
Sign In Now