TheBEAUMONTGURU Posted March 28 Posted March 28 The canuck 3d 1966 beaumont conversion kit is designed to fit the AMT(lindberg) 66 Chevelle kit. Well, that old kit is a total pile of garbage as far as im concerned so i decided to figure out how to get the 3D parts to fit on the Revell Wagon body instead. The Revell body is a bit wider across the front so i had to slice and dice the fenders and squeeze the rad support a little in order to get the width proper, then narrow the hood a bit(and i have to use the flat hood from the Revell Elcamino kit. 5
TheBEAUMONTGURU Posted March 28 Author Posted March 28 With all the cutting i got it to fit really good, and you cant even tell the fenders a squeezed in slightly. 5
TheBEAUMONTGURU Posted March 28 Author Posted March 28 I robbed the revell 66 GTO kit door panels and cut out the chevelle ones and grafted in the GTO ones, they are not 100 percent correct pattern for a66 beaumont but they are darn close 6
TheBEAUMONTGURU Posted March 28 Author Posted March 28 Here i have added the correct Beaumont Custom upper side trim, proper rear tailgate trim(after filling in all the chevelle stuff). also added the front fender emblems and a 230 engine callout. because this one will be a 230 straight 6 with a Powerglide. Im leaning towards a Silvergreen(Laurel Mist in canada) body with a fawn interior and not many options. 9
Steve H Posted March 28 Posted March 28 Awesome! Nice to see another Beaumont from the guru. Excellent solution to fitting the grill on the body, well played. 1
TheBEAUMONTGURU Posted March 31 Author Posted March 31 thats my buddies 65 beaumont: with a olds vista roof grafted on
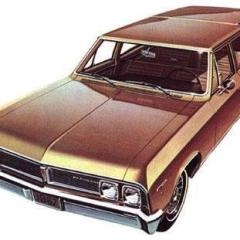
TheBEAUMONTGURU Posted April 7 Author Posted April 7 Endless mixing of some tamiya silver along with a couple greens, pretty much nailed the color. Helped to have a real car panel to compare to Im really liking my new painting idea. Tamiya Acrylic(yes water base), followed by about 5 coats of Duplicolor automotive spraybomb clear(solvent based). Allow to shrink out for a couple months then i will polish it. done 2 others that way now with flawless results. also modified the rear tub to represent a wagon floor and tank. Getting good at that part, its the 3dr time ive done it! 8
WillyBilly Posted April 9 Posted April 9 Beautiful build. I love what you have done so far. Great color choice.
Mark C. Posted April 9 Posted April 9 Awesome! I haven’t been all that intimate with these cars in 1:1… exactly what is the difference between the gas tank in the hardtop and the wagon?
TheBEAUMONTGURU Posted April 10 Author Posted April 10 12 hours ago, Mark C. said: Awesome! I haven’t been all that intimate with these cars in 1:1… exactly what is the difference between the gas tank in the hardtop and the wagon? The rear floor pan is higher, and the gas tank straps run in the opposite direction, i have more detail showing the mods in my other wagon build threads.
Recommended Posts
Create an account or sign in to comment
You need to be a member in order to leave a comment
Create an account
Sign up for a new account in our community. It's easy!
Register a new accountSign in
Already have an account? Sign in here.
Sign In Now