gautreau Posted February 26, 2011 Posted February 26, 2011 (edited) Hi,everyone this is my first wip on here.I'm going to be building R-M's 1965 Chevelle SS396 Z-16.It's going to be a pro-touring style build.These are just mock-up pics.I plan to get it lower as I modify the front and rear wheelwells to clear the tires. Thanx for lookin'. Jeremy Edited February 26, 2011 by gautreau
DRG Posted February 26, 2011 Posted February 26, 2011 If memory serves me right, it doesn't always, I built a 65 Chevelle back when it was an AMT kit. Good Lord, what a mess that was.
george 53 Posted February 26, 2011 Posted February 26, 2011 Don THIS is a NICE kit. It has NO relation to the ancient AMT kit, except for the subject matter. THIS is a GREAT kit!!!
Greg Pugh Posted February 27, 2011 Posted February 27, 2011 Nice wheels!! I like those alot! Your mock-up shots look great!
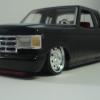
juergen Posted February 27, 2011 Posted February 27, 2011 hi ! the pegasus wheels looks great on the chevelle. are the rear wheels deeper then the front wheels??? can you tell me which wheels they are? here my pics from my building chevelle with the pegasus´s: greets juergen
gautreau Posted February 27, 2011 Author Posted February 27, 2011 (edited) Thanx fellas I appreciate that. Juergen,the wheels I'm using are a staggered 19/23 set.So the rears are alot deeper.They are made by Pegasus. Edited February 27, 2011 by gautreau
juergen Posted February 27, 2011 Posted February 27, 2011 Thanx fellas I appreciate that. Juergen,the wheels I'm using are a staggered 19/23 set.So the rears are alot deeper.They are made by Pegasus. Thanks for your answer !!! Ahhh !!! you used the 23 from pegasus - looks great this combination !!! greets juergen
gautreau Posted February 27, 2011 Author Posted February 27, 2011 Thanks for your answer !!! Ahhh !!! you used the 23 from pegasus - looks great this combination !!! greets juergen Your quite welcome Juergen.You'll notice in my future builds that I use alot of pegasus wheels.
gautreau Posted February 28, 2011 Author Posted February 28, 2011 I had to make some adjustments to the rear diff to get the rear tires to fit properly. As you can see hear the diff and rear wheels are 4mm too wide to fit. Here is the diff marked to be narrowed. Cuts made. Narrowed and everything fits snuggly. Don't mind the link bars not lining up.I'm going to be putting a 4 link rear suspension with air bags in. Thanx for lookin'. Jeremy
diymirage Posted February 28, 2011 Posted February 28, 2011 looks pretty good are the pegasus rims aluminum ? ive build modele like that where the rear end was too wide and a lot of time it was easier to remove some material from the inside of the wheel rather then to section the rear end regardless, it looks good
gautreau Posted February 28, 2011 Author Posted February 28, 2011 looks pretty good are the pegasus rims aluminum ? ive build modele like that where the rear end was too wide and a lot of time it was easier to remove some material from the inside of the wheel rather then to section the rear end regardless, it looks good Thanx diymirage.No the rims are plastic.I did remove some material out of the mounting area on the wheels but it still wasn't enough to get the wheels to fit inside the body with the axle.
BigEdsGarage Posted February 28, 2011 Posted February 28, 2011 Nice start so far. What are the plans for power and paint?
gautreau Posted March 1, 2011 Author Posted March 1, 2011 Nice start so far. What are the plans for power and paint? I'm thinking Ross Gibson 502 and Testors Lime Ice.
walt francis Posted March 1, 2011 Posted March 1, 2011 Oh yea you have a good grip on which way this is going and I LIKE IT !!!!!
gautreau Posted March 2, 2011 Author Posted March 2, 2011 Oh yea you have a good grip on which way this is going and I LIKE IT !!!!! Thanx Walt,I appreciate that.
gautreau Posted March 5, 2011 Author Posted March 5, 2011 Finally got sometime to build.I got the bags mocked up for the rear suspension. Here's the rear diff set in place with the airbags.I'm not sure how well it shows up but I used a silver sharpie to show the brackets I had to remove to install ne link brackets. Last pic.This show the new brackets installed.I made them out of 3mm square tubing. Now to build the linkbars. Thanx for lookin'. Jeremy
gautreau Posted March 20, 2011 Author Posted March 20, 2011 Its been a bit since I had a chance to get to the bench because of a family emergency.But,now I'm back.Got a couple updates on the rear suspension on the Chevelle. Here is the lower bag mounts on the rear diff. Here is the first lower link bar I made.I used 1.6 mm tubing and the smallest headed push pins I could find at WalMart. Thanx for lookin'. Jeremy
Skydime Posted March 20, 2011 Posted March 20, 2011 I've seen seals used for airbags but, those look real! What did you use to make them?
gautreau Posted March 20, 2011 Author Posted March 20, 2011 I've seen seals used for airbags but, those look real! What did you use to make them? Thanx.Actually a buddy of mine makes them and I buy them from him.I'm not sure what he uses but I think he uses plumbing o-rings.
tooltas Posted March 21, 2011 Posted March 21, 2011 i used some'3'o rings stack on top they do look rigth .i did a s10 truck that way 23'' placs too great wheels
Mooneyzs Posted March 21, 2011 Posted March 21, 2011 This build is off to a nice start. Looking good. really like the look of the bags. I have this same kit that I have started many years ago (something like 14 years ago) which I was going to pro street it. I need to adventually get back and finish it lol.
gautreau Posted March 21, 2011 Author Posted March 21, 2011 Thanx fellas I appreciate the comments.This build so far has the most detail I've evr put in to a build.I got the upper and lower link bars finished this evening. Here's the lower bars in place. The upper bars are just set in place at the front as a mock-up pic so people can see how it will look. Thanx for lookin'. Jeremy
gautreau Posted March 28, 2011 Author Posted March 28, 2011 Got the front suspension dialed in.Here is the original front suspension. With the original frt. suspension the wheels were too wide to fit the wheelwells. I cut the original wheel mounting tabs off and added some 2.5 mm x 6.3 mm styrene strip. Keeping with the air suspension I added deflated bags to the front. Here is the finalized stance of the Chevelle. Now I'm going to remove the factory fuel tank area to make room for a fuel cell. Thanx for lookin'. Jeremy
Recommended Posts
Create an account or sign in to comment
You need to be a member in order to leave a comment
Create an account
Sign up for a new account in our community. It's easy!
Register a new accountSign in
Already have an account? Sign in here.
Sign In Now