JasonFL Posted February 11, 2012 Posted February 11, 2012 So I have been trying to finish my 57 Belair and I wanted to give the bumpers a brushed look. I'm limited with tools and paint so I put two coats of testors silver agent, put it under my lamp for a bit to dry, then left it alone for two days, came back and tried to wet sand the brush strokes out to give it more of a flatter look. It just ended up getting my finger prints all over them and the paint start to glob. I'm a little jammed because now I'm stuck with pieces painted and one bumper I'm still trying to strip now. If anyone has any advice on how I can achieve the brushed metal look, how to strip my bumper, and what I do to prevent fingerprints I would be so greatful. Thanks for any help in advance.
Dr. Cranky Posted February 11, 2012 Posted February 11, 2012 Jason, House of Kolor makes a couple of products where if you scratch the surface it will show under the paint coat, thus giving it that brushed aluminum look. Craig Fraser knows how to do it really well, then again he does it on real cars and motorcycles. If you look around there might be a how-to somewhere . . . http://www.houseofkolor.com/index.jsp
fatkidd Posted February 13, 2012 Posted February 13, 2012 a very simple way is to use a scotchbrite pad before and after painting...take the scothbrite pad and use it like sand paper. in the case of a bumper, i would scotchbrite from right to left of the bumper itself, paint it with a non-metallic silver (ie: tamiya flat auminum or the like), as soon as you get done painting said part, drag the scotchbrite pad through the paint (lightly and in the same direction as before) but try not to go back and forth. hope this helps Happy Building
JasonFL Posted February 14, 2012 Author Posted February 14, 2012 Thanks a lot guys for the advice. If I had the extra cash dr. Cranky I would get some new materials but for right now I have to work with that silver, a brush, and a scotchbrite pad. Fatkidd, I was doing something similar to that already. What I did was use the pad to scuff them up, painted silver, then took the pad and wet sanded, then I put another layer of silver on and wet sanded again to take the shine out a little and give it nice brush marks. It isn't coming out so hot so I'll have to get stripping and try it your way. Thanks again for the help, you both build some really nice models. I can't wait to finish off this model and post my first finished model up here.
fatkidd Posted February 14, 2012 Posted February 14, 2012 the real trick is to use the scotchbrite while the paint is still "wet", if you have a spare hood or any part...try it on that first. let us know if you have any other questions...there are plenty of people to help
MikeMc Posted February 14, 2012 Posted February 14, 2012 I would of said to shoot a coat of dullkote over the chrome....metalizers with sealer will give the same look.
JasonFL Posted February 16, 2012 Author Posted February 16, 2012 I'm still stripping the bumpers but I'm doing some test pieces tonight so I'll let you know how they come out. If I could post photos I would but I don't have much luck with that either.
JasonFL Posted February 21, 2012 Author Posted February 21, 2012 So I have learned a lot from this little paint project. 1. I need to have more patients and not get to excited to finish a build. I rushed it which set me back a while. 2. Brushing the paint while wet doesn't work to well. Not sure if it was the wrong materials but it just didn't work for me. It just made very think lines with deep valleys. 3. Put 2-3 thin coats of just testors silver with a brush on your part taking the brush in the direction you want the brushless to go. When it's fully dry take your scotch brite pad and "very lightly" brush it across the top until you get the look you want. I think it turned out pretty good, it took me a few good tries but not to bad for my first attempt. I found the hardest part is trying to hold the parts while making the brush strokes.
VW Dave Posted February 21, 2012 Posted February 21, 2012 I think it turned out pretty good Pictures of your results would be a nice thing to share.
MikeMc Posted February 21, 2012 Posted February 21, 2012 Pictures of your results would be a nice thing to share. Yup....and where in So FL are you?
JasonFL Posted February 23, 2012 Author Posted February 23, 2012 I'm working on the photos. I'm from palm beach county, where aborts you from?
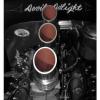
JasonFL Posted March 10, 2012 Author Posted March 10, 2012 Here's the photos of the finished work. The taillight on the right is the finished product. The top bumper (back bumper) is undone while the bottom bumper (front bumper) has been worked and finished up along with some black on the grill Let me know what you think, thanks for looking.
Jantrix Posted March 10, 2012 Posted March 10, 2012 So I have learned a lot from this little paint project. 1. I need to have more patients and not get to excited to finish a build. I rushed it which set me back a while. That right there is the best piece of advice ever posted on this forum and something even the best of us still struggle with. I think your efforts have produced a great result. Nice work.
brodie_83 Posted May 19, 2012 Posted May 19, 2012 Wow, that actually looks pretty good! I was wanting to do that to my 1/12 '67 Corvette bumpers and trim. Thanks for the tutorial!
JasonFL Posted May 20, 2012 Author Posted May 20, 2012 That right there is the best piece of advice ever posted on this forum and something even the best of us still struggle with. I think your efforts have produced a great result. Nice work. Thanks Rob, I'm not sure why I didn't see your post before. Sorry about that but I appreciate the compliment. Wow, that actually looks pretty good! I was wanting to do that to my 1/12 '67 Corvette bumpers and trim. Thanks for the tutorial! Thanks Brodie. The only thing I might suggest is putting some sort of clear/sealer after you get the look you want, so as not to leave any fingerprints. Good luck with your project, post up pics of the results when you get done. I'd like to see how it come out.
Recommended Posts
Create an account or sign in to comment
You need to be a member in order to leave a comment
Create an account
Sign up for a new account in our community. It's easy!
Register a new accountSign in
Already have an account? Sign in here.
Sign In Now