Jim B Posted December 9, 2012 Posted December 9, 2012 Nice vid. Man, they didn't call them "Clatterpillers" for nothing, did they?
Truck parts Posted December 10, 2012 Posted December 10, 2012 That's going to be a very nice build when you are done. I also like the older trucks.
Wagoneer81 Posted December 19, 2012 Posted December 19, 2012 "Wolf in sheeps clothing"... That sounds about right!
Rich_S Posted December 24, 2012 Posted December 24, 2012 Yes, that four and a quarter Cat was a big motor back in the day, in fact we'd call that truck a large car. When I first started driving all of the road tractors had Armstrong steering. You learned quick how to back up without wearing yourself out. Not like today where I see guys just palm the wheel and it doesn't matter that they completely over steered, as they can just palm it back the other direction. I was talking to a driver the other day and the company he drives for has all automatic now, what has trucking come to? Man that was part of the fun of driving, getting good enough that you could drop it in gear with one finger, plus learning how to short shift to get going faster, man times have changed. Yes those were the days. Very nice build Old Albion, I spent a few years driving a 352 Pete Cabover with a 350 Cummins and 13 speed Roadranger transmission and yes, it had Armstrong steering
Old Albion Posted January 20, 2013 Author Posted January 20, 2013 Ok a little update. Appologies for the delay!! I have made some good progress, but due to the cold weather I can not do any painting (I like to spray in my little shed outside) So I have gone as far as I can for the moment. The Wilson livestock trailer will be matched with the truck. That too is now awaiting paint. Thanks for looking! http://www.fotki.com'>Hosted on Fotki http://www.fotki.com'>Hosted on Fotki http://www.fotki.com'>Hosted on Fotki http://www.fotki.com'>Hosted on Fotki
ewaskew Posted January 20, 2013 Posted January 20, 2013 Two oldies together as a kit will be a nice look. Good job on the details. God Bless you and your's
numbersman Posted January 20, 2013 Posted January 20, 2013 (edited) Where did you get the 1693? I'd like to have one. I got 3 1693TA engines from Sourkraut's Model Trucks. They are the ones made by KFS. I have got one about 2/3 of the way built. It is the best model truck engine in resin I have ever seen and I have done several of them. His internet address is sourkrautsmodeltrucks.com. Edited January 20, 2013 by numbersman
numbersman Posted January 28, 2013 Posted January 28, 2013 (edited) Its been a while since I posted anything so decided that it was time to do so. I have been working on a couple of builds (matching Pair) of Peterbilt trucks one a 352 Coe and the other a 359 conventional. Progress on the 359 is slow with not much done but I have been making progress with the 352. The truck will feature a Clatterpillar 1693TA engine. This is a big engine and took a lot of carefull "adjustments" to get it to sit in the frame and not clash with the dog house. With the big engine (Probably the biggest horsepower engine (425HP) available in a pacemaker in 1970) I needed a larger air breather unit and bigger exhaust stacks. It will also need a bigger radiator. You will note from the photo's that the exhausts are not fitted to the cab rear. Instead they are fitted to the "Eiffel tower" frame. This looks quite pleasing and in keeping with the rest of the build. This frame did not appear until 1973 (I think) so mine being a 1970 model has had the exhausts removed from the cab and the Eiffel Tower retro fitted at a later date. The frame and the bottom half of the cab will be dark blue, middle of the cab white and the top of the cab light blue. Thanks for Looking! Hosted on Fotki Hosted on Fotki Hosted on Fotki http://public.fotki.com/oldalbion/peterbilt-352-pacemaker/ What modifications did you make to the frame and doghouse to get the big engine to fit? I am going to do about the same build, different colors. Maybe I won't have to re-invent the wheel. Thanks, Charles Edited January 28, 2013 by numbersman
Mr mopar Posted January 28, 2013 Posted January 28, 2013 Now we're talking ...... That Peterbilt looks really good keep up the good work.
Old Albion Posted January 28, 2013 Author Posted January 28, 2013 Charles, Getting the engine to fit was a pain! As far as modifications to the frame these basically are the removal of the front engine crossmember and the crossmember that supports the radiator. The new crossmember with the engine kit will fit in place of these two. There are two pads on the crossmember that the front engine mounts fit on. These pads will need to be removed. It's important to get the engine as low as practically possible in the frame. Also the two front engine mounts were removed and ones that were twice as long made and installed. This pushes the engine further back to allow forthe bigger radiator. When assembling the engine turbocharger it's important to shave of as much material as possible from the exhaust manifold to reduce the overall height when the turbo is fitted. Get it as close as possible to the manifold without touching. You will see from the photo's that the inlet pipe on the turbocharger has also been reduced in length. This is to allow for the inlet elbow to conect to the air cleaner. Watch this because it will foul with the dog house. As far as the dog house is concerned. It will most probably need to be eased or relieved a little. Your problems will be with the turbocharger and the air inlet pipe from the air cleaner. On mine I assembled the tub main structural components, then gently heated the tub in the area of the turbo and gradually eased it out. So that there was a small deflection big enough to accomodate for the turbo. WIth regards other modifications the height of the gear change lever bracket is too high and needs to be lowered otherwise it will interfere with the cab when fitted. (Have a read look through some of Tim's Pacemaker builds, there are some usefull tips when building.) Hope this helps.
mackinac359 Posted January 28, 2013 Posted January 28, 2013 Fitting the engine... and now you know why they developed the 352H ! The bigger engines and radiators just wouldn't fit under the Pacemaker. So they raised the cab 4 inches, widened the dog house slightly at the radiator and all the big powerplants fit with no real problems with pipes and hoses. Before the H, they had to be really creative and custom design parts to fit. Tim
Old Albion Posted January 28, 2013 Author Posted January 28, 2013 Tim, it's interesting to read what you say about the problems of fitting the bigger engines. Whilst working on the build I often wondered what the engineers and designers thought and did to overcome the problems. And yes I can see why they developed the H model. That 4" (4mm to us in 1/25 scale) would have made all the difference. It's interesting to note that the 1693TA was a taller engine than the Cummins KTA series. Cummins put the turbochargers on the side where as Clatterpillar fitted them up on top. This is probably due to the fact that they were developed for earthmover equipment. Still I would have thought that the engine envelope was to an SAE standard of some sort. But maybe not. It's all history now but good fun.
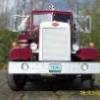
Old Albion Posted March 24, 2013 Author Posted March 24, 2013 A little update on this. Not much to report on but I have at least got the decals in place. The weather is still to cold to clear coat the cab. So pretty much at a stand still on this one. http://www.fotki.com'>Hosted on Fotki http://www.fotki.com'>Hosted on Fotki http://www.fotki.com'>Hosted on Fotki Thanks forlooking.
72 Charger Posted March 24, 2013 Posted March 24, 2013 Dave thats a sweet 352 any chance of an engine pic now its fitted?
55pete351 Posted March 24, 2013 Posted March 24, 2013 Awesome build as always!! I wondered if anyone had pictures of the cab hinges, undercab, and frame where they attach. I have built this kit several time and would like to do something better than the kit arrangement with the bumper. Maybe brass or photoetch?? Thanks in advance!!
Truck parts Posted March 28, 2013 Posted March 28, 2013 Very nice build. Great colors you painted it.
Recommended Posts
Create an account or sign in to comment
You need to be a member in order to leave a comment
Create an account
Sign up for a new account in our community. It's easy!
Register a new accountSign in
Already have an account? Sign in here.
Sign In Now